Unleashing the Power of Windows: Configuring SMB Protocols for Enhanced System Performance
Recently, Fortect has become increasingly popular as a reliable and efficient way to address a wide range of PC issues. It's particularly favored for its user-friendly approach to diagnosing and fixing problems that can hinder a computer's performance, from system errors and malware to registry issues.
- Download and Install: Download Fortect from its official website by clicking here, and install it on your PC.
- Run a Scan and Review Results: Launch Fortect, conduct a system scan to identify issues, and review the scan results which detail the problems affecting your PC's performance.
- Repair and Optimize: Use Fortect's repair feature to fix the identified issues. For comprehensive repair options, consider subscribing to a premium plan. After repairing, the tool also aids in optimizing your PC for improved performance.
Using PowerShell or Command Prompt for SMBv2 troubleshooting
To troubleshoot SMBv2 issues on Windows 11/10 systems, you can use either PowerShell or Command Prompt. Both tools provide effective ways to enable or disable SMB versions.
Using PowerShell, open the Start menu and search for “PowerShell.” Right-click on the Windows PowerShell result and select “Run as administrator.” To enable SMBv2, enter the command “Set-SmbServerConfiguration -EnableSMB2Protocol $true” and press Enter. Similarly, to disable SMBv2, use the command “Set-SmbServerConfiguration -EnableSMB2Protocol $false“.
Alternatively, you can use Command Prompt by pressing Win + X to open the Power User Menu and selecting “Command Prompt (Admin).” To enable SMBv2, type “sc.exe config lanmanworkstation depend= bowser/mrxsmb20/nsi” and hit Enter. For disabling SMBv2, use the command “sc.exe config lanmanworkstation depend= bowser/mrxsmb10/nsi“.
By using either PowerShell or Command Prompt, you can easily enable or disable SMBv2 to troubleshoot any related issues on your Windows 11/10 system.
Resolving “Your system requires SMB2 or higher” error
To resolve the “Your system requires SMB2 or higher” error, follow these steps:
1. Press the Windows key + X on your keyboard to open the Power User Menu.
2. Select “Command Prompt (Admin)” to open an elevated command prompt.
3. In the command prompt, type “sc.exe config lanmanworkstation depend= bowser/mrxsmb20/nsi” and press Enter.
4. Restart your computer for the changes to take effect.
By disabling SMBv1 and enabling SMBv2 or higher, you ensure better security and compatibility with modern devices and applications. SMBv2 and SMBv3 are more secure versions of the Server Message Block protocol, offering improved file sharing and network communication.
Note that SMBv1 is an older technology that is susceptible to exploits and should be disabled whenever possible. Enabling SMBv2 or higher is recommended for a safer and more reliable network environment.
Enabling the Windows feature for SMBv2
To enable the Windows feature for SMBv2 on your Windows 11/10 system, follow these steps:
1. Open the Run dialog box by pressing the Windows key + R.
2. Type “appwiz.cpl” and press Enter to open the Programs and Features window.
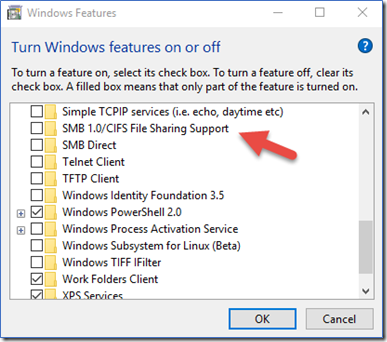
3. Click on “Turn Windows features on or off” on the left-hand side.
4. Scroll down and locate “SMB 1.0/CIFS File Sharing Support” in the list.
5. Uncheck the box next to “SMB 1.0/CIFS File Sharing Support” to disable SMBv1.
6. Check the box next to “SMB Direct” and “SMB 1.0/CIFS File Sharing Support” to enable SMBv2.
7. Click OK and wait for the changes to take effect.
Enabling SMBv2 will improve your system’s security and performance. It’s important to disable SMBv1 as it has known vulnerabilities that can be exploited by malware.
Note: Disabling SMBv1 may cause compatibility issues with older devices or applications that rely on this version.
Powershell solutions for SMBv2 troubleshooting
If you’re experiencing issues with SMBv2 on your Windows 11/10 systems, PowerShell offers solutions to troubleshoot and enable/disable SMBv1, SMBv2, and SMBv3. Here’s a guide to help you resolve any problems quickly.
To enable or disable SMBv1, open PowerShell as an administrator and execute the following commands:
1. To enable SMBv1: Enable-WindowsOptionalFeature -Online -FeatureName SMB1Protocol
2. To disable SMBv1: Disable-WindowsOptionalFeature -Online -FeatureName SMB1Protocol
For SMBv2 and SMBv3, there are built-in features in Windows 11/10 that automatically enable them. However, you can verify their status using PowerShell:
1. To check if SMBv2 is enabled: Get-SmbServerConfiguration | Select EnableSMB2Protocol
2. To check if SMBv3 is enabled: Get-SmbServerConfiguration | Select EnableSMB3Protocol
Understanding SMBv2 features and performance
To enable or disable SMBv1, SMBv2, and SMBv3 on Windows 11/10 systems, follow these steps:
1. Press the Windows key + R to open the Run dialog box.
2. Type “OptionalFeatures.exe” and press Enter to open the Windows Features window.
3. Scroll down and locate “SMB 1.0/CIFS File Sharing Support” in the list.
4. To enable SMBv1, check the box next to it and click OK.
5. To disable SMBv1, uncheck the box next to it and click OK.
6. Restart your computer for the changes to take effect.
Enabling or disabling SMBv1, SMBv2, and SMBv3 can help protect your device from potential vulnerabilities and improve file sharing performance. It is recommended to disable SMBv1 if it’s not needed for compatibility reasons, as it has known security risks.
A brief history of SMBv2 and its versions
SMBv2, or Server Message Block version 2, is an important protocol in the Windows operating system that allows for file sharing and resource access among devices on a network.
SMBv2 was introduced in Windows Vista and Windows Server 2008 as an improvement over the older SMBv1 protocol. It offered better performance, security, and reliability, making it the preferred choice for most users.
In subsequent versions, such as Windows 7, Windows Server 2008 R2, and Windows 8, SMBv2 continued to evolve with additional features and enhancements.
To enable or disable SMBv1, SMBv2, or SMBv3 on your Windows 11 or Windows 10 system, follow these steps:
1. Press the Windows key + R to open the Run dialog box.
2. Type “optionalfeatures” and press Enter.
3. In the Windows Features window, locate “SMB 1.0/CIFS File Sharing Support” and uncheck the box to disable it or check the box to enable it.
4. Click OK and restart your PC for the changes to take effect.
Enabling or disabling SMB versions can help improve security and ensure compatibility with modern systems. It’s important to keep your SMB protocol up to date to protect against potential vulnerabilities.
Exploring SMBv2 specifications and third-party implementations
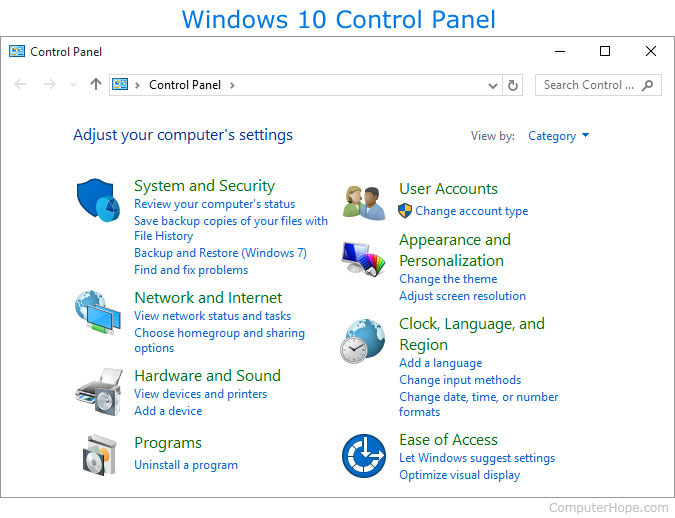
- Open Control Panel by searching for it in the Start Menu or by pressing Windows key + X and selecting Control Panel.
- Click on Programs or Programs and Features, depending on your version of Windows.
- Click on Turn Windows features on or off.
- In the Windows Features window, scroll down and locate SMB 1.0/CIFS File Sharing Support.
- Check the box next to SMB 1.0/CIFS File Sharing Support to enable it.
- Expand the SMB 1.0/CIFS File Sharing Support option and check the boxes next to SMB 1.0/CIFS Client and SMB 1.0/CIFS Server.

- Scroll up and locate SMB Direct and check the box next to it to enable it.
- Click OK to save the changes.
- Restart your computer for the changes to take effect.
Repair Method 2: Disable SMBv1, SMBv2, SMBv3
- Open Control Panel by searching for it in the Start Menu or by pressing Windows key + X and selecting Control Panel.
- Click on Programs or Programs and Features, depending on your version of Windows.
- Click on Turn Windows features on or off.
- In the Windows Features window, scroll down and locate SMB 1.0/CIFS File Sharing Support.
- Uncheck the box next to SMB 1.0/CIFS File Sharing Support to disable it.
- Expand the SMB 1.0/CIFS File Sharing Support option and uncheck the boxes next to SMB 1.0/CIFS Client and SMB 1.0/CIFS Server.
- Scroll up and locate SMB Direct and uncheck the box next to it to disable it.
- Click OK to save the changes.

- Restart your computer for the changes to take effect.
Security considerations for SMBv2
When enabling or disabling SMBv1, SMBv2, and SMBv3 for your Windows 11/10 systems, it’s important to consider security measures.
To enable or disable SMB protocols, follow these steps:
1. Press the Windows key + R to open the Run dialog box.
2. Type “optionalfeatures” and press Enter.
3. In the Windows Features window, scroll down and locate “SMB 1.0/CIFS File Sharing Support“.
4. Check or uncheck the box next to “SMB 1.0/CIFS Client” and “SMB 1.0/CIFS Server” to enable or disable SMBv1 respectively.
5. Click OK and restart your PC for the changes to take effect.
Note: Disabling SMBv1 can enhance security by mitigating potential vulnerabilities. However, it may impact compatibility with older devices, applications, or file sharing with Windows XP or older systems.
By enabling SMBv2 and SMBv3, you can benefit from improved security and performance compared to SMBv1. These protocols provide stronger encryption, better error handling, and enhanced features such as SMB Direct for faster file transfers.
Ensure your network devices, such as printers or NAS devices, support SMBv2 or higher to avoid any compatibility issues. Regularly updating your Windows systems and using security software is also crucial in safeguarding your network against potential exploits.
For more information on SMB protocols, you can refer to the Microsoft documentation or consult with your IT team.
Related resources and references for SMBv2
- Microsoft Support Article: Learn more about SMBv2 and its features
- Windows 11/10 Documentation: Find detailed instructions on enabling and disabling SMBv2
- Security Best Practices: Understand the importance of disabling SMBv1 and upgrading to newer versions
- Microsoft Tech Community: Engage with experts and fellow users to discuss SMBv2 implementation
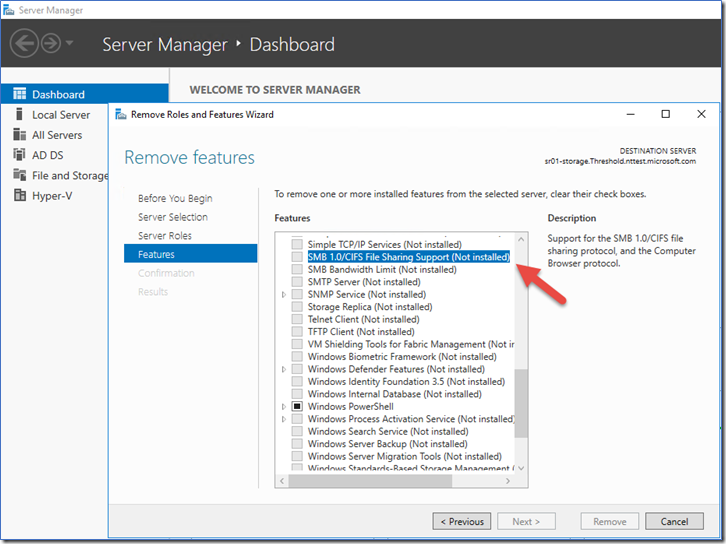
- Windows Server Documentation: Explore SMBv2 configuration options in a server environment
- Microsoft Security Bulletin: Stay updated on the latest security vulnerabilities and patches related to SMBv2
- Windows Update: Ensure your system is up to date with the latest SMBv2 enhancements and fixes
- Microsoft Download Center: Access additional tools and resources for SMBv2 management
Additional information and external links on SMBv2
| Additional Information | External Links |
|---|---|
| SMBv2 is the second version of the Server Message Block (SMB) protocol, which is used for file sharing and network communication between computers. | Microsoft Docs – Detect, Enable, and Disable SMBv1, SMBv2, SMBv3 |
| SMBv2 offers several improvements over its predecessor, including better performance, enhanced security features, and support for larger file transfers. | Samba – SMBD(8) Manual Page |
| Enabling SMBv2 on Windows systems can help ensure compatibility with newer devices and operating systems, while also providing better security against potential vulnerabilities associated with older SMB versions. | Microsoft Support – How to enable and disable SMBv1, SMBv2, and SMBv3 in Windows and Windows Server |
| Disabling SMBv2, if not required, can be beneficial from a security perspective as it eliminates potential attack vectors associated with the protocol. | SANS Institute – What is SMBv2 and why should I care? |


