Having trouble opening Skype on your Windows computer? Don’t worry, I’ve got you covered. In this article, we’ll dive into the common issues causing Skype not to open and provide troubleshooting steps to help you resolve them quickly and easily. Let’s get started!
Recently, Fortect has become increasingly popular as a reliable and efficient way to address a wide range of PC issues. It's particularly favored for its user-friendly approach to diagnosing and fixing problems that can hinder a computer's performance, from system errors and malware to registry issues.
- Download and Install: Download Fortect from its official website by clicking here, and install it on your PC.
- Run a Scan and Review Results: Launch Fortect, conduct a system scan to identify issues, and review the scan results which detail the problems affecting your PC's performance.
- Repair and Optimize: Use Fortect's repair feature to fix the identified issues. For comprehensive repair options, consider subscribing to a premium plan. After repairing, the tool also aids in optimizing your PC for improved performance.
App Permissions and Conflicts
If you’re facing issues with Skype not opening on your Windows device, it could be due to app permissions or conflicts. Here are some troubleshooting steps to resolve this problem.
1. Check App Permissions:
Make sure that Skype has the necessary permissions to access your microphone, camera, and other required features. To do this, follow these steps:
– Open the Windows Settings menu by clicking on the Start button and selecting “Settings.”
– Go to “Privacy” and select “Microphone” or “Camera” from the left sidebar.
– Enable the toggle switch for Skype to allow access to the respective device.
2. Close Conflicting Applications:
Sometimes, other applications may conflict with Skype, preventing it from opening properly. To close conflicting applications:
– Press Ctrl + Shift + Esc to open the Task Manager.
– In the Processes tab, look for any applications that may interfere with Skype, such as communication or video software.
– Right-click on the conflicting application and select “End Task” to close it.
3. Reset Skype:
If the above steps didn’t resolve the issue, try resetting Skype. This will clear any temporary settings or configurations that might be causing the problem. To reset Skype:
– Close Skype if it’s running.
– Press Win + R to open the Run dialog box.
– Type “%appdata%\Microsoft\Skype” and press Enter.
– Rename the “shared.xml” file to something like “shared_old.xml”.
– Restart your computer and launch Skype again.
Remember to update Skype to the latest version and ensure that your Windows operating system is also up to date. If the issue persists, you may consider reinstalling Skype or seeking further assistance from the Skype support team.
Windows Firewall and Antivirus Protection
If you’re having trouble opening Skype on your Windows computer, it may be due to the Windows Firewall or antivirus software blocking the application. Here are a few troubleshooting steps you can follow to resolve this issue.
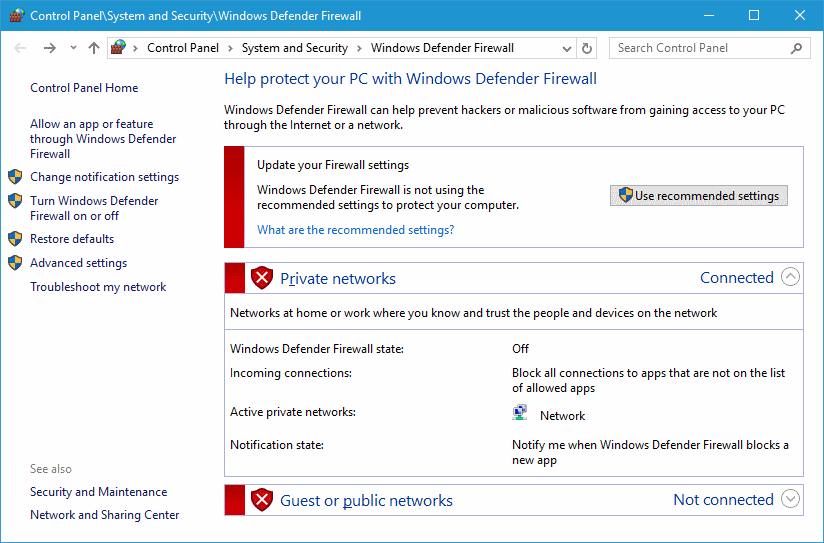
First, check if the Windows Firewall is blocking Skype. To do this, follow these steps:
1. Press the Windows key + R on your keyboard to open the Run dialog box.
2. Type “control firewall.cpl” (without quotes) and press Enter.
3. Click on “Allow an app or feature through Windows Firewall” on the left side of the window.
4. Scroll down and look for Skype in the list of apps.
5. Make sure the checkboxes next to Skype are ticked for both private and public networks.
6. If Skype is not listed, click on the “Change settings” button at the top right, then click “Allow another app”.
7. Browse to the location where Skype is installed (usually C:\Program Files\Skype) and select the Skype executable file.
8. Click “Add” and then make sure the checkboxes next to Skype are ticked for both private and public networks.
If the Windows Firewall settings are correct, it’s possible that your antivirus software is blocking Skype. To resolve this, you can try temporarily disabling your antivirus software and then see if Skype opens. If it does, you’ll need to add Skype as an exception in your antivirus software. Refer to the documentation or support website of your antivirus software for instructions on how to do this.
If neither of these solutions work, you may want to consider reinstalling Skype or contacting Skype support for further assistance.
Malware Activities and Privacy Settings
If you’re experiencing trouble opening Skype on your Windows device, it’s possible that malware activities or privacy settings may be the cause. To troubleshoot this issue, follow these steps:
1. Scan for Malware: Use a reliable antivirus software to perform a thorough scan of your system. This will help identify and remove any malware that could be interfering with Skype. Be sure to keep your antivirus software up to date.
2. Check Privacy Settings: Ensure that the privacy settings on your Windows device are not blocking Skype from opening. To do this, follow these steps:
a. Click on the Start button and select “Settings.”
b. In the Settings menu, click on “Privacy.”
c. Navigate to the “App permissions” section and click on “Microphone” and “Camera.”
d. Make sure that the toggle switch for Skype is turned on.
3. Reset Skype Settings: If the previous steps didn’t resolve the issue, you can try resetting Skype settings to their default values. Here’s how:
a. Close Skype if it’s open.
b. Press the Windows key + R to open the Run dialog box.
c. Type “%appdata%\Skype” and press Enter.
d. Locate the folder with your Skype username and rename it to something like “OldSkype.”
e. Restart Skype and sign in again. This will create a new folder with default settings.
If you’re still unable to open Skype after following these steps, it may be helpful to uninstall and reinstall the application. This can resolve any potential software conflicts or corrupted files. Additionally, make sure that your Windows operating system and Skype application are up to date with the latest patches and updates.
Changing Skype’s Folder Name and Disabling uPnP
1. Changing Skype’s Folder Name:
– Close Skype if it’s currently open.
– Open File Explorer by pressing Windows key + E.
– Navigate to the folder where Skype is installed. The default location is usually “C:\Program Files (x86)\Skype\”.
– Right-click on the “Skype” folder and select “Rename”.
– Change the folder name to something different, like “Skype_Backup”.
– Restart your computer.
– After the restart, try opening Skype again and see if the issue is resolved.
2. Disabling uPnP:
– Press Windows key + R to open the Run dialog box.
– Type “control” and press Enter to open the Control Panel.
– In the Control Panel, select “Network and Internet” and then click on “Network and Sharing Center”.
– On the left-hand side, click on “Change adapter settings”.
– Right-click on your active network connection and select “Properties”.
– In the Properties window, scroll down and locate “Internet Protocol Version 4 (TCP/IPv4)”.
– Select it and click on the “Properties” button.
– In the new dialog box, click on the “Advanced” button.
– Go to the “WINS” tab and uncheck the option that says “Enable NetBIOS over TCP/IP”.
– Click “OK” to save the changes.
– Restart your computer and try opening Skype again.
By changing Skype’s folder name and disabling uPnP, you may be able to resolve the issue of Skype not opening in Windows. If the problem persists, you may want to try other troubleshooting steps or seek further assistance from Microsoft support.
Running a System File Checker (SFC) Scan
1. Press the Windows key and type “Command Prompt” in the search bar.
2. Right-click on “Command Prompt” and select “Run as administrator” from the context menu.
3. In the Command Prompt window, type sfc /scannow and press Enter.
4. The scan will now begin, and it may take some time to complete. Be patient and let it finish.
5. Once the scan is complete, you’ll see a message indicating whether any issues were found and repaired.
If the scan found and repaired any issues, try opening Skype again to see if it resolves the problem. If not, you may need to try other troubleshooting steps or contact Skype support for further assistance.
Uninstalling and Reinstalling Skype
![]()
To troubleshoot Skype not opening in Windows, you may need to uninstall and reinstall the app. Here’s how to do it:
1. Close Skype if it’s currently running on your computer.
2. Press the Windows key on your keyboard and type “Control Panel.” Open the Control Panel from the search results.
3. In the Control Panel, locate and click on “Uninstall a program” under the “Programs” section.
4. Look for Skype in the list of installed programs and select it.
5. Click on the “Uninstall” button at the top of the list or right-click on Skype and choose “Uninstall.”
6. Follow the on-screen instructions to complete the uninstallation process.
7. Once Skype is successfully uninstalled, open your web browser and go to the official Skype website.
8. Download the latest version of Skype for Windows.
9. After the download is complete, locate the installation file and double-click on it to start the installation.
10. Follow the on-screen instructions to install Skype on your computer.
11. Once the installation is complete, launch Skype and sign in with your Microsoft account or create a new one if you don’t have an account yet.
If you’re still experiencing issues with Skype not opening, you may need to further troubleshoot your Windows system or seek additional support from Microsoft.


