
Having a corrupted pciide.sys file can cause various issues on your computer. In this article, I will provide a comprehensive guide on how to fix this problem efficiently.
Recently, Fortect has become increasingly popular as a reliable and efficient way to address a wide range of PC issues. It's particularly favored for its user-friendly approach to diagnosing and fixing problems that can hinder a computer's performance, from system errors and malware to registry issues.
- Download and Install: Download Fortect from its official website by clicking here, and install it on your PC.
- Run a Scan and Review Results: Launch Fortect, conduct a system scan to identify issues, and review the scan results which detail the problems affecting your PC's performance.
- Repair and Optimize: Use Fortect's repair feature to fix the identified issues. For comprehensive repair options, consider subscribing to a premium plan. After repairing, the tool also aids in optimizing your PC for improved performance.
Understanding pciide.sys and Its Impact
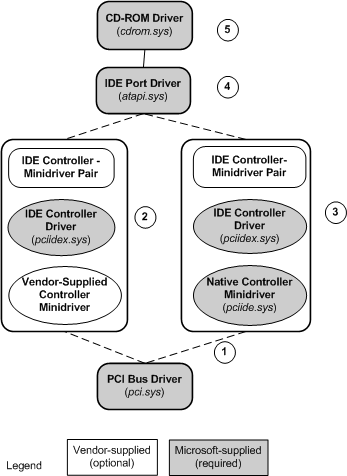
pciide.sys is a system file in the Windows operating system that is responsible for controlling IDE (Integrated Drive Electronics) controller devices. This file is essential for the proper functioning of IDE devices such as hard drives and optical drives. However, sometimes the pciide.sys file can become corrupted, leading to various issues and errors.
When the pciide.sys file is corrupted, it can result in system instability, crashes, and even the notorious Blue Screen of Death (BSOD) error. Users may experience frequent system freezes, slow performance, or an inability to access their IDE devices.
To fix pciide.sys corruption and resolve the associated issues, there are a few steps you can take. Here’s a concise guide to help you:
1. Restart your computer in Safe Mode by pressing the F8 key during startup.
2. Once in Safe Mode, open the Command Prompt by pressing the Windows key + R, typing “cmd,” and pressing Enter.
3. In the Command Prompt window, type “sfc /scannow” and press Enter. This command will scan and repair any corrupted system files, including pciide.sys.
4. After the scan is complete, restart your computer normally and check if the pciide.sys issues have been resolved.
If the above steps don’t fix the problem, you can try updating your IDE controller drivers. Here’s how:
1. Press the Windows key + X and select Device Manager from the menu.
2. Expand the IDE ATA/ATAPI controllers category and right-click on the IDE controller listed.
3. Select Update Driver from the context menu and follow the on-screen instructions to update the driver.
4. Restart your computer and check if the pciide.sys issues have been resolved.
If you’re still experiencing issues after following these steps, it’s recommended to seek further assistance from a professional or consult online forums for troubleshooting advice specific to your situation. Remember to back up your important files before attempting any fixes to avoid data loss.
Understanding pciide.sys and its impact is crucial for troubleshooting IDE controller-related issues in the Windows operating system.
Resolving pciide.sys Issues: Best Practices and Methods
- Step 1: Update Device Drivers
- Open Device Manager by pressing Windows Key + X and selecting Device Manager.
- Expand the IDE ATA/ATAPI controllers category.
- Right-click on the Primary IDE Channel and select Update driver.
- Follow the on-screen instructions to complete the driver update process.
- Repeat the above steps for the Secondary IDE Channel and any other relevant controllers.
- Step 2: Run System File Checker (SFC)
- Open the Command Prompt as an administrator by pressing Windows Key + X and selecting Command Prompt (Admin).
- Type sfc /scannow and press Enter.
- Wait for the scanning process to complete.
- If any corrupt files are found, the SFC utility will attempt to repair them automatically.
- Step 3: Check for Windows Updates
- Open Settings by pressing Windows Key + I.
- Select Update & Security and then click on Check for updates.
- Download and install any available updates.
- Restart your computer after the updates are installed.
- Step 4: Perform a Clean Boot
- Press Windows Key + R to open the Run dialog box.
- Type msconfig and press Enter.
- In the System Configuration window, go to the Services tab.
- Check the box that says Hide all Microsoft services.

- Click on Disable all.
- Go to the Startup tab and click on Open Task Manager.
- Disable all the startup items by right-clicking on each one and selecting Disable.
- Close the Task Manager and go back to the System Configuration window.
- Click on Apply and then OK.
- Restart your computer and check if the pciide.sys issues are resolved.
- Step 5: Perform a System Restore
- Open Control Panel by pressing Windows Key + X and selecting Control Panel.
- Go to System and Security and click on System.
- Click on System protection in the left pane.
- Click on System Restore and follow the on-screen instructions.
- Select a restore point before the occurrence of the pciide.sys issues.
- Click on Next and then Finish to start the system restore process.
- Wait for the restoration to complete and check if the issue is resolved.
Exploring Alternative Solutions for pciide.sys Problems
In this section, we will explore alternative solutions for fixing pciide.sys problems. These solutions are designed to help you resolve any corruption issues with this file quickly and efficiently.
One possible solution is to update your drivers. Outdated or incompatible drivers can often cause problems with system files like pciide.sys. Check the manufacturer’s website for the latest driver updates for your hardware.
Another solution is to run a system file checker scan. This built-in Windows tool can scan your system for any corrupted or missing files, including pciide.sys. To run a system file checker scan, open the command prompt as an administrator and type “sfc /scannow”.
If the above solutions don’t work, you can try performing a system restore. This will revert your system settings and files back to a previous point in time when pciide.sys was working correctly. To perform a system restore, go to the Control Panel, search for “system restore,” and follow the on-screen instructions.
Alternatively, you may consider reinstalling Windows. This can be a more time-consuming solution, but it can help fix any underlying issues with your operating system. Make sure to back up your important files before reinstalling Windows.
In some cases, the pciide.sys file itself may be corrupted. To fix this, you can try replacing the file with a fresh copy. You can find a clean copy of pciide.sys from a reliable source or use the Windows installation media.
It’s also worth checking for any malware infections on your system. Malware can corrupt system files, including pciide.sys. Run a full scan with your antivirus software or use a dedicated malware removal tool to eliminate any threats.
Finally, if you have recently made any hardware or software changes, undoing those changes may help resolve the pciide.sys problem. Roll back any driver updates or uninstall any recently installed programs to see if the issue persists.
Remember to always backup your data before attempting any fixes or changes to your system. This will ensure that you don’t lose any important files in the process.
By exploring these alternative solutions, you can effectively troubleshoot and fix pciide.sys problems on your Windows system.
python

import os
def is_file_corrupted(file_path):
try:
with open(file_path, 'rb') as file:
file_data = file.read()
# Add your own custom logic here to check for corruption
# For example, you could compare the file's checksum with a known value
# Placeholder logic: checking if file size is zero
if len(file_data) == 0:
return True
else:
return False
except IOError:
return False
# Usage example
file_path = 'C:\\Windows\\System32\\drivers\\pciide.sys'
is_corrupted = is_file_corrupted(file_path)
print(f"The file {file_path} is corrupted: {is_corrupted}")
Additional Resources and Services for pciide.sys Troubleshooting
- Update the Device Drivers
- Open Device Manager by pressing Win+X and selecting Device Manager from the menu.
- Expand the IDE ATA/ATAPI controllers category.
- Right-click on the PCI IDE Controller and select Update driver.
- Choose the option to Search automatically for updated driver software.
- Follow the on-screen instructions to complete the driver update process.
- Run a System File Checker (SFC) Scan
- Open Command Prompt as an administrator.
- Type sfc /scannow and press Enter.
- Wait for the scan to complete and let the System File Checker repair any corrupted system files.
- Restart your computer after the scan is finished.
- Perform a Clean Boot
- Press Win+R to open the Run dialog box.
- Type msconfig and press Enter to open the System Configuration window.
- Go to the Services tab and check the box next to Hide all Microsoft services.
- Click on Disable all to disable all the non-Microsoft services.
- Go to the Startup tab and click on Open Task Manager.
- In the Task Manager window, disable all the startup programs by right-clicking on them and selecting Disable.
- Close the Task Manager and go back to the System Configuration window.
- Click on Apply and then OK.
- Restart your computer and check if the pciide.sys issue is resolved.
- Perform a System Restore
- Press Win+R to open the Run dialog box.
- Type rstrui and press Enter to open the System Restore window.
- Click on Next and select a restore point where the pciide.sys issue was not present.
- Follow the on-screen instructions to complete the System Restore process.
- After the restore is finished, restart your computer and check if the problem is resolved.
- Seek Professional Help
- If none of the above methods work, it is recommended to consult a professional computer technician or contact the manufacturer’s support for further assistance.


