Struggling with Windows 10 WiFi not connecting automatically? Here are some quick and easy fixes to get your internet up and running smoothly.
Recently, Fortect has become increasingly popular as a reliable and efficient way to address a wide range of PC issues. It's particularly favored for its user-friendly approach to diagnosing and fixing problems that can hinder a computer's performance, from system errors and malware to registry issues.
- Download and Install: Download Fortect from its official website by clicking here, and install it on your PC.
- Run a Scan and Review Results: Launch Fortect, conduct a system scan to identify issues, and review the scan results which detail the problems affecting your PC's performance.
- Repair and Optimize: Use Fortect's repair feature to fix the identified issues. For comprehensive repair options, consider subscribing to a premium plan. After repairing, the tool also aids in optimizing your PC for improved performance.
Troubleshooting Network Problems
If your Windows 10 WiFi is not connecting automatically, there are a few troubleshooting steps you can take to fix the issue.
First, check to make sure that your WiFi is turned on and that you are within range of the network you want to connect to.
Next, try restarting your computer and your WiFi router to see if that resolves the issue.
If the problem persists, you can try updating your WiFi driver in the Device Manager.
Another option is to forget the network and then reconnect to it, which can sometimes resolve connectivity issues.
If none of these steps work, you may need to reset your network settings in Windows 10.
It’s also a good idea to check for any software bugs or glitches that could be causing the problem.
Initial Steps to Resolve Connection Issues
- Check WiFi Network Status
- Restart Your Computer
- Check for Windows Updates
- Restart Your Router and Modem
- Forget and Reconnect to WiFi Network
Modify Power Plan and Saver Options
1. Right-click on the Start button and select Power Options from the context menu.
2. In the Power Options menu, select the power plan you want to modify and click on Change plan settings next to it.
3. From here, you can adjust the settings for when the computer should turn off the display and when it should go to sleep.
4. You can also click on Change advanced power settings to further customize power plan options.
5. To modify saver options, go back to the Power Options menu and click on Change when the computer sleeps on the left-hand side.
6. Here, you can adjust the settings for when the computer should go to sleep when plugged in or on battery power.
By modifying these power plan and saver options, you may be able to resolve issues with Windows 10 not connecting to WiFi automatically.
Install or Update Network Drivers
If Windows doesn’t find a new driver, you can try visiting the manufacturer’s website to download and install the latest driver manually. Make sure to restart your computer after installing the new driver to apply the changes.
If you’re experiencing issues with your Wi-Fi not connecting automatically, updating the network drivers can often solve the problem. Keeping your drivers up to date can help fix connectivity issues and improve overall performance.
Running the Network Troubleshooter
To troubleshoot your Wi-Fi connectivity issues on Windows 10, you can use the Network Troubleshooter tool. This tool can help identify and fix common connectivity issues that may be preventing your Wi-Fi from connecting automatically.
First, navigate to the taskbar and locate the Wi-Fi icon. Right-click on the Wi-Fi icon to open the context menu. From the menu, select “Troubleshoot problems” to launch the Network Troubleshooter.
Once the Network Troubleshooter is open, it will scan for any issues that may be causing your Wi-Fi to not connect automatically. Follow the on-screen prompts and click through the troubleshooting process to identify and resolve any connectivity issues.
After the Network Troubleshooter has completed its scan and made any necessary fixes, restart your computer to apply the changes. This should help resolve any common Wi-Fi connectivity issues and allow your Windows 10 device to connect to Wi-Fi automatically.
By utilizing the Network Troubleshooter, you can quickly diagnose and fix common Wi-Fi connectivity issues without the need for extensive technical knowledge or troubleshooting skills.
Turning Off Wi-Fi Direct Virtual Adapter
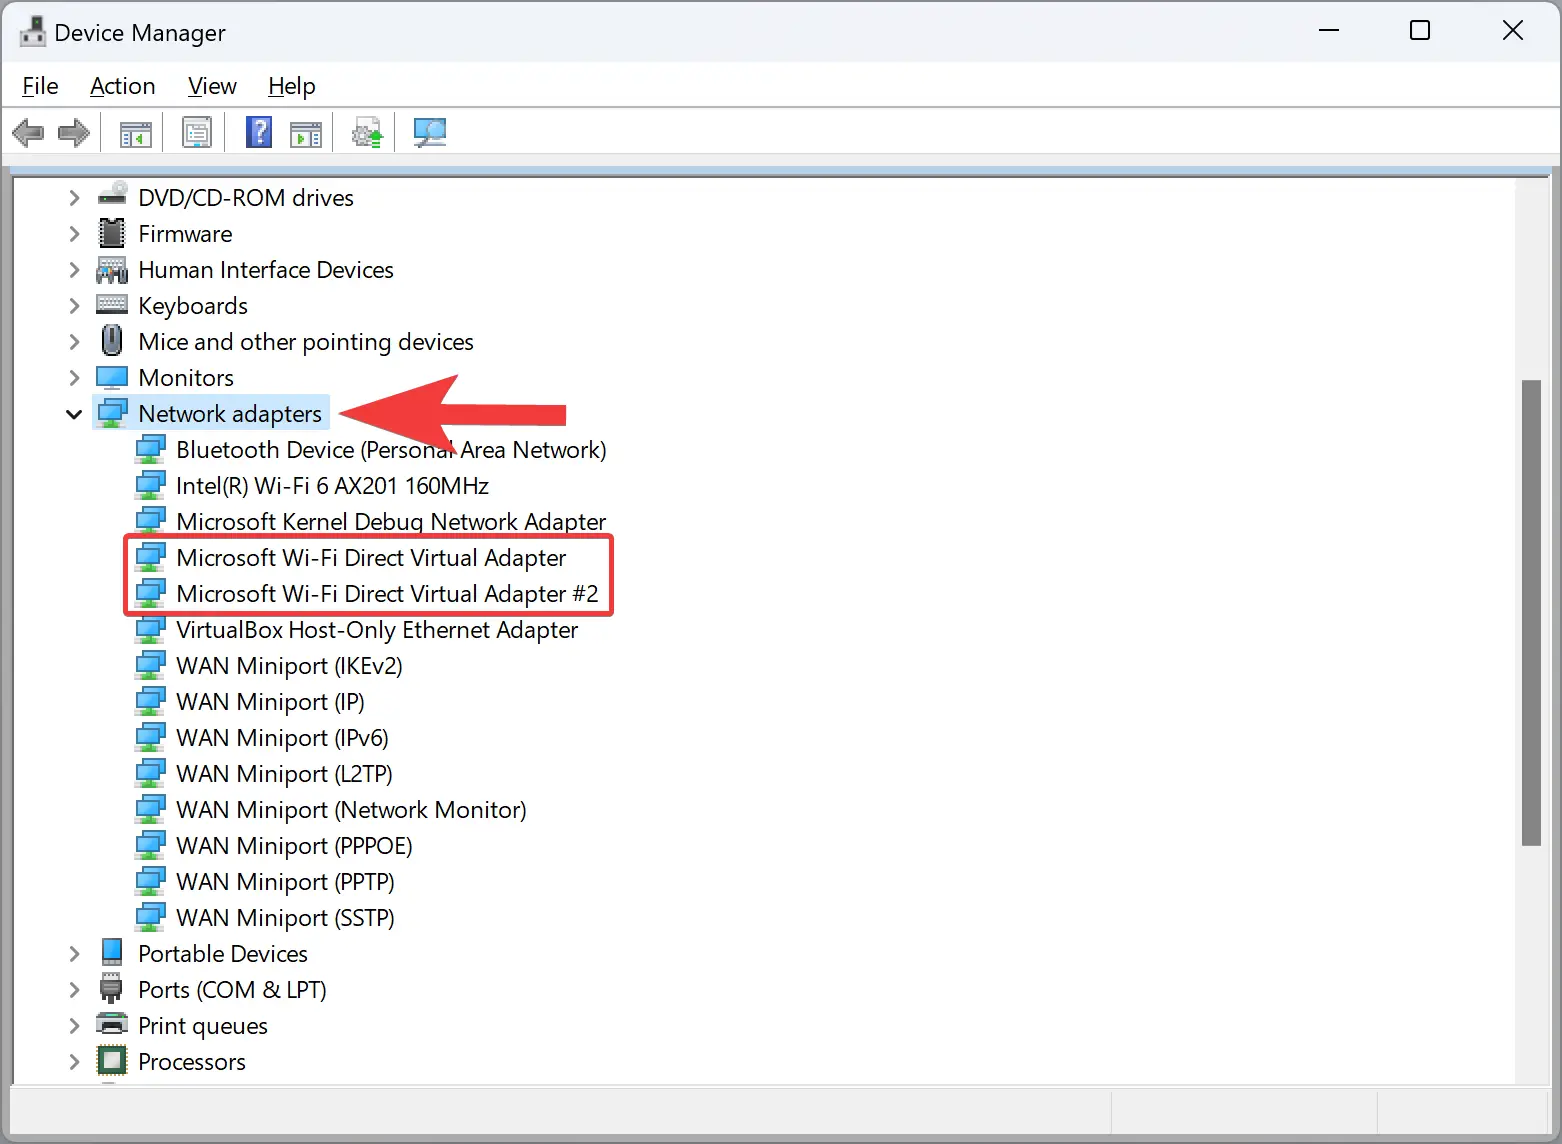
To turn off the Wi-Fi Direct virtual adapter on Windows 10, you can follow these steps. First, right-click on the Start button and select “Device Manager.” In the Device Manager window, expand the “Network adapters” section. Look for the “Wi-Fi Direct” or “Microsoft Wi-Fi Direct Virtual Adapter” and right-click on it.
Select “Disable device” from the drop-down menu. You may need to confirm the action in a pop-up window. Once the Wi-Fi Direct virtual adapter is disabled, you can close the Device Manager window.
After disabling the Wi-Fi Direct virtual adapter, you can try reconnecting to your Wi-Fi network to see if the issue is resolved. If you’re still experiencing problems with your Wi-Fi connection, you may need to explore other troubleshooting steps.
Disable IPv6 Protocol and Background Apps
To fix the issue of Windows 10 WiFi not connecting automatically, you can try disabling the IPv6 protocol. To do this, go to the Control Panel and open the Network and Sharing Center. Click on your WiFi connection, then click on Properties. Uncheck the box next to “Internet Protocol Version 6 (TCP/IPv6)” and click OK to save the changes.
Another potential fix is to disable background apps that may be interfering with the WiFi connection. To do this, go to Settings, then Privacy, and click on Background apps. Turn off the toggle switch for any apps that you don’t need running in the background.
By disabling the IPv6 protocol and background apps, you may be able to resolve the issue of Windows 10 WiFi not connecting automatically. These simple fixes can help improve your overall WiFi connection experience on your Windows 10 device.
Adjust Wi-Fi Adapter Power Management
In the Wi-Fi adapter properties window, navigate to the “Power Management” tab. Here, you can uncheck the option that says “Allow the computer to turn off this device to save power.”
Click “OK” to save the changes and close the properties window. Finally, restart your computer to apply the new power management settings to your Wi-Fi adapter.
By adjusting the power management settings for your Wi-Fi adapter, you can ensure that it stays connected and doesn’t experience any automatic disconnections or issues when trying to connect to a Wi-Fi network.
Prevent Simultaneous Connection Conflicts
If you are using a Wi-Fi hotspot or tethering from your phone, ensure that only one device is connected at a time. This can prevent conflicts and make the connection process smoother.
Check the Wi-Fi icon in the taskbar and make sure that the correct network is selected for automatic connection. Sometimes, manually selecting the network and entering the password can resolve automatic connection issues.
If you are still experiencing problems with automatic Wi-Fi connection, consider rebooting your computer and the router. This can help clear any glitches or software bugs that may be causing the issue.
Reset Network Settings to Default
To reset your network settings to default in Windows 10, follow these steps:
1. First, open the “Settings” menu by clicking on the Start button and then selecting the gear icon.
2. In the Settings menu, click on “Network & Internet.”
3. Under the “Status” tab, scroll down and click on “Network reset.”
4. A warning message will pop up, informing you that this will remove and reinstall all your network adapters and set other networking components back to their original settings. Click on “Reset now” to confirm.
5. After clicking “Reset now,” your computer will restart to apply the changes.
6. Once your computer has rebooted, you will need to reconnect to your Wi-Fi network and re-enter the password.
Resetting your network settings to default can often resolve issues with Wi-Fi not connecting automatically on Windows 10. If you continue to experience problems after resetting your network settings, you may need to consider other troubleshooting steps, such as updating your network drivers or checking for software bugs.
Connect to Hidden Networks Manually
1. Click on the Wi-Fi icon in the taskbar to open the network menu.
2. Click on “Network & Internet settings” to open the settings menu.
3. Click on “Wi-Fi” in the left-hand menu and then select “Manage known networks.”
4. Click on “Add a new network” and enter the network name (SSID) and security type.
5. Click on “Next” and enter the network security key if required.
6. Click on “Next” and then “Close” to save the network and connect to it manually.


