In this article, we will delve into the perplexing world of iPhone 7 hotspot connection issues in Windows 10, unraveling the knots that hinder seamless connectivity.
Recently, Fortect has become increasingly popular as a reliable and efficient way to address a wide range of PC issues. It's particularly favored for its user-friendly approach to diagnosing and fixing problems that can hinder a computer's performance, from system errors and malware to registry issues.
- Download and Install: Download Fortect from its official website by clicking here, and install it on your PC.
- Run a Scan and Review Results: Launch Fortect, conduct a system scan to identify issues, and review the scan results which detail the problems affecting your PC's performance.
- Repair and Optimize: Use Fortect's repair feature to fix the identified issues. For comprehensive repair options, consider subscribing to a premium plan. After repairing, the tool also aids in optimizing your PC for improved performance.
Can’t Connect Laptop to iPhone Hotspot
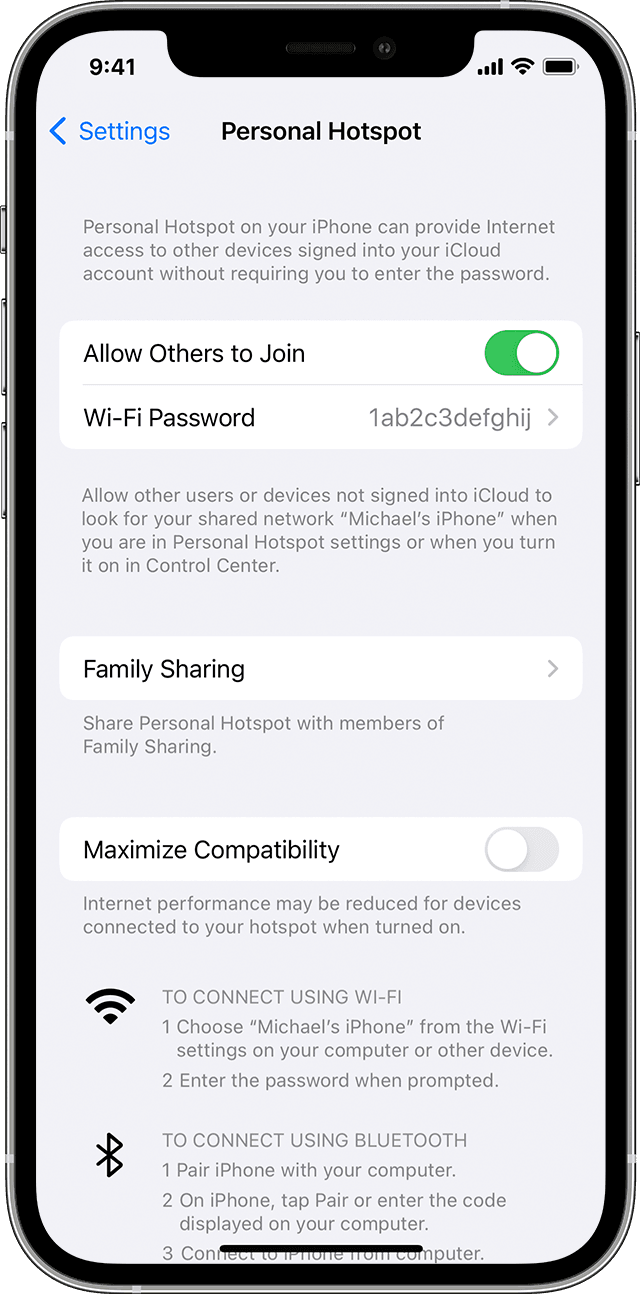
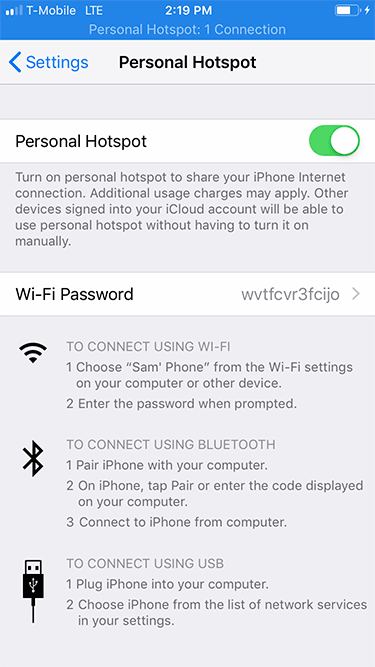
If you’re having trouble connecting your laptop to your iPhone hotspot in Windows 10, there are a few fixes you can try. First, make sure your iPhone’s Personal Hotspot is turned on by going to Settings > Personal Hotspot.
Next, on your laptop, open the Control Center by clicking on the Wi-Fi icon in the bottom right corner of the screen. Look for your iPhone’s hotspot name and click on it to connect. If you don’t see your hotspot in the list, try restarting your iPhone and laptop.
If that doesn’t work, update your iPhone to the latest version of iOS and make sure your laptop has all the latest Windows updates. You can also try connecting via USB by using a USB cable.
If none of these solutions work, you may need to troubleshoot further or seek additional help.
Basic Troubleshooting Steps for iPhone Hotspot Connectivity
- Step 1: Check Wi-Fi and Bluetooth Connectivity
- Make sure that Wi-Fi and Bluetooth are turned on both on your iPhone and Windows 10 device.

- Step 2: Reset Network Settings on iPhone
- Go to the Settings app on your iPhone.
- Select General and then Reset.
- Tap on Reset Network Settings.
- Enter your passcode if prompted and confirm the reset.
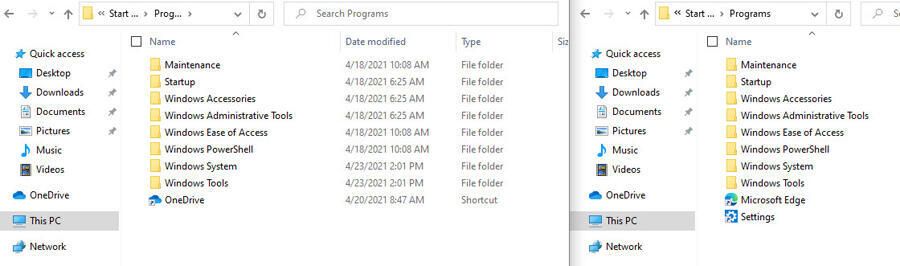
- Step 3: Forget the iPhone Hotspot Network on Windows 10
- Open the Settings app on your Windows 10 device.
- Click on Network & Internet.

- Select Wi-Fi and click on Manage known networks.
- Find your iPhone hotspot network and click on it.
- Click on Forget to remove the network from your Windows 10 device.
- Step 4: Restart iPhone and Windows 10 Device
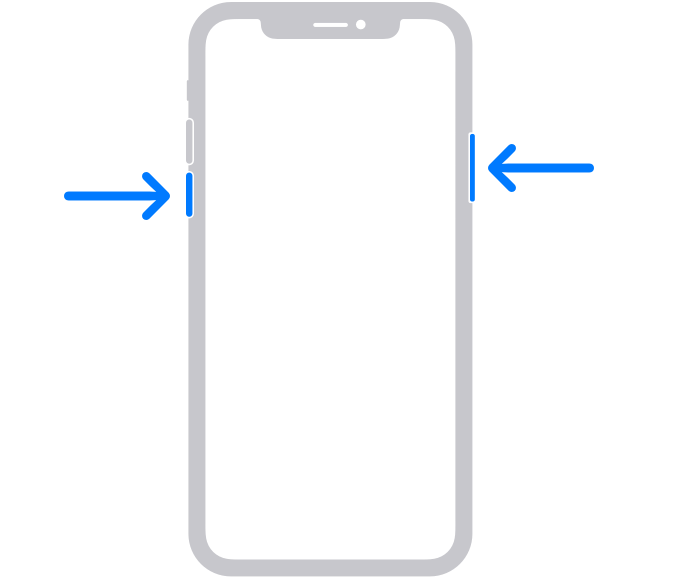
- Restart your iPhone by pressing and holding the power button, then sliding the power off slider.
- Wait for a few seconds, then press and hold the power button again to turn it back on.
- Restart your Windows 10 device by clicking on the Start button, selecting Power, and then Restart.
- Step 5: Update iOS and Windows 10
- On your iPhone, go to the Settings app.
- Select General and then Software Update.
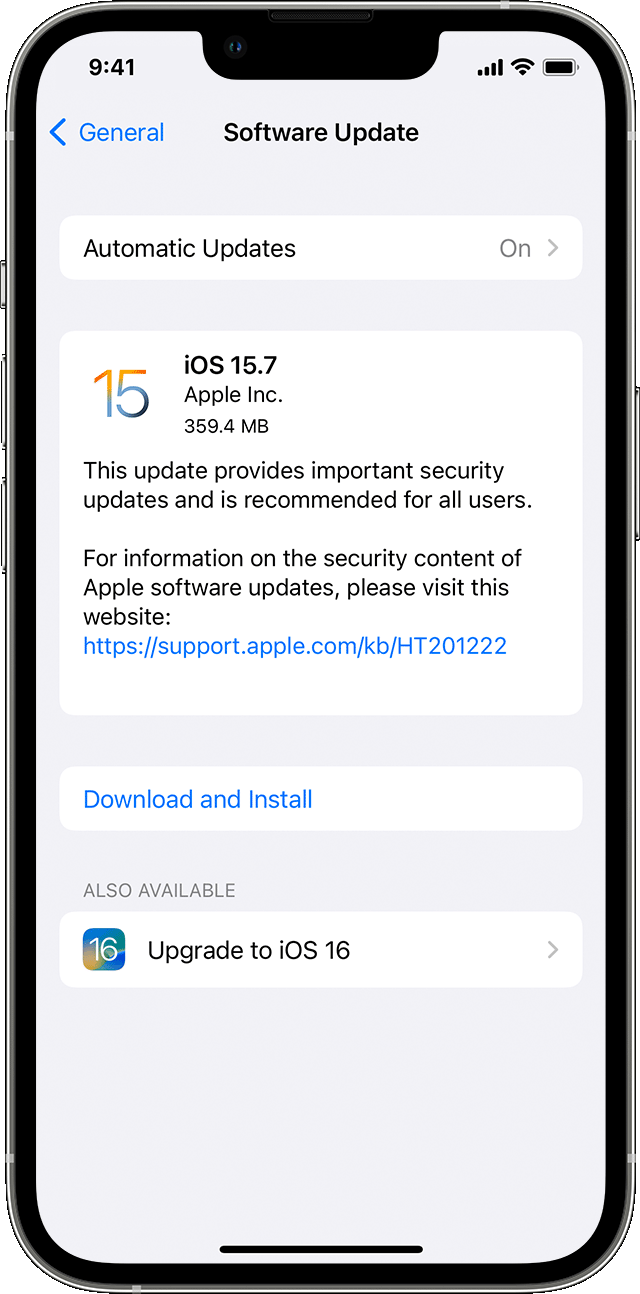
- If an update is available, tap on Download and Install.
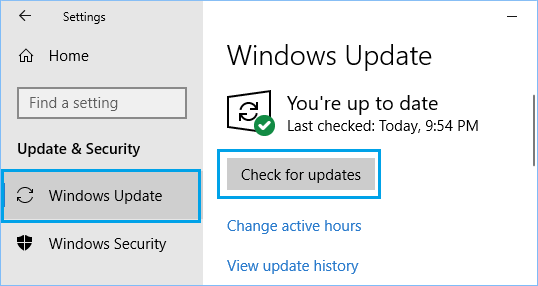
- On your Windows 10 device, click on the Start button.
- Select Settings and then Update & Security.
- Click on Check for updates and install any available updates.
Enabling and Disabling Airplane Mode on iPhone and PC
To enable or disable Airplane Mode on your iPhone, swipe down from the top right corner of the screen to open the Control Center. Then, tap the airplane icon to turn on or off Airplane Mode. You can also go to Settings > Airplane Mode and toggle the switch to enable or disable it.
On a PC running Windows 10, you can enable or disable Airplane Mode by clicking on the network icon in the bottom right corner of the taskbar. In the network menu, click on the Airplane Mode button to toggle it on or off.
If you’re experiencing hotspot connection issues on your iPhone 7 while using Windows 10, there are a few troubleshooting steps you can try. First, make sure your iPhone’s hotspot is enabled and that the correct device name and password are entered on your PC. Restart both your iPhone and PC to refresh their connection. If the issue persists, try using a different USB cable or connecting via Wi-Fi instead. You can also check for any updates for your iPhone and Windows 10, as software updates can often fix connectivity issues.
Changing iPhone Hotspot Password
To change your iPhone hotspot password in Windows 10, follow these steps:
1. Connect your iPhone to your Windows 10 laptop via USB.
2. On your iPhone, go to Settings > Personal Hotspot.
3. Under the Wi-Fi Password section, click on the blue text to edit the password.
4. Enter a new password and click Done.
5. On your Windows 10 laptop, open the Network & Internet settings.
6. Click on the Wi-Fi tab and select your iPhone’s hotspot from the list.
7. Click on the Connect button to establish a connection using the new password.
If you’re experiencing hotspot connectivity errors or your laptop can’t connect to the iPhone hotspot, try the following solutions:
1. Restart your iPhone and laptop.
2. Make sure you’re in a location with a good cellular signal.
3. Check if your iPhone’s hotspot is enabled and the device name is correct.
4. Disable any VPN or proxy settings on your laptop.
5. Ensure that your Windows 10 is up to date with the latest software.
Changing Hotspot Name on iPhone
To change the hotspot name on your iPhone, follow these steps:
1. Open the Settings app on your iPhone.
2. Tap on “Personal Hotspot” or “Hotspot” (depending on your iOS version).
3. Tap on “Wi-Fi Password” or “Password”.
4. Enter a new name for your hotspot in the “Wi-Fi Name” or “SSID” field.
5. Tap “Done” to save the changes.
By changing the hotspot name, you can easily identify your iPhone when connecting to it from your Windows 10 laptop or other devices.
If you’re still experiencing hotspot connectivity issues on your Windows 10 laptop, try the following troubleshooting steps:
1. Restart your iPhone and Windows 10 laptop.
2. Make sure both devices are updated to the latest software version.
3. Check if your iPhone is connected to the internet and has a stable cellular or Wi-Fi connection.
4. Ensure that the Personal Hotspot option is enabled on your iPhone.
5. Remove any restrictions or limitations on your iPhone that may be preventing hotspot connectivity.
For more detailed troubleshooting steps, you can visit the Microsoft Support website or refer to the documentation provided by Apple.
Forgetting iPhone Personal Hotspot
If you’re experiencing trouble with your iPhone 7 hotspot connection in Windows 10, here are some fixes to try:
1. Restart your iPhone and Windows 10 computer to refresh their settings.
2. Make sure your iPhone is set to the correct country in Settings > General > Language & Region.
3. Check if your laptop can’t connect to the hotspot because it’s using an outdated version of Windows (not Windows 11).
4. Ensure that your iPhone has reliable internet access before enabling the hotspot.
5. If your iPhone keeps disconnecting, try moving closer to your computer or removing any obstructions that may be blocking the signal.
6. If your Mac doesn’t see the iPhone hotspot, toggle Wi-Fi off and on in the menu bar or try using a different Wi-Fi network.
7. Don’t forget to look for the hotspot option in your iPhone’s Settings > Personal Hotspot. It should be enabled for the hotspot to work.
8. If your Windows 10 computer can’t see the iPhone hotspot, open the network settings and click “Add a new network” or “Connect to a hidden network.”
9. Sometimes, a third-party software or antivirus may interfere with the hotspot connection. Temporarily disable them to see if that resolves the issue.
10. If you’re still having trouble, consider using a USB cable for a more stable connection. Connect your iPhone to your Windows 10 computer via USB and enable “USB Hotspot” in the hotspot settings on your iPhone.
Running Internet Connections Troubleshooter
To troubleshoot the iPhone 7 hotspot connection issue in Windows 10, you can try running the Internet Connections Troubleshooter. Follow these steps:
1. Press the Windows key + I to open the Settings window.
2. Click on “Network & Internet.”
3. In the left sidebar, select “Status.”
4. Scroll down and click on “Network troubleshooter.”
5. Click on “Run the troubleshooter” and wait for the process to complete.
6. The troubleshooter will attempt to identify and fix any issues with your internet connection.
If the troubleshooter doesn’t resolve the problem, there are a few other things you can try:
1. Restart your iPhone 7 and Windows 10 computer.
2. Make sure your iPhone’s hotspot feature is enabled.
3. Check if your iPhone is connected to Wi-Fi or has a stable cellular data connection.
4. Ensure that you have the latest version of iTunes installed on your Windows 10 computer.
5. Try connecting your iPhone to your Windows 10 computer via USB and enabling “Personal Hotspot” in the iPhone’s settings.
If none of these solutions work, you may need to consult Apple support or your network provider for further assistance.
Updating Wireless Network Adapter
To update your wireless network adapter in Windows 10, follow these steps:
1. Press the Windows key + X and select “Device Manager” from the menu.
2. In the Device Manager window, expand the “Network adapters” category.
3. Right-click on your wireless network adapter and select “Update driver.”
4. Choose the option to search automatically for updated driver software.
5. Windows will then search for and install the latest driver for your wireless network adapter.
If you’re still experiencing hotspot connectivity issues on your iPhone 7, try the following troubleshooting steps:
1. Restart your iPhone 7 and Windows 10 computer.
2. Make sure your iPhone 7 is connected to a stable Wi-Fi network.
3. Enable Personal Hotspot on your iPhone 7 by going to Settings > Personal Hotspot.
4. On your Windows 10 computer, click the network icon in the system tray and select your iPhone 7 from the hotspot list.
5. If the hotspot connection keeps disconnecting, try moving closer to your iPhone 7 or vice versa.
6. If the issue persists, try using a USB cable to connect your iPhone 7 to your Windows 10 computer and enable USB hotspot in the iPhone settings.
7. You can also try using third-party software like MiniTool Mobile Recovery for iOS to troubleshoot any software-related issues.
Enabling Personal Hotspot on iPhone
To enable Personal Hotspot on your iPhone, follow these steps:
1. Open the Settings app on your iPhone.
2. Tap on “Personal Hotspot” in the list of settings.
3. Toggle the switch to turn on Personal Hotspot.
4. If prompted, set a Wi-Fi password for your hotspot.
5. On your Windows 10 computer, click on the Wi-Fi icon in the system tray.
6. Look for your iPhone’s hotspot name in the list of available networks.
7. Click on your iPhone’s hotspot name to connect.
8. If you encounter any hotspot connectivity errors, try restarting your iPhone and computer.
9. If the issue persists, try connecting your iPhone to your computer via USB.
10. On your Windows 10 computer, open the Network & Internet settings.
11. Click on “Mobile hotspot” in the sidebar.
12. Enable “Share my Internet connection with other devices.”
Restarting iPhone and PC
To troubleshoot a hotspot connection issue between an iPhone 7 and a Windows 10 PC, restarting both devices can often resolve the problem. Follow these steps:
1. Restart your iPhone: Press and hold the power button until the “slide to power off” option appears. Slide it to turn off your iPhone. After a few seconds, press and hold the power button again until the Apple logo appears.
2. Restart your PC: Click on the “Start” button, select the power icon, and choose “Restart” from the options.
3. Once both devices have restarted, enable the hotspot on your iPhone by going to Settings > Personal Hotspot and toggling it on.
4. On your PC, open the Wi-Fi settings and select your iPhone’s hotspot from the list.
If you still can’t connect, there may be other factors at play. Check for any software updates for both devices and ensure that the Wi-Fi and Bluetooth features are turned on. If the issue persists, consider reaching out to technical support for further assistance.
Resetting Network Settings on iPhone and PC
If you’re experiencing trouble connecting your iPhone 7 hotspot to your Windows 10 PC, resetting your network settings might help. Here’s how to do it:
1. On your iPhone, go to Settings.
2. Scroll down and tap on General.
3. Scroll to the bottom and tap on Reset.
4. Tap on Reset Network Settings.
5. Enter your passcode if prompted.
6. Confirm the reset.
Once your iPhone restarts, try connecting to your hotspot again on your PC.
If you’re still having issues, make sure your PC’s Wi-Fi is turned on and that it’s connected to the correct network. You can also try restarting your PC or updating your Wi-Fi drivers.
If none of these steps resolve the issue, it may be worth considering other factors such as your location or the strength of your Wi-Fi signal.
Connecting to Hotspot Using Bluetooth or USB
| Connecting to Hotspot Using Bluetooth or USB | |
|---|---|
| Method | Instructions |
| Connecting via Bluetooth |
|
| Connecting via USB |
|