Looking for ways to fix the 100% disk usage issue on Windows 10? Here are the top solutions to help you resolve this common problem.
Recently, Fortect has become increasingly popular as a reliable and efficient way to address a wide range of PC issues. It's particularly favored for its user-friendly approach to diagnosing and fixing problems that can hinder a computer's performance, from system errors and malware to registry issues.
- Download and Install: Download Fortect from its official website by clicking here, and install it on your PC.
- Run a Scan and Review Results: Launch Fortect, conduct a system scan to identify issues, and review the scan results which detail the problems affecting your PC's performance.
- Repair and Optimize: Use Fortect's repair feature to fix the identified issues. For comprehensive repair options, consider subscribing to a premium plan. After repairing, the tool also aids in optimizing your PC for improved performance.
Restart Your Device
1. Click on the Start menu and select the Power icon.
2. Choose Restart from the options provided.
3. Wait for your computer to fully shut down and then turn it back on.
Restarting your device can help clear any temporary glitches or issues that may be causing the high disk usage. This simple solution is often effective in resolving performance issues with your Windows 10 system.
If the problem persists after restarting your device, you may need to explore other troubleshooting methods to address the 100% disk usage.
Check and Update Windows 10
| Method | Description |
|---|---|
| 1. Check for Windows Updates | Ensure that your Windows 10 is up to date by checking for and installing any pending updates. |
| 2. Update Device Drivers | Outdated or corrupted device drivers can cause high disk usage. Update your drivers to the latest version. |
| 3. Disable Windows Search | Windows Search can sometimes cause high disk usage. Disable it temporarily to see if it helps. |
| 4. Check for Malware | Run a full system scan using Windows Defender or a third-party antivirus program to check for malware. |
| 5. Disable Superfetch Service | Superfetch is a Windows service that can sometimes lead to high disk usage. Disable it and see if it improves. |
Disable Startup Applications
1. Open Task Manager by pressing Ctrl + Shift + Esc.
2. Go to the “Startup” tab.
3. Right-click on the applications you want to disable and select “Disable.”
Update Device Drivers and Firmware
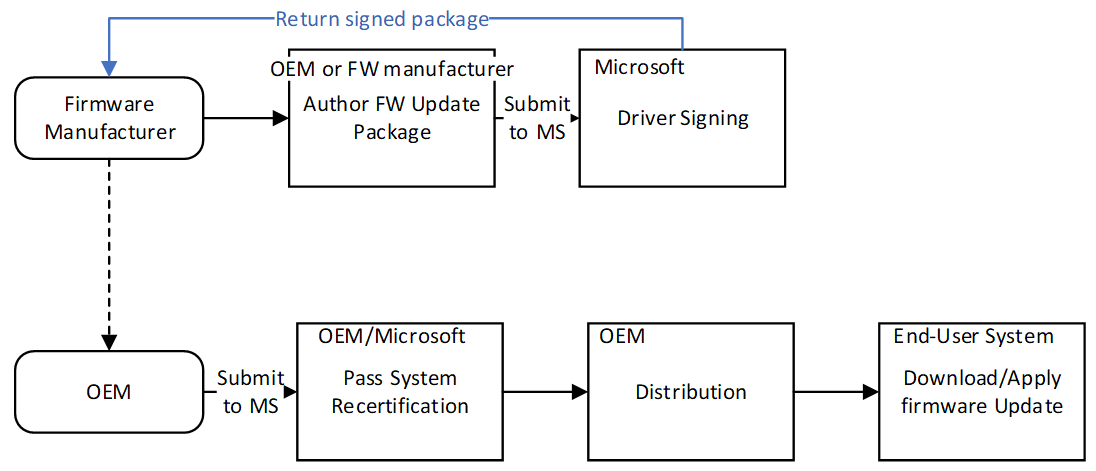
1. Update Device Drivers: Go to Device Manager by right-clicking on the Start menu and selecting it from the context menu. Look for any devices with a yellow exclamation mark, indicating outdated drivers. Right-click on the device and select “Update driver” to download and install the latest drivers from the manufacturer’s website.
2. Update Firmware: Firmware updates are essential for the proper functioning of hardware components. Check the manufacturer’s website for any available firmware updates for your hard drive or other devices. Follow the instructions provided to update the firmware.
Regularly updating device drivers and firmware can help resolve disk usage issues and improve overall system performance.
Run Antivirus Scans
Running an antivirus scan can help identify and remove any potential threats that may be causing the disk to run at full capacity. Scan your entire system thoroughly to ensure that all files and programs are checked for any malicious software.
If the antivirus scan detects any threats, make sure to quarantine or remove them immediately to prevent further damage to your system. It is also a good idea to run regular scans and keep your antivirus program up to date to ensure that your computer is protected from any new threats that may arise.
By running antivirus scans regularly, you can help prevent the 100% disk usage issue on Windows 10 and keep your system running smoothly. Make sure to schedule regular scans to ensure that your computer stays protected from potential threats.
Clear Temporary and Junk Files
1. Use Disk Cleanup: Right-click on the drive you want to clean up, select “Properties,” then click on “Disk Cleanup.” Check the boxes for the file types you want to delete, then click “OK.”
2. Clear Temporary Files: Press Windows key + R, type in “%temp%” and hit Enter. Select all files in the temp folder and delete them.
3. Clear Prefetch Files: Press Windows key + R, type in “Prefetch” and hit Enter. Select all files in the Prefetch folder and delete them.
Adjust Power Settings
1. Change Power Plan Settings: Go to Control Panel > Hardware and Sound > Power Options. Select the High performance plan to ensure your computer is running at its best performance.
2. Disable Windows Search: Press Windows key + R, type “services.msc” and hit Enter. Locate Windows Search, right-click, and select Properties. Change the Startup type to Disabled.
3. Turn Off Superfetch: Press Windows key + R, type “services.msc” and hit Enter. Find Superfetch, right-click, and choose Properties. Set the Startup type to Disabled.
4. Adjust Virtual Memory: Right-click on This PC, select Properties, then click on Advanced system settings. Under the Performance section, click Settings, go to the Advanced tab, and click Change. Uncheck “Automatically manage paging file size for all drives” and set a custom size.
Repair Disk Errors and Check Disk
Repair Disk Errors: To repair disk errors on Windows 10, you can use the built-in tool called Check Disk. This tool scans the disk for errors and fixes them to improve performance.
Check Disk: To run Check Disk, press the Windows key + X and select “Command Prompt (Admin)” to open an elevated Command Prompt window. Type “chkdsk /f /r” and press Enter to schedule a disk check on the next restart.
Restart: After scheduling the disk check, restart your computer to allow Check Disk to scan and repair any disk errors.
Wait: Depending on the size of your disk and the number of errors found, the disk check process may take some time to complete. It is important to let the process finish without interruptions.
Disable Superfetch and Windows Search
After disabling these processes, restart your computer to see if the disk usage has improved. If you’re still experiencing high disk usage, you may need to try other troubleshooting methods.
Modify Virtual Memory and Page Files
1. Right-click on the “This PC” icon on your desktop and select “Properties.”
2. Click on “Advanced system settings” on the left side of the window.
3. Under the “Advanced” tab, click on the “Settings” button under the “Performance” section.
4. In the new window, go to the “Advanced” tab and click on the “Change” button under the “Virtual memory” section.
5. Uncheck the box that says “Automatically manage paging file size for all drives.”
6. Select the drive you want to modify the page file for and click on “Custom size.”
7. Set the Initial size and Maximum size according to your system’s requirements (usually 1.5 times your RAM size).
8. Click on “Set” and then “OK” to save the changes.
9. Restart your computer for the changes to take effect.
Optimize Web Browser Settings
1. Clear browsing history, cache, and cookies regularly to free up disk space and improve performance.
2. Disable unnecessary browser extensions and plugins that may be consuming resources.
3. Adjust browser settings to limit the number of tabs open at once and prevent automatic loading of videos or ads.
Perform a Clean Boot and System Optimization
Performing a Clean Boot can help identify if a third-party application is causing the 100% disk usage issue on Windows 10. To do this, open the System Configuration tool by typing “msconfig” in the Windows search bar and selecting it from the results. Go to the “Services” tab, check the “Hide all Microsoft services” box, then click “Disable all”. Next, head to the “Startup” tab and click “Open Task Manager”. Disable all startup items and restart your computer.
System Optimization can also improve disk usage on Windows 10. Open the Task Manager by pressing Ctrl + Shift + Esc and go to the “Startup” tab. Disable unnecessary startup programs by right-clicking on them and selecting “Disable”. Additionally, you can optimize your system by running the built-in Disk Cleanup tool. Type “Disk Cleanup” in the Windows search bar, select the drive you want to clean up, and check the boxes for the types of files you want to remove.
By performing a Clean Boot and optimizing your system, you can potentially fix the 100% disk usage issue on Windows 10.
F.A.Qs
Why disk usage is high in Windows 10?
High disk usage in Windows 10 can be caused by various factors such as malware, corruption, power issues, physical damage, and other reasons. It is important to address disk errors promptly to prevent data loss. Windows 10 will typically alert you if it detects a hard disk problem.
Why is my disk running at 100%?
Your disk is running at 100% due to various factors such as multiple programs running simultaneously, a faulty hard drive, or malware operating in the background.