Before accessing the Logical Disk Manager, it is crucial to properly initialize the disk.
Recently, Fortect has become increasingly popular as a reliable and efficient way to address a wide range of PC issues. It's particularly favored for its user-friendly approach to diagnosing and fixing problems that can hinder a computer's performance, from system errors and malware to registry issues.
- Download and Install: Download Fortect from its official website by clicking here, and install it on your PC.
- Run a Scan and Review Results: Launch Fortect, conduct a system scan to identify issues, and review the scan results which detail the problems affecting your PC's performance.
- Repair and Optimize: Use Fortect's repair feature to fix the identified issues. For comprehensive repair options, consider subscribing to a premium plan. After repairing, the tool also aids in optimizing your PC for improved performance.
Understanding Disk Initialization
Before accessing a disk with Logical Disk Manager (LDM), it is important to initialize the disk. Disk initialization prepares the disk for use with LDM and allows it to be recognized by Microsoft Windows.
To initialize a disk, follow these steps:
1. Open Disk Management: Right-click the Start button, select “Disk Management” from the context menu.
2. Locate the disk: In the Disk Management window, locate the disk you want to initialize. It will be listed as “Unknown” and “Not Initialized”.
3. Initialize the disk: Right-click the disk and select “Initialize Disk” from the context menu.
4. Choose a partition style: Choose either the GUID Partition Table (GPT) or the Master Boot Record (MBR) partition style. GPT is recommended for disks larger than 2TB.
5. Initialize the disk: Select the partition style and click “OK” to initialize the disk.
6. Create partitions: After the disk is initialized, you can create partitions on it by right-clicking the unallocated space and selecting “New Simple Volume” or “New Spanned Volume”. Follow the prompts to create the desired partitions.
It’s important to note that initializing a disk will erase all existing data, so make sure to back up any important files before proceeding.
Initializing a Disk: MBR or GPT
When initializing a disk before accessing the Logical Disk Manager, you have the option to choose between two partitioning styles: Master Boot Record (MBR) and GUID Partition Table (GPT).
MBR: The MBR partitioning style has been widely used for many years and is compatible with all versions of Microsoft Windows. However, it has limitations, such as support for a maximum of 2 terabytes per disk and up to 4 primary partitions.
GPT: The GPT partitioning style is newer and offers several advantages over MBR. It supports disks larger than 2 terabytes, allows for an unlimited number of partitions, and provides better data recovery options. GPT is recommended for modern systems, especially those using UEFI firmware.
To initialize a disk with MBR or GPT, follow these steps:
1. Open Computer Management by right-clicking on the Start button and selecting Computer Management.
2. In the left pane, click on Disk Management under Storage.
3. Right-click on the disk you want to initialize and select Initialize Disk.
4. Choose the desired partition style: MBR or GPT.
5. Click OK to initialize the disk.
Before initializing a disk, make sure to back up any important data, as initializing a disk will erase all existing partitions and data on the disk.
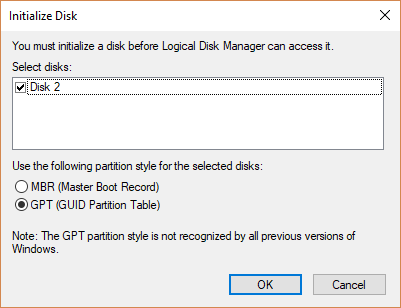
How to Initialize a Disk
- Open Windows Disk Management by right-clicking on the Start button and selecting Disk Management.
- If prompted by the User Account Control window, click Yes to grant administrative privileges.
- In the Disk Management window, locate the uninitialized disk. It will be marked as Unallocated and will not have a drive letter assigned.
- Right-click on the uninitialized disk and select Initialize Disk.
- In the Initialize Disk window, choose the appropriate disk to initialize. If there is only one disk, it will be selected by default.
- Select the desired partition style for the disk: MBR (Master Boot Record) or GPT (GUID Partition Table).
- Click OK to initialize the disk.
- Note: Initializing the disk will erase all data on the disk. Make sure to backup any important data before proceeding.
- Once the initialization process is complete, the disk will be marked as Online and will be ready for use.
python

import os
def initialize_disk(disk_path):
# Validate disk path
if not os.path.exists(disk_path):
print("Disk path does not exist.")
return
# Check if disk is already initialized
if is_disk_initialized(disk_path):
print("Disk is already initialized.")
return
# Perform disk initialization steps here
# ...
# Print success message
print("Disk initialized successfully.")
def is_disk_initialized(disk_path):
# Check if disk is already initialized by looking for specific indicators
# Return True if initialized, False otherwise
return False # Placeholder value
# Usage example
disk_path = "/dev/sdb" # Example disk path
initialize_disk(disk_path)
Recovering Missing Data after Disk Initialization
If you have accidentally initialized a disk before accessing it with Logical Disk Manager, you may think that your data is lost forever. However, there are steps you can take to recover your missing data.
1. Stop using the disk immediately. Continuing to use the disk can overwrite the data you are trying to recover, making it more difficult or even impossible to retrieve.
2. Do not format or reinitialize the disk. Formatting or reinitializing the disk will erase all data on it, making recovery impossible.
3. Use data recovery software. There are many data recovery software options available that can help you recover your missing data. These tools are designed to scan the disk and retrieve any recoverable files.
4. Consult a professional data recovery service. If you are unable to recover the data using software, or if the data is of critical importance, it may be necessary to seek the help of a professional data recovery service. These experts have specialized tools and techniques to recover data from even the most challenging situations.
Updating Disk Drivers
To ensure the smooth functioning of your disk drives, it’s important to keep your disk drivers up to date. Updated drivers can improve performance and fix any issues you may be experiencing. Here’s how you can update your disk drivers:
1. Open the Device Manager: From the Start menu, search for “Device Manager” and open it.
2. Locate your disk drive: Expand the “Disk drives” category to see a list of all your disk drives.
3. Update the driver: Right-click on the disk drive you want to update, and select “Update driver.”
4. Choose an update method: You can either choose to search automatically for updated driver software or browse your computer for driver software.
5. Follow the on-screen instructions: If you choose to search automatically, Windows will search for the latest driver software and install it. If you choose to browse, locate the driver software on your computer and follow the instructions to install it.
6. Restart your computer: After the driver update is complete, it’s recommended to restart your computer to ensure the changes take effect.
Reinstalling the “Not Initialized” Disk
If you have a “Not Initialized” disk, you will need to initialize it before you can access it with Logical Disk Manager. Initializing a disk is a simple process that can be done through Disk Management in Windows. Here’s how to do it:
1. Open Disk Management by pressing Windows key + X and selecting “Disk Management” from the menu that appears.
2. Locate the “Not Initialized” disk in the list of disks. It will be labeled as “Unknown” and will have a black bar indicating that it is not initialized.
3. Right-click on the “Not Initialized” disk and select “Initialize Disk” from the context menu.
4. In the Initialize Disk window, select the disk(s) you want to initialize. If you have multiple disks, make sure to select the correct one.
5. Choose the partition style for the disk. If the disk is 2TB or larger, select GPT. Otherwise, select MBR.
6. Click “OK” to initialize the disk. A progress bar will appear, and once it is complete, the disk will be labeled as “Online” and will have a blue bar indicating that it is initialized.
Now that the disk is initialized, you can create partitions and format them using Disk Management or File Explorer.
Reinstalling USB Controllers
If you’re experiencing issues with your USB controllers, reinstalling them can often help resolve the problem. Here’s how you can do it:
1. Press the Windows key + X on your keyboard to open the Power User Menu.
2. Select Device Manager from the list of options.
3. In the Device Manager window, expand the Universal Serial Bus controllers category.
4. Right-click on each USB controller listed and select Uninstall.
5. Once all the USB controllers have been uninstalled, restart your computer.
6. After the computer restarts, Windows will automatically reinstall the USB controllers.
7. To verify if the issue has been resolved, try connecting a USB device to your computer.
Modifying Registry Values
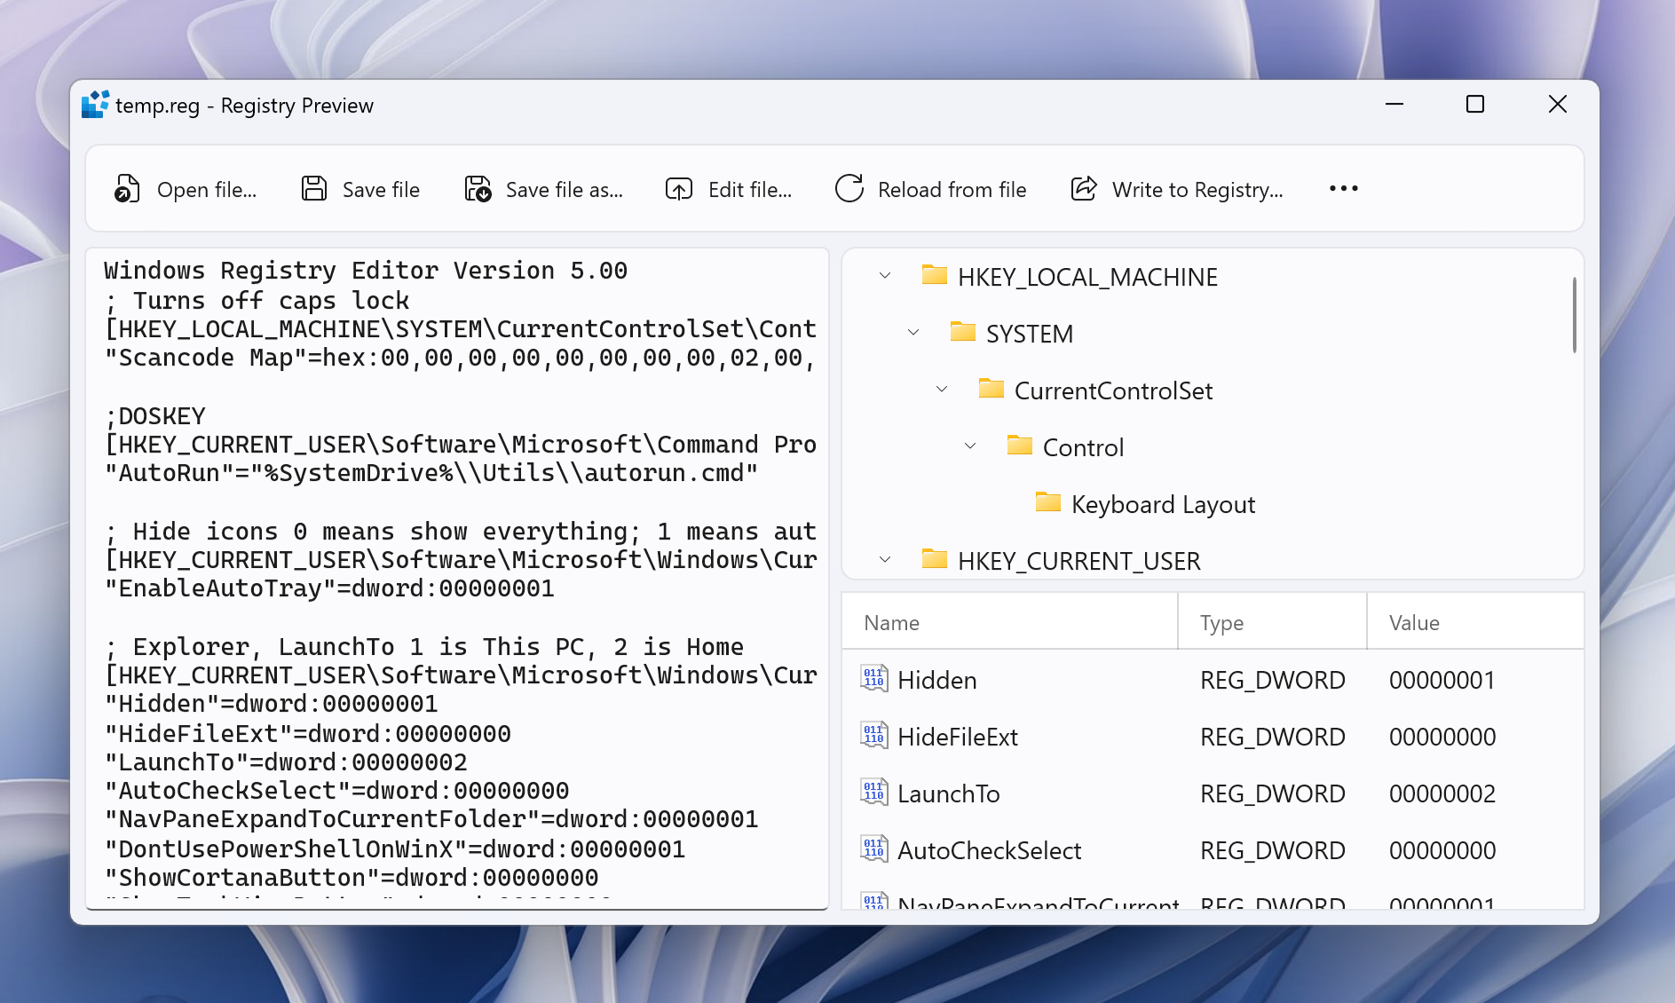
To initialize a disk before accessing it with Logical Disk Manager, you can modify registry values in Windows. This process is useful when you encounter issues with disk initialization or when you need to manually initialize a disk.
Before proceeding, please note that modifying the Windows Registry can have serious consequences if not done correctly. It is recommended to back up your registry or create a system restore point before making any changes.
To modify registry values for disk initialization:
1. Press the Windows key + R to open the Run dialog box.
2. Type regedit and press Enter to open the Registry Editor.
3. Navigate to the following registry key: HKEY_LOCAL_MACHINE\SYSTEM\CurrentControlSet\Services\Disk\Enum.
4. In the Enum folder, you will find a list of disk devices. Identify the disk you want to initialize by checking the device descriptions, such as the disk size or manufacturer.
5. Right-click on the disk device and select Permissions.
6. In the Permissions window, click on Advanced.
7. In the Advanced Security Settings window, click on Change next to the Owner.
8. Enter your username in the Enter the object name to select field and click Check Names. Once your username is verified, click OK.
9. Back in the Permissions window, select your username and check the box for Full Control under the Allow column.
10. Click OK to apply the changes and close the Permissions window.
11. Close the Registry Editor.
After modifying the registry values, you can now initialize the disk using the Logical Disk Manager or other disk management tools in Windows. Remember to exercise caution when making changes to the registry to avoid unintended consequences and potential data loss.
For more detailed instructions or troubleshooting steps, please refer to the official Microsoft documentation or seek assistance from Microsoft support.
Resetting CMOS Settings and Checking for Bad Sectors
To reset CMOS settings, start by shutting down your computer and disconnecting the power cable. Locate the CMOS battery on your motherboard and carefully remove it. Wait for about 5 minutes before reinserting the battery. This will reset the BIOS settings to their default values. Reconnect the power cable and start your computer to see if the issue is resolved.
To check for bad sectors, open File Explorer and right-click on the disk you want to check. Select “Properties” and go to the “Tools” tab. Click on the “Check” button under the “Error checking” section. This will scan the disk for bad sectors and attempt to repair any issues it finds.


