In the realm of Windows 10, the Storage Service plays a crucial role in managing disk usage. However, encountering high disk usage can be a frustrating roadblock. Fear not! This article unveils the top 12 solutions that will help you tackle this issue head-on, ensuring a seamless computing experience.
Recently, Fortect has become increasingly popular as a reliable and efficient way to address a wide range of PC issues. It's particularly favored for its user-friendly approach to diagnosing and fixing problems that can hinder a computer's performance, from system errors and malware to registry issues.
- Download and Install: Download Fortect from its official website by clicking here, and install it on your PC.
- Run a Scan and Review Results: Launch Fortect, conduct a system scan to identify issues, and review the scan results which detail the problems affecting your PC's performance.
- Repair and Optimize: Use Fortect's repair feature to fix the identified issues. For comprehensive repair options, consider subscribing to a premium plan. After repairing, the tool also aids in optimizing your PC for improved performance.
Understanding Service Host Local System High Disk Usage
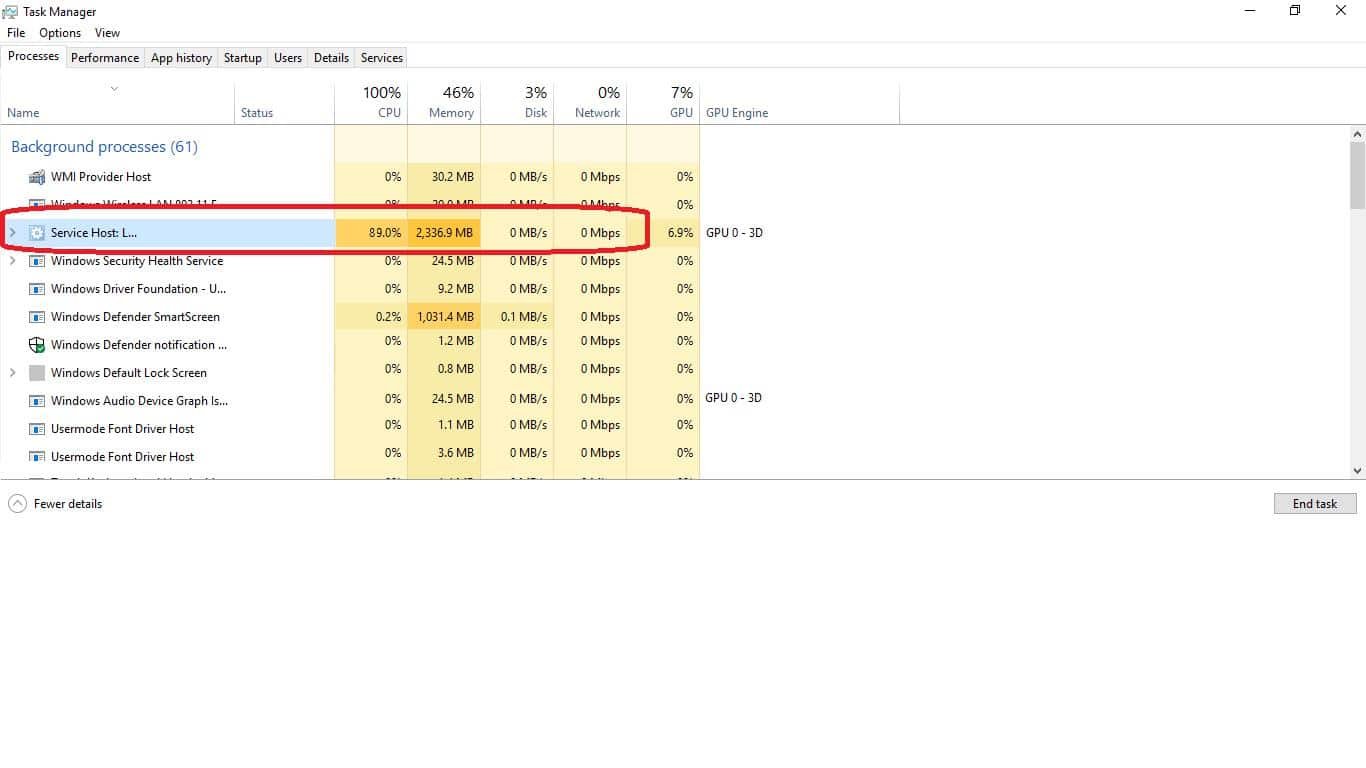
1. Identify the problem service: Open Task Manager by pressing the Windows key + X and selecting Task Manager. Look for the Service Host process that is causing high disk usage.
2. Restart the problem service: Right-click on the identified Service Host process in Task Manager and select Restart.
3. Disable Windows Auto Update: Open the Settings app and go to Update & Security > Windows Update. Click on Advanced options and disable the “Automatic updates” toggle.
4. Clear temporary files and cookies: Open the Settings app and go to System > Storage. Click on the “Temporary files” option and delete the files.
5. Scan for malware: Run a full scan using Windows Defender or any third-party antivirus software to detect and remove any malicious programs.
6. Disable unnecessary startup programs: Press the Windows key + R, type “msconfig,” and press Enter. In the System Configuration window, go to the Startup tab and uncheck unnecessary programs.
7. Check for hardware issues: Ensure that your hard drive is properly connected and functioning correctly. Consider running a disk check using the Command Prompt.
8. Update device drivers: Visit the manufacturer’s website and download the latest drivers for your hardware components.
9. Adjust virtual memory: Press the Windows key + X, select System, and go to Advanced system settings. Under the Performance section, click on Settings, go to the Advanced tab, and click on Change. Uncheck the “Automatically manage paging file size for all drives” option and set a custom size.
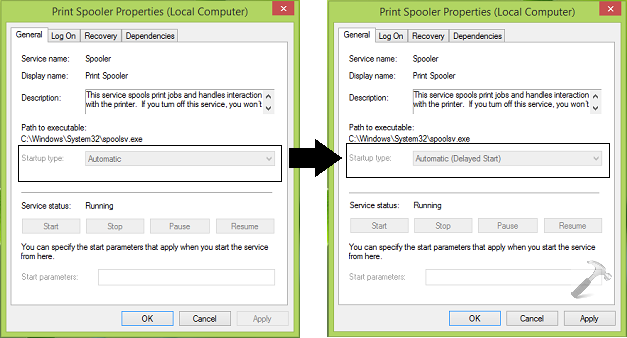
10. Disable unnecessary services: Press the Windows key + R, type “services.msc,” and press Enter. Disable services that you don’t need by right-clicking on them and selecting Properties.
11. Perform a system restore: If the issue started recently, consider restoring your system to a previously saved restore point.
12. Upgrade to Windows 11: If all else fails, upgrading to Windows 11 may resolve the high disk usage issue, as it comes with improved performance and optimization.
Resolving Service Host Local System High Disk Usage
If you’re experiencing high disk usage due to the Service Host Local System process in Windows 10, we’ve got you covered with 12 solutions to help resolve the issue.
1. Check for Windows Auto Updates: Make sure your Windows 10 is up to date to avoid any potential errors or bugs.
2. Scan for Malware: Run a full system scan using Windows Defender or a trusted antimalware program to eliminate any potential threats.
3. Disable Superfetch: Disable the Superfetch service to free up disk space and improve system performance.
4. Reset Virtual Memory: Adjust your virtual memory settings to optimize disk usage.
5. Disable Windows Search: Temporarily disable the Windows Search service to see if it improves disk usage.
6. Disable Windows Tips and Notifications: Turn off Windows tips and notifications to reduce background processes.
7. Disable Runtime Broker: Disable the Runtime Broker process to alleviate high disk usage.
8. Clear Temporary Files: Delete temporary files and clear your disk space to improve performance.
9. Disable OneDrive Sync: Pause or disable OneDrive sync to reduce disk activity.
10. Update Device Drivers: Ensure all your device drivers are up to date to avoid any compatibility issues.
11. Disable Windows Update Delivery Optimization: Turn off Windows Update Delivery Optimization to prevent excessive disk usage.
12. Limit Background Apps: Limit the number of background apps running to reduce disk usage.
Try these solutions to resolve the high disk usage issue and improve the performance of your Windows 10 device.
Optimizing System Performance for High Disk Usage
To optimize system performance for high disk usage in Windows 10 Storage Service, follow these top 12 solutions:
1. Identify resource-hungry processes: Use the Task Manager to determine which processes are consuming excessive CPU or disk resources.
2. Disable unnecessary startup programs: Open the Task Manager’s Startup tab and disable programs that are not essential.
3. Update device drivers: Outdated drivers can cause high disk usage. Visit your device manufacturer’s website to download and install the latest drivers.
4. Disable Windows Auto Update: This can consume significant resources. Go to Settings > Update & Security > Windows Update > Advanced Options and disable automatic updates.
5. Run a disk cleanup: Use the built-in Disk Cleanup tool to remove unnecessary files and free up disk space.
6. Scan for malware: Run a full scan using Windows Defender or a reliable antivirus program to detect and remove any malware or viruses.
7. Disable Superfetch and Windows Search: These services can sometimes cause high disk usage. Disable them by opening the Services dialog and stopping the Superfetch and Windows Search services.
8. Adjust virtual memory settings: Virtual memory can contribute to high disk usage. To optimize it, go to Control Panel > System > Advanced System Settings > Performance > Settings > Advanced > Change, and adjust the virtual memory size.
9. Disable background apps: Go to Settings > Privacy > Background Apps and toggle off the apps that are not necessary.
10. Clear browser cookies: Browser cookies can accumulate and slow down disk access. Clear them regularly in your browser settings.
11. Check for disk errors: Use the built-in Error Checking tool to scan and fix any disk errors that could be contributing to high disk usage.
12. Upgrade your hardware: If none of the above solutions resolve the issue, consider upgrading your computer’s hardware, such as adding more RAM or replacing the hard drive with a solid-state drive (SSD).
Optimizing system performance for high disk usage can improve the overall responsiveness and speed of your Windows 10 system.
python

import os

import psutil
def get_disk_usage(path):
total, used, free = psutil.disk_usage(path)
return total, used, free
if __name__ == "__main__":
storage_path = "/path/to/storage"
total_size, used_size, free_size = get_disk_usage(storage_path)
print(f"Total: {total_size / (1024 ** 3)} GB")
print(f"Used: {used_size / (1024 ** 3)} GB")
print(f"Free: {free_size / (1024 ** 3)} GB")
This code utilizes the psutil library to retrieve disk usage information for a specific storage path. It calculates the total, used, and free disk space in gigabytes (GB) and prints the results.
Keep in mind that this is just a basic example and might not work directly with your specific storage service. You may need to adapt the code to use the appropriate APIs or methods provided by your storage service provider.
Disabling Service Host Local System Tasks
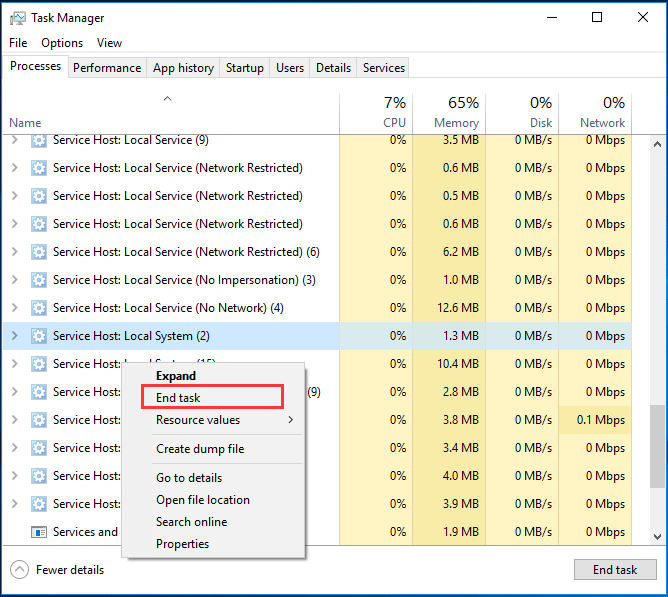
- Open Task Manager by pressing Ctrl+Shift+Esc.
- In the Processes tab, locate the Service Host: Local System tasks.
- Right-click on each Service Host: Local System task and select End Task to stop them temporarily.
- Open the Services tab in Task Manager by clicking on the Services button at the bottom.
- Scroll down and find the Service Host: Local System tasks in the list.
- Right-click on each Service Host: Local System task and select Properties.
- In the Properties window, set the Startup type to Disabled.
- Click Apply and then OK to save the changes.
- Repeat steps 6-8 for all Service Host: Local System tasks.
- Restart your computer to apply the changes.
Managing Backup and Transfer Services for High Disk Usage
To effectively manage high disk usage in Windows 10 Storage Service, follow these steps:
1. Identify the main culprits: Use the Task Manager to identify CPU-intensive processes and system services that contribute to high disk usage. Look out for processes like “Antimalware Service Executable” or “Service Host Network Service” that may be consuming excessive resources.
2. Optimize system processes: Disable unnecessary startup programs and services to reduce disk usage. Open the Task Manager, go to the “Startup” tab, and disable any unwanted programs from launching at startup.
3. Utilize backup and transfer services: Regularly backup your important files and transfer them to external storage or cloud services. This frees up disk space and ensures data safety.
4. Manage privacy and consent settings: Adjust privacy settings to control data processing and sharing. Go to Settings > Privacy and review the options for various apps and system features.
5. Maintain system hygiene: Perform regular disk cleanup and defragmentation to remove unnecessary files and optimize disk performance. Use the built-in Disk Cleanup tool or third-party software for this purpose.
By implementing these solutions, you can effectively manage high disk usage in Windows 10 Storage Service, ensuring smooth operation and better system performance.
Enhancing Hard Drive Health and System Optimization
In this article, we will provide you with the top 12 solutions to address high disk usage in the Windows 10 Storage Service. These solutions will help improve your hard drive health and optimize your system for better performance.
One of the first steps you can take is to identify any system processes that may be causing the high disk usage. Use the Task Manager to check for any processes that are consuming too much disk space.
Next, you can optimize your system by disabling unnecessary startup programs and services. This will free up resources and reduce disk usage.
Another solution is to scan your computer for malware using a reliable antivirus program. Malware can often cause high disk usage, so it’s important to regularly scan and remove any threats.
Additionally, you can clean up your hard drive by deleting unnecessary files and folders. Use the built-in Disk Cleanup tool to remove temporary files, old system files, and other unnecessary data.
If you are experiencing issues with specific apps or programs, try updating or reinstalling them. Outdated or corrupted software can contribute to high disk usage.
Furthermore, check for any system updates that may be available. These updates often include bug fixes and performance improvements that can help reduce disk usage.
It’s also important to manage your browser settings to prevent excessive disk usage. Clear your browsing history, disable unnecessary extensions, and limit the number of open tabs.
To optimize disk usage, minimize the number of running processes and close any unnecessary background applications. This will help reduce the strain on your hard drive.
If you are using a laptop, consider adjusting your power settings to a more balanced or power-saving mode. This can help reduce disk usage and extend battery life.
Lastly, be cautious when installing third-party software or downloading from untrusted sources. Some programs may bundle unwanted applications or malware that can cause high disk usage.
By following these solutions, you can enhance your hard drive health and optimize your system for improved performance. Remember to regularly monitor your disk usage to catch any potential issues early on.
For more detailed instructions on each solution, please refer to the link provided in the article.
Promoting Privacy and Transparency in Storage Services
When it comes to storage services, privacy and transparency are of utmost importance. At Microsoft, we understand the need to protect the data and information of our users. That’s why we have taken steps to ensure that your privacy is safeguarded and that you have complete visibility into how your data is being used.
To promote privacy, we have implemented measures that give you control over your data. You can manage your privacy settings by going to the Privacy section in the Settings menu. Here, you can choose what data is collected and shared with our partners, ensuring that your personal information remains secure.
In addition, we believe in being transparent about our data usage practices. We provide detailed information about the type of data we collect, how it is used, and who it is shared with. This can be found in the Privacy section as well, under Data Collection and Usage.
By promoting privacy and transparency, we empower computer users like you to make informed decisions about your data. We value your trust and strive to protect your privacy every step of the way.