Introducing a Game-Changing Solution: Halting the Windows Module Installer
Recently, Fortect has become increasingly popular as a reliable and efficient way to address a wide range of PC issues. It's particularly favored for its user-friendly approach to diagnosing and fixing problems that can hinder a computer's performance, from system errors and malware to registry issues.
- Download and Install: Download Fortect from its official website by clicking here, and install it on your PC.
- Run a Scan and Review Results: Launch Fortect, conduct a system scan to identify issues, and review the scan results which detail the problems affecting your PC's performance.
- Repair and Optimize: Use Fortect's repair feature to fix the identified issues. For comprehensive repair options, consider subscribing to a premium plan. After repairing, the tool also aids in optimizing your PC for improved performance.
Understanding the Windows Modules Installer Worker
The Windows Modules Installer Worker is a service in Windows 10 that helps with the installation and maintenance of system updates. It runs in the background, and in some cases, it may use a significant amount of CPU power, causing your computer to slow down or overheat.
To address high CPU usage by the Windows Modules Installer Worker, here are a few solutions you can try:
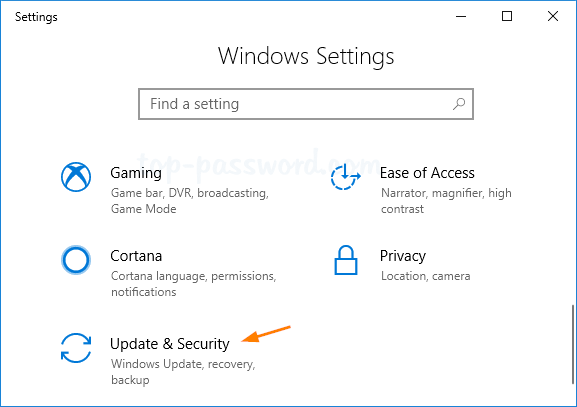
1. Check for Windows updates: Make sure your computer is up to date by going to Settings > Update & Security > Windows Update.
2. Run the System File Checker: Open the Command Prompt as an administrator and type “sfc /scannow” to scan and repair any corrupted system files.
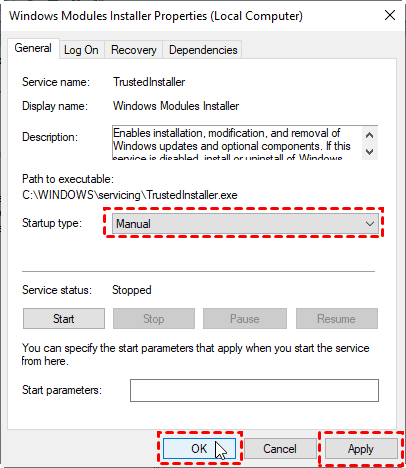
3. Disable the Windows Modules Installer Worker: Open the Services window by pressing Windows + R, typing “services.msc,” and pressing Enter. Locate the “Windows Modules Installer” service, right-click on it, and select “Properties.” Change the startup type to “Disabled” and click “OK.”
Disabling the Windows Modules Installer Worker
To stop the Windows Module Installer Worker and resolve high CPU usage issues, you can follow these steps:
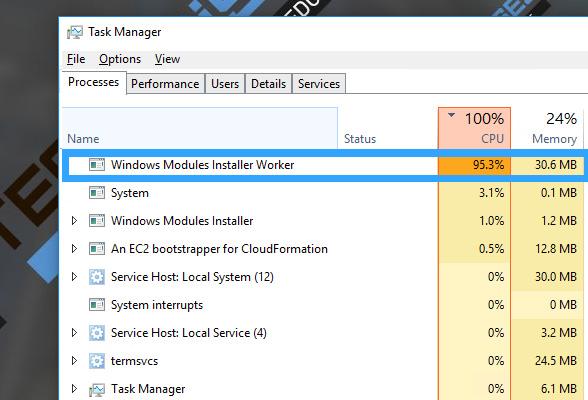
1. Open the Task Manager by pressing Ctrl + Shift + Esc or right-clicking on the taskbar and selecting Task Manager.
2. Click on the “Processes” or “Details” tab, depending on your version of Windows.
3. Look for the “Windows Modules Installer Worker” or “TiWorker.exe” process.
4. Right-click on the process and select “End Task” or “End Process Tree.”
5. If prompted, click “End Process” or “End Process Tree” again to confirm.
6. Check if the CPU usage has decreased. If not, continue to the next step.
7. Press the Windows key + R to open the Run dialog box.
8. Type “services.msc” and press Enter to open the Services window.
9. Scroll down and double-click on “Windows Modules Installer” or “Windows Update Service.”
10. In the General tab, click on the “Stop” button to disable the service temporarily.
11. Click on “Apply” and then “OK” to save the changes.
12. Restart your computer to apply the changes.
Is the Windows Modules Installer Worker necessary?
The Windows Modules Installer Worker is a necessary component for your Windows operating system. It is responsible for installing, modifying, and removing Windows updates and system components. However, in some cases, it can cause high CPU usage, which may slow down your PC.
If you are experiencing this issue, there are a few solutions you can try to stop the Windows Module Installer:
1. Method 1: Use the Windows Update Service troubleshooter to identify and fix any issues with the Windows Update Service. This can be accessed through the Control Panel.
2. Method 2: Run the System File Checker tool to scan and repair any corrupted system files. Open the Command Prompt as an administrator and type “sfc /scannow” without the quotes, then press Enter.
3. Method 3: Disable the Windows Modules Installer Worker temporarily by stopping the “TrustedInstaller” service. Open the Services window, locate the service, right-click on it, and select “Stop.”
Remember, these methods may vary depending on your version of Windows. It’s always a good idea to back up your important data before making any changes to your system.
Fixing high CPU usage caused by the Windows Modules Installer Worker
If you are experiencing high CPU usage caused by the Windows Modules Installer Worker, here are some methods to help resolve the issue.
Method 1: Restart the Windows Modules Installer service.
1. Press Windows key + R, type “services.msc” and hit Enter.
2. Scroll down and find “Windows Modules Installer” service.
3. Right-click on it and select “Restart”.
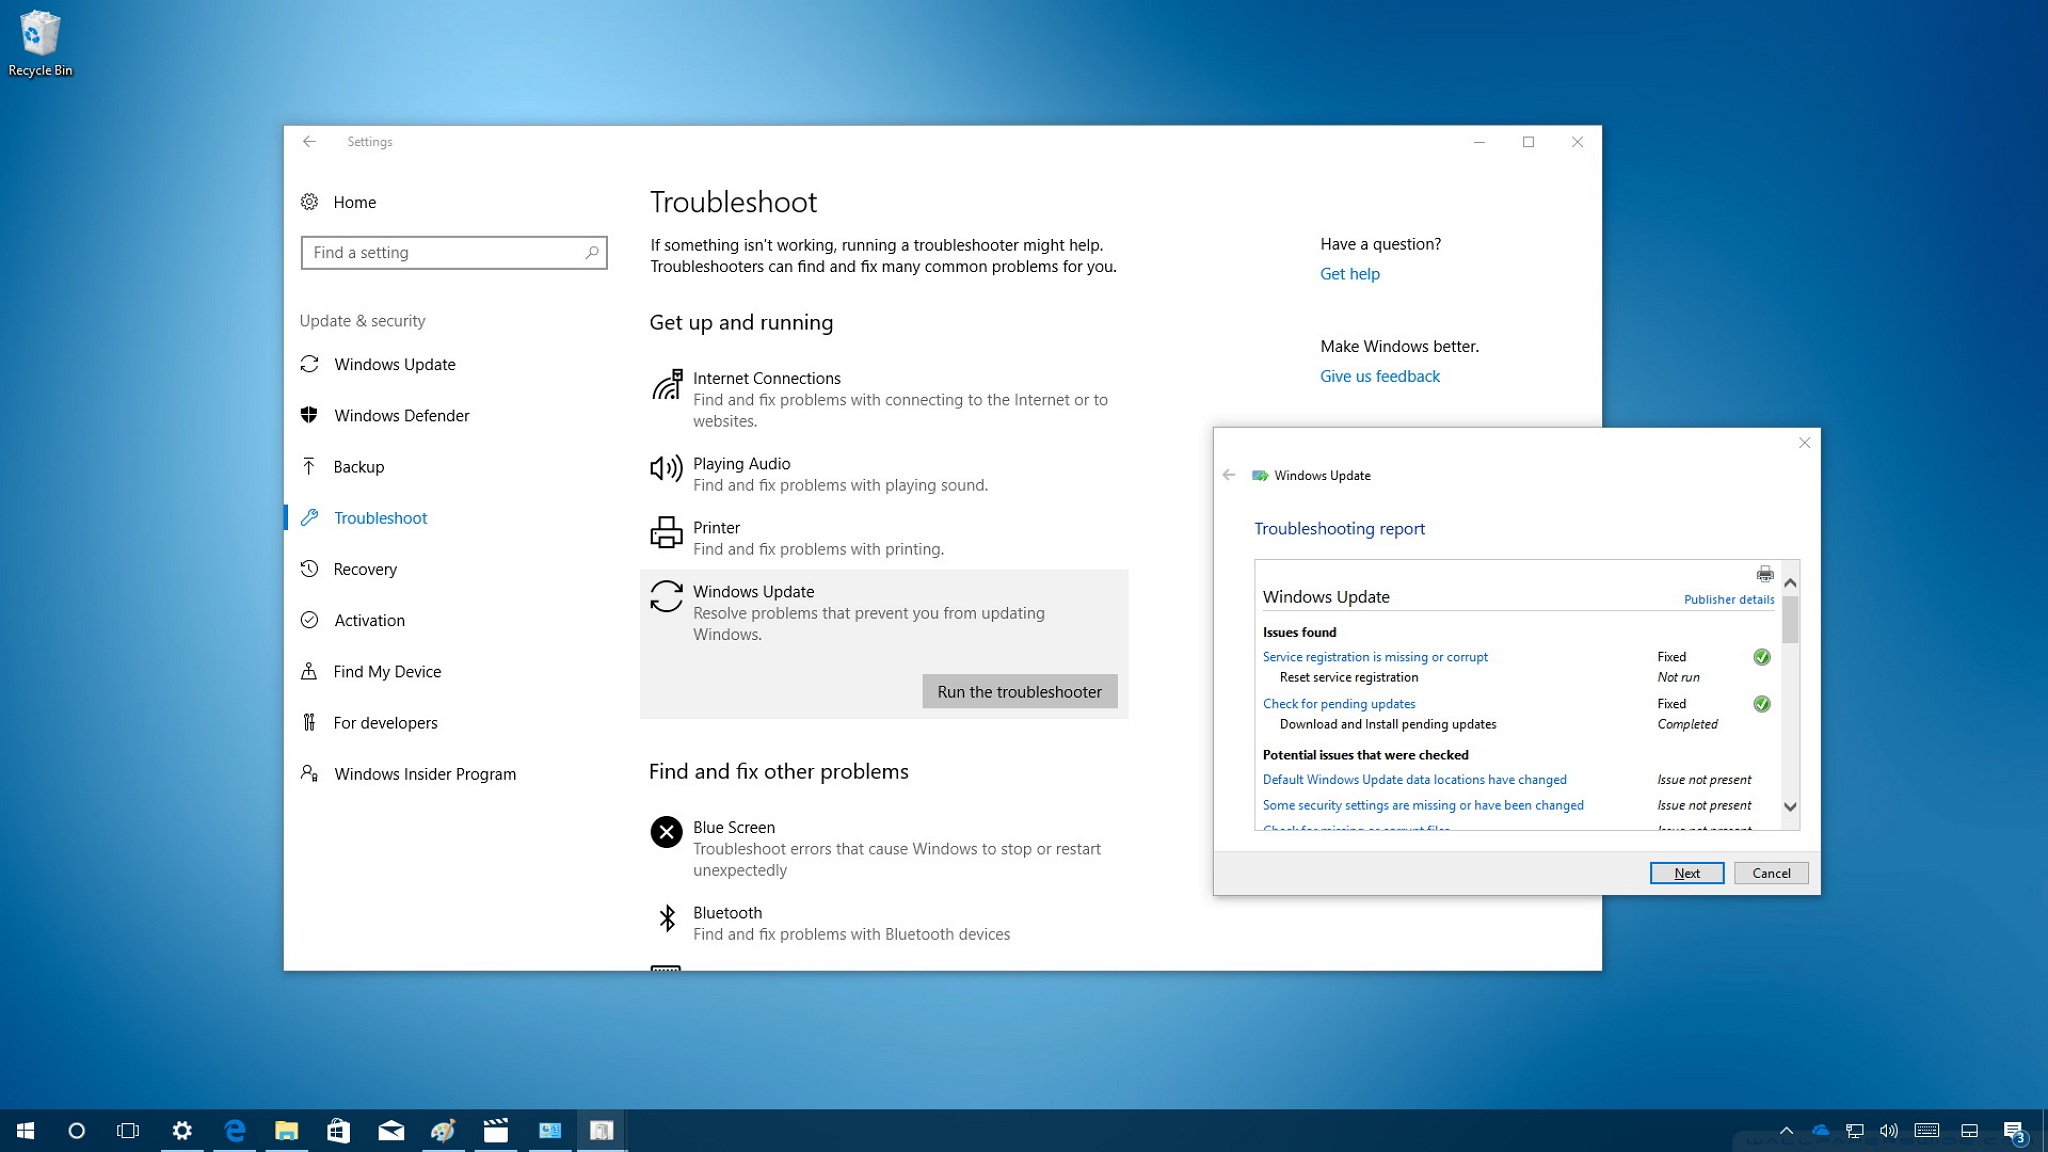
Method 2: Run the Windows Update Troubleshooter.
1. Press Windows key + I to open the Settings app.
2. Go to Update & Security > Troubleshoot.
3. Click on “Windows Update” and then select “Run the troubleshooter”.
Method 3: Check for malware or viruses.
1. Use a trusted antivirus tool to scan your PC for any malware or viruses.
2. Remove any threats found and restart your PC.
Method 4: Disable Windows automatic updates temporarily.
1. Press Windows key + R, type “services.msc” and hit Enter.
2. Scroll down and find “Windows Update” service.
3. Right-click on it and select “Properties”.
4. Set the Startup type to “Disabled” and click OK.
Method 1: Stopping and disabling the Windows Update service
To stop and disable the Windows Update service, follow these steps:
1. Press the Windows key + R to open the Run dialog box.
2. Type “services.msc” and press Enter to open the Services window.
3. Scroll down and locate “Windows Update” in the list of services.
4. Right-click on “Windows Update” and select “Properties.”
5. In the Properties window, select the “General” tab.
6. Change the startup type to “Disabled.”
7. Click on the “Stop” button to immediately stop the service.
8. Click “Apply” and then “OK” to save the changes.
This will prevent Windows from automatically downloading and installing updates. Keep in mind that disabling updates can leave your system vulnerable to security risks, so it’s important to regularly check for updates and enable them when necessary.
Method 2: Adjusting Internet settings for Wi-Fi networks
Method 2: Adjusting Internet Settings for Wi-Fi Networks
To stop the Windows Module Installer from causing high CPU usage or overheating on your Windows 10 device, you can try adjusting your internet settings. Here’s how to do it:
1. Open the Start menu and type “Control Panel” to search for it. Open the Control Panel.
2. In the Control Panel, click on “Network and Internet” and then “Internet Options.”
3. In the Internet Properties window, go to the “Connections” tab and click on “LAN settings.”
4. In the LAN settings, uncheck the box that says “Automatically detect settings.”
5. Click “OK” to save the changes and close the window.
6. Restart your device for the changes to take effect.
Adjusting your internet settings can help resolve issues with the Windows Module Installer and improve your overall system performance. Give it a try and see if it makes a difference.
Note: If you’re unsure about making these changes, it’s always a good idea to consult with a trusted IT professional or refer to the official Microsoft support documentation for further assistance.
Method 3: Adjusting Internet settings for Ethernet networks
To adjust Internet settings for Ethernet networks, follow these steps:
1. Open the Control Panel by pressing the Windows key + X and selecting “Control Panel” from the menu.
2. Click on “Network and Internet” and then “Internet Options”.
3. In the Internet Properties window, go to the “Connections” tab.
4. Click on the “LAN settings” button.
5. In the LAN Settings window, uncheck the box that says “Automatically detect settings”.
6. Check the box that says “Use a proxy server for your LAN”.
7. Enter the proxy server address and port number provided by your network administrator.
8. Click “OK” to save the changes and close the windows.
Adjusting the Internet settings for Ethernet networks can help resolve issues related to the Windows Module Installer.
Additional methods to fix high CPU usage caused by the Windows Modules Installer Worker
- Open Task Manager by pressing Ctrl+Shift+Esc.
- Click on the Processes tab.
- Scroll down and locate Windows Modules Installer Worker in the list of processes.
- Right-click on Windows Modules Installer Worker and select End Task.
- Click on the Services tab.
- Scroll down and find the Windows Modules Installer service.
- Right-click on Windows Modules Installer and select Properties.
- In the Properties window, change the Startup type to Disabled.
- Click Apply and then OK.
Method 2: Run Windows Update Troubleshooter
- Press Win+I to open the Settings app.
- Click on Update & Security.
- In the left sidebar, select Troubleshoot.
- Scroll down and click on Windows Update.
- Click on the Run the troubleshooter button.
- Follow the on-screen instructions to complete the troubleshooting process.
- Restart your computer and check if the high CPU usage issue is resolved.
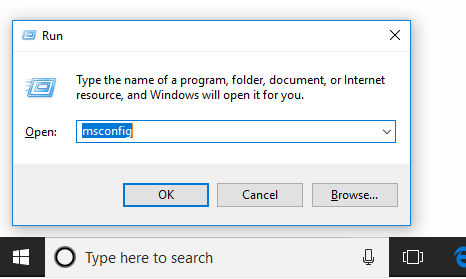
Method 3: Perform a Clean Boot
- Press Win+R to open the Run dialog box.
- Type msconfig and press Enter.
- In the System Configuration window, go to the Services tab.
- Check the box next to Hide all Microsoft services.
- Click on Disable all.
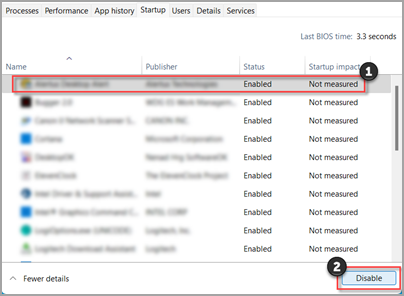
- Go to the Startup tab.
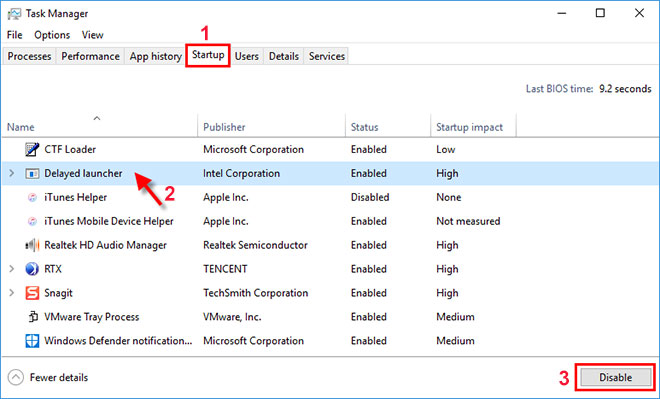
- Click on Open Task Manager.
- In the Task Manager, disable all the startup programs by right-clicking on each one and selecting Disable.
- Close the Task Manager and go back to the System Configuration window.
- Click Apply and then OK.
- Restart your computer and check if the high CPU usage issue is resolved.
Conclusion and final considerations
Conclusion and Final Considerations:
In conclusion, stopping the Windows Module Installer can be a beneficial choice for users experiencing high CPU usage due to driver updates or other reasons. By following the steps outlined in this article, you can easily disable the Windows Module Installer service and prevent it from running in the background.
Remember, it’s important to exercise caution when making changes to your operating system. Make sure to create a system restore point before making any modifications.
If you’re unsure about disabling the Windows Module Installer, it’s always a good idea to seek the advice of a trusted professional or consult Microsoft support.
By taking action to stop the Windows Module Installer, you can improve your system’s CPU performance and prevent overheating issues. This can lead to a smoother and more efficient computing experience.
Thank you for reading this article and we hope it has provided helpful information to address your concerns regarding the Windows Module Installer.
Bonus Tip: Keep your system updated regularly to ensure you have the latest security patches and bug fixes. Regular system updates can help prevent viruses and improve overall system performance.
If you have any further questions or need more information, don’t hesitate to reach out to our support team.