In my search per a solution to the “MSVCR120.dll Not Designed to Run on Windows” error, I discovered a straightforward fix that I want to share.
Recently, Fortect has become increasingly popular as a reliable and efficient way to address a wide range of PC issues. It's particularly favored for its user-friendly approach to diagnosing and fixing problems that can hinder a computer's performance, from system errors and malware to registry issues.
- Download and Install: Download Fortect from its official website by clicking here, and install it on your PC.
- Run a Scan and Review Results: Launch Fortect, conduct a system scan to identify issues, and review the scan results which detail the problems affecting your PC's performance.
- Repair and Optimize: Use Fortect's repair feature to fix the identified issues. For comprehensive repair options, consider subscribing to a premium plan. After repairing, the tool also aids in optimizing your PC for improved performance.
Reinstall Visual C++ Redistributable Packages
If you are encountering the error message “MSVCR120.dll not designed to run on Windows,” you may need to reinstall the Visual C++ Redistributable Packages on your system. Here’s how you can fix this issue:
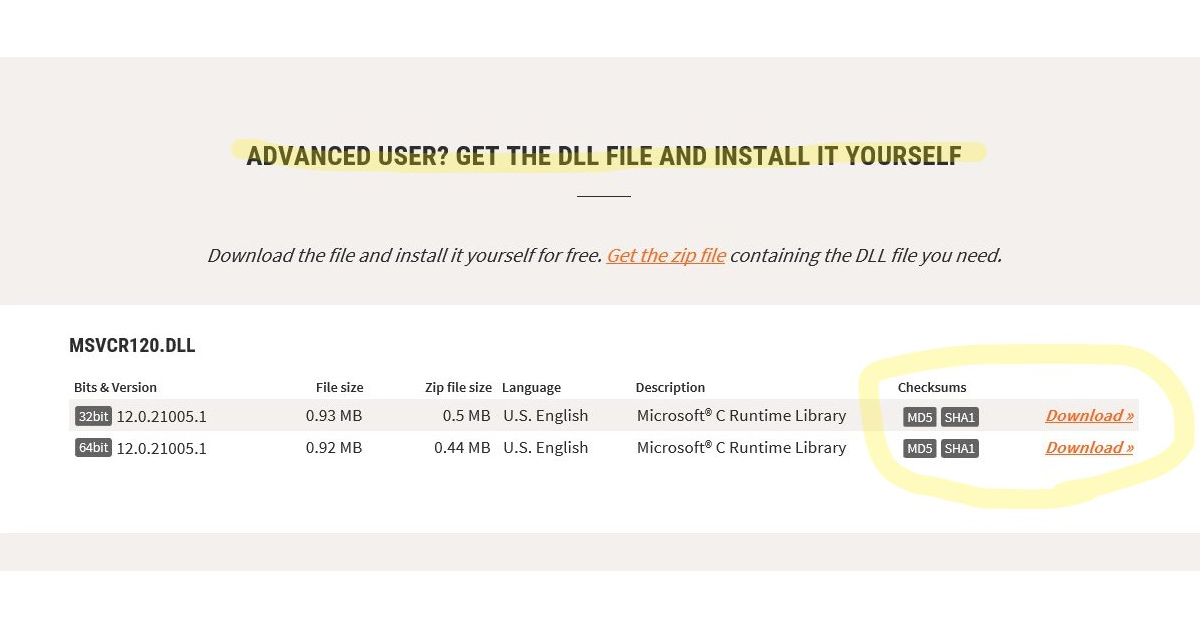
1. Download the Visual C++ Redistributable Packages: Visit the Microsoft website and download the Visual C++ Redistributable Packages that are compatible with your operating system. Make sure to choose the correct version for your system, whether it’s 32-bit or 64-bit.
2. Uninstall the existing Visual C++ Redistributable Packages: Go to the Control Panel on your computer and navigate to the Programs and Features section. Look for any existing Visual C++ Redistributable Packages and uninstall them.
3. Install the downloaded Visual C++ Redistributable Packages: Double-click on the downloaded file to start the installation process. Follow the on-screen instructions to complete the installation. Make sure to restart your computer after the installation is finished.
If the issue persists after reinstalling the Visual C++ Redistributable Packages, you may want to run a System File Checker scan to check for any corrupted system files. Additionally, it’s important to ensure that your computer is free from viruses and malware by running a full scan with your antivirus software.
Conduct a Clean Installation of the Program
1. Uninstall the program causing the error by going to the Control Panel, selecting “Uninstall a program,” and then choosing the program in question to uninstall it completely.
2. Download the latest version of the program from the official website or a trusted source to ensure you have the most up-to-date and compatible version.
3. Run a system file checker scan to check for any corrupted or missing system files that could be causing the error. Open Command Prompt as an administrator and type “sfc /scannow” to start the scan.
4. Check for computer viruses or malware that could be affecting the program. Use your antivirus software to run a full scan of your system and remove any threats that are detected.
5. Install the program again by double-clicking on the downloaded file and following the on-screen instructions for a clean installation.
6. Restart your computer after the installation is complete to ensure the changes take effect.
Utilize System File Checker (SFC) Scan
- Open Command Prompt as an administrator by searching for it in the Windows search bar, right-clicking on it, and selecting Run as administrator.
- Type sfc /scannow in the Command Prompt window and press Enter to initiate the System File Checker scan.
- Wait for the scan to complete. This process may take some time, so be patient and do not interrupt it.
- After the scan is finished, restart your computer to apply any repairs that were made by the System File Checker.
Execute a System Virus Scan
1. Open your antivirus program by double-clicking on the icon located on your desktop or by accessing it through the Start menu.
2. Initiate a full system scan by selecting the option within your antivirus program. This will allow the software to thoroughly examine all files and folders on your computer for any potential threats.
3. Wait for the scan to complete, as this process may take some time depending on the size of your hard drive and the number of files being scanned.
4. Review the scan results once the scan is finished. If any viruses or malware are detected, follow the prompts provided by your antivirus program to remove or quarantine the threats.
5. Restart your computer to ensure that any malicious software has been effectively removed from your system.
By performing a system virus scan, you can proactively protect your computer from potential security threats and ensure that it continues to operate smoothly.
If you are experiencing issues with the MSVCR120.dll file not being designed to run on Windows, it is recommended to also consider updating your operating system and ensuring that all necessary software updates are installed. This can help resolve compatibility issues and prevent future errors from occurring.
F.A.Q.
How do you fix msvcp140 dll is either not designed to run on Windows or it contains an error?
To fix the error “msvcp140.dll is either not designed to run on Windows or it contains an error,” try reinstalling the Microsoft Visual C++ Redistributables on your PC. You can find and download this file online, then restart your computer after installation.
How to install MSVCP120 dll in Windows 11?
To install MSVCP120 dll in Windows 11, you can navigate to the system32 folder and copy the appropriate 64-bit or 32-bit file into it.