Unraveling the intricate puzzle of memory corruption, the article dives into the depths of the notorious “Fix Special Pool Detected Memory Corruption” issue. Delving into the complexities of this problem, this article seeks to shed light on the causes behind it and provide effective solutions to restore stability and harmony to your system.
Recently, Fortect has become increasingly popular as a reliable and efficient way to address a wide range of PC issues. It's particularly favored for its user-friendly approach to diagnosing and fixing problems that can hinder a computer's performance, from system errors and malware to registry issues.
- Download and Install: Download Fortect from its official website by clicking here, and install it on your PC.
- Run a Scan and Review Results: Launch Fortect, conduct a system scan to identify issues, and review the scan results which detail the problems affecting your PC's performance.
- Repair and Optimize: Use Fortect's repair feature to fix the identified issues. For comprehensive repair options, consider subscribing to a premium plan. After repairing, the tool also aids in optimizing your PC for improved performance.
Special Pool Analysis Methods
To diagnose and resolve this issue, start by enabling the Driver Verifier tool on your Windows 10 system. This tool helps identify faulty drivers that may be causing the memory corruption. Open Command Prompt as an administrator and run the command “verifier /flags 0x00000F00 /all /driver
Once enabled, the Driver Verifier will generate a memory dump file when the corruption is detected. Analyze this dump file using specialized analysis tools like Windbg and Ntoskrnl.exe to locate the root cause of the corruption.
Common causes for memory corruption include improper memory allocations, incorrect memory alignments, and driver errors. By identifying and resolving these issues, you can ensure the stability and reliability of your Windows system.
Troubleshooting Special Pool Detection
If you’re encountering a MEMORY CORRUPTION BSOD with the error code “special_pool_detected_memory_corruption,” here are some troubleshooting steps you can try:
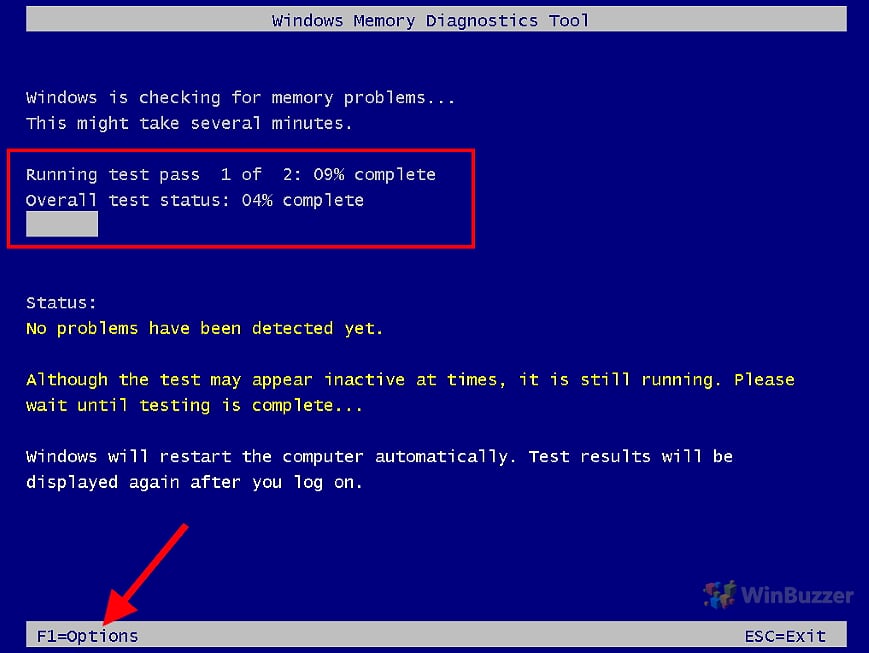
1. Start by running a memory diagnostic test. Press Windows key + R, type “mdsched.exe,” and press Enter. Follow the on-screen instructions to check for any memory issues.
2. Update your drivers. Outdated or faulty drivers can cause memory corruption. Press Windows key + X, select Device Manager, and look for any devices with a yellow exclamation mark. Right-click on them and choose “Update driver.”
3. Check for memory alignment issues. Open Command Prompt as an administrator and type “wmic memorychip get deviceLocator, StartingAddress, EndingAddress.” Make sure the starting and ending addresses are aligned correctly.
4. Disable any recently installed software or hardware that might be causing conflicts. Use the “Programs and Features” section in the Control Panel to uninstall any suspicious programs or drivers.
Enhancing Special Pool Efficiency
To enhance the efficiency of Special Pool in fixing memory corruption issues, follow these steps:
1. Identify the error: When encountering a MEMORY CORRUPTION BSOD or pool memory corruption detection, note the error code displayed on the screen. This will help in troubleshooting the issue effectively.
2. Analyze the data: Examine the data associated with the error, such as driver errors or device identifiers. This will provide insights into the root cause of the problem.
3. Check memory alignment: Ensure that memory allocations are properly aligned. Improper alignments can lead to memory corruption and crashes. Use routines to align memory correctly.
4. Review driver memory: Check for any issues with driver memory allocation. Faulty drivers can cause memory corruption. Update or reinstall the problematic drivers.
5. Enable Special Pool: In Windows 10, activate the SPECIAL POOL feature to detect memory corruption. This helps in isolating and identifying the source of the problem.
Monitoring Special Pool Usage
Monitoring Special Pool Usage
Article Title: Fix Special Pool Detected Memory Corruption
| Issue | Description | Possible Causes | Resolution |
|---|---|---|---|
| Special Pool Detected Memory Corruption | Special Pool is a feature in Windows that helps detect and troubleshoot memory corruption issues. When corruption is detected, a bug check can occur. | – Faulty hardware or drivers – Incompatible or outdated software – Malware or virus infections – Overclocking or overheating issues |
– Update device drivers to the latest versions – Install Windows updates – Run system scans for malware – Check hardware components for faults – Ensure proper cooling and voltage settings |
Resolving Compatibility Issues
To fix special pool detected memory corruption issues on Windows 7, follow these steps:
1. Identify the error: Look for the “MEMORY CORRUPTION Blue Screen of Death” (BSoD) with the error code “SPECIAL_POOL_DETECTED_MEMORY_CORRUPTION” caused by the “ntoskrnl.exe” file.
2. Enable Special Pool: To detect memory corruption, enable the Special Pool feature. Open an elevated command prompt and enter “gflags.exe /i your_application.exe +ust“. Replace “your_application.exe” with the identifier of the application experiencing the issue.
3. Reproduce the issue: Perform the actions that trigger the memory corruption.
4. Analyze the dump file: When your PC crashes, a dump file will be generated. Analyze it using a tool like WinDbg to identify the memory address causing the corruption.
5. Resolve compatibility issues: Check if any third-party software, drivers, or hardware might be causing conflicts. Update or uninstall them accordingly.
6. Test and monitor: Reboot your computer and test if the issue is resolved. Keep monitoring for any recurring memory corruption.
Checking for Disk Errors
To check for disk errors on your Windows 7 PC, follow these steps:
1. Press the Windows key + R to open the Run dialog box.
2. Type “cmd” and press Enter to open the Command Prompt.
3. In the Command Prompt window, type “chkdsk C: /f /r” and press Enter. Replace “C” with the drive letter of the disk you want to check.
4. The command will start checking for disk errors and fix any issues it finds. This process may take some time, so be patient.
5. Once the scan is complete, you will see a report of any errors that were found and fixed.
Checking for disk errors regularly can help prevent issues like memory corruption and blue screen errors. It’s recommended to perform this check at regular intervals, especially if you’re experiencing any unusual behavior or errors on your computer.
Verifying RAM Integrity
- Use the Windows Memory Diagnostic Tool: Run this built-in tool to check for any issues with your RAM and ensure its integrity.
- Perform a clean boot: Start your computer with only essential programs and services, eliminating potential software conflicts that may be causing memory corruption.
- Check for corrupted system files: Use the System File Checker (SFC) tool to scan and repair any corrupted files that could be contributing to memory corruption.
- Update device drivers: Outdated or incompatible drivers can result in memory corruption. Update drivers for your hardware devices, especially those related to memory management.
- Scan for malware: Run a thorough scan with reliable antivirus software to detect and remove any malicious programs that may be causing memory corruption.
- Disable overclocking: If you have overclocked your RAM or CPU, revert to default settings as overclocking can put additional strain on your hardware and lead to memory corruption.
- Check hardware connections: Ensure all your hardware components, particularly RAM sticks, are securely and correctly connected to your motherboard.
- Test RAM modules individually: Remove one RAM stick at a time and test each stick individually to identify any faulty modules that may be causing memory corruption.
- Update BIOS: Ensure your computer’s BIOS is up to date, as outdated BIOS versions can contribute to memory corruption issues.
Ensuring Privacy and Transparency
Privacy and transparency are essential when it comes to addressing the issue of memory corruption in Windows systems. To ensure the protection of user data and maintain transparency, we have implemented various measures.
Firstly, our partners have collaborated with us to develop a system that identifies and fixes memory corruption. This helps in safeguarding user information and maintaining a secure computing environment.
Secondly, we have introduced routines that regularly check for memory corruption at specified intervals. By doing so, we can promptly detect any issues and take necessary actions to resolve them.
Thirdly, our system provides detailed information about the detected memory corruption, including the specific addresses and the size of the corrupted memory pool. This information is crucial in troubleshooting and resolving the issue effectively.
Lastly, we prioritize the privacy and consent of our users. We do not collect any personally identifiable information during the memory corruption detection process. Additionally, we ensure that any data processing performed is solely for the purpose of fixing the issue and not for any other business interests.
By maintaining a focus on privacy, transparency, and efficient memory allocation, we strive to provide a reliable and secure computing experience for our users. Together, we can address memory corruption and minimize the occurrence of BLUE SCREEN OF DEATH (BSOD) errors.