
Having trouble with your Bluetooth driver on Windows 10/11? Learn how to reinstall the driver and fix the issue.
Recently, Fortect has become increasingly popular as a reliable and efficient way to address a wide range of PC issues. It's particularly favored for its user-friendly approach to diagnosing and fixing problems that can hinder a computer's performance, from system errors and malware to registry issues.
- Download and Install: Download Fortect from its official website by clicking here, and install it on your PC.
- Run a Scan and Review Results: Launch Fortect, conduct a system scan to identify issues, and review the scan results which detail the problems affecting your PC's performance.
- Repair and Optimize: Use Fortect's repair feature to fix the identified issues. For comprehensive repair options, consider subscribing to a premium plan. After repairing, the tool also aids in optimizing your PC for improved performance.
Preliminary Steps Before Driver Reinstallation
Before reinstalling your Bluetooth driver, there are a few preliminary steps you should take to ensure a smooth process. First, it’s important to run the System File Checker tool to scan for any corrupted system files that may be causing issues with your Bluetooth driver. To do this, open the Command Prompt as an administrator and type “sfc /scannow” and press Enter.
Next, make sure that your Windows 10 or 11 is fully updated with the latest patches and updates. This can help resolve any known issues with the Bluetooth driver. You can check for updates by going to Settings > Update & Security > Windows Update.
It’s also a good idea to disconnect any Bluetooth devices such as AirPods, headphones, or a wireless keyboard or mouse before reinstalling the driver. This can prevent any interference during the process.
Before proceeding with the driver reinstallation, it’s important to ensure that your computer is free from malware. Consider running a full system scan with a reliable antivirus program to rule out any potential malware-related issues.
Finally, it’s a good idea to reboot your computer before reinstalling the Bluetooth driver. This can help clear any temporary issues that may be affecting the driver’s functionality. Once you’ve completed these preliminary steps, you can proceed with the driver reinstallation process.
Verify Bluetooth Functionality and Settings
| Step | Description |
|---|---|
| 1 | Open the Settings app on your computer. |
| 2 | Click on “Devices” and then select “Bluetooth & other devices” from the left-hand menu. |
| 3 | Ensure that Bluetooth is turned on. If it’s not, toggle the switch to turn it on. |
| 4 | Check if your computer is discoverable to other Bluetooth devices. This can usually be found in the Bluetooth settings menu. |
| 5 | Try connecting a Bluetooth device to your computer to test the functionality. |
Manual Driver Reinstallation Process
To manually reinstall the Bluetooth driver in Windows 10/11, follow these steps:
1. First, press the Windows key + X to open the Start menu, then select Device Manager.
2. In the Device Manager window, locate and right-click on the Bluetooth adapter under the “Bluetooth” or “Network adapters” section.
3. Select Uninstall device from the context menu that appears.
4. Once the driver is uninstalled, restart your computer by clicking on the Start button and selecting Restart.
5. After the computer has restarted, Windows will automatically reinstall the Bluetooth driver. If it does not, you can manually install the driver by downloading the latest driver from the manufacturer’s website and double-clicking on the downloaded file to install it.
6. After the driver is installed, test your Bluetooth connection to ensure that the issue has been resolved.
Automatic Driver Update and Installation
When dealing with Bluetooth driver issues on Windows 10 or 11, it’s important to ensure that the driver is up to date and properly installed. To automatically update and install the Bluetooth driver on your Windows system, follow these steps:
1. Press the Windows key + X to open the Start menu and select Device Manager from the list.
2. In the Device Manager window, locate and expand the Bluetooth category to display the installed Bluetooth adapter.
3. Right-click on the Bluetooth adapter and select Update driver from the context menu.
4. Choose the option to Search automatically for updated driver software. Windows will then search for and install any available updates for the Bluetooth driver.
5. If Windows is unable to find an updated driver, you can also visit the manufacturer’s website to manually download and install the latest driver for your Bluetooth adapter.
6. Once the driver update is complete, restart your computer to ensure that the changes take effect.
Troubleshooting Persistent Issues
If you are experiencing persistent issues with your Bluetooth driver in Windows 10/11, there are a few troubleshooting steps you can take to try and fix the problem.
First, try running the System File Checker tool to scan for and repair any corrupted system files. To do this, open the Command Prompt as an administrator and type sfc /scannow and press Enter.
You can also try updating your device driver by going to the Device Manager, finding the Bluetooth driver, right-clicking on it, and selecting Update driver.
If updating the driver doesn’t work, you can try uninstalling the Bluetooth driver completely and then reinstalling it. To do this, go to the Device Manager, find the Bluetooth driver, right-click on it, and select Uninstall device. Then, restart your computer and the driver should reinstall automatically.
Ensuring Correct System Information Before Download
Before downloading any software or drivers, it’s crucial to ensure that you have the correct system information. This will help prevent compatibility issues and potential errors during the installation process. To do this on a Windows 10 or 11 system, you can easily check your device specifications by following these steps:
1. Click on the Start button and select Settings.
2. Go to System and then About.
3. Here, you will find the necessary information about your device, including the version of Windows you are running, the processor, installed RAM, and system type (64-bit or 32-bit).
It’s also important to make a note of the specific Bluetooth driver you are currently using, as this will help ensure that you reinstall the correct driver for your system. To find this information:
1. Go to Device Manager by right-clicking on the Start button and selecting it from the list.
2. Expand the Bluetooth category and double-click on your Bluetooth adapter.
3. Under the Driver tab, make a note of the driver provider, version, and date.
Downloading the Appropriate Bluetooth Driver
To download the appropriate Bluetooth driver for Windows 10/11, follow these steps. First, identify the make and model of your Bluetooth device. Next, visit the manufacturer’s website to locate the correct driver for your specific device.
Once you have found the appropriate driver, download it to your computer. After the download is complete, locate the file and double-click to start the installation process. Follow the on-screen instructions to complete the installation.
After the installation is finished, reboot your computer to ensure that the new driver is fully integrated into the system. Once your computer has restarted, test the Bluetooth functionality to ensure that the driver has been installed correctly.
Step-by-Step Driver Installation Guide
Step 1: Press the Windows key + X on your keyboard to open the Power User menu and select Device Manager.
Step 2: In the Device Manager window, locate and expand the category for Bluetooth. Right-click on the Bluetooth driver and select Uninstall device.
Step 3: After the driver is uninstalled, restart your computer.
Step 4: Once your computer has restarted, it will automatically reinstall the Bluetooth driver. If it does not, open Device Manager again and select Action > Scan for hardware changes.
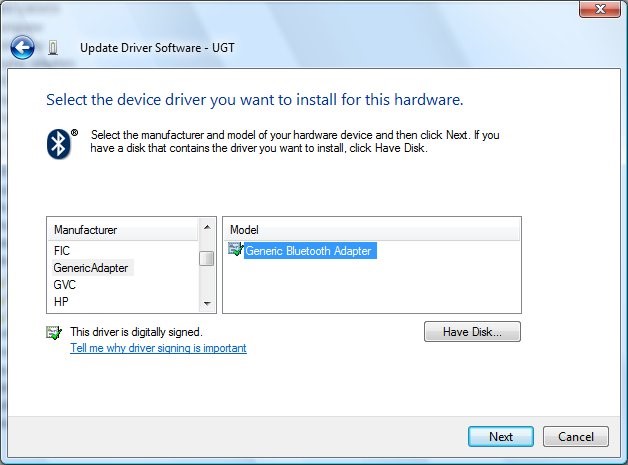
Step 5: If the driver still does not reinstall, you can manually download the latest Bluetooth driver from the manufacturer’s website and install it on your computer.
This step-by-step guide should help you reinstall the Bluetooth driver on your Windows 10/11 computer and fix any issues you may be experiencing.
How to Check Your Bluetooth Version
To check your Bluetooth version on Windows 10 or 11, you can follow these steps. First, go to the “Device Manager” by right-clicking on the Windows icon in the taskbar and selecting it from the list. Look for the “Bluetooth” category and expand it to see the Bluetooth adapter.
Right-click on the Bluetooth adapter and select “Properties.” In the Properties window, go to the “Advanced” tab. Here, you should be able to see the Bluetooth version of your adapter.
If you’re unable to find the Bluetooth version in the Device Manager, you can also check it using the Command Prompt. Open the Command Prompt by searching for it in the Windows search bar. Then, type “systeminfo” and press Enter. Look for the “Bluetooth Version” in the list of information displayed.
Enabling and Restarting Bluetooth Services
To enable and restart Bluetooth services on Windows 10 or 11, follow these steps. First, press the Windows key + X to open the Power User menu. Then, select Device Manager from the list. In the Device Manager window, expand the Bluetooth category to see the installed Bluetooth devices. Right-click on the Bluetooth device and select Disable device. This will turn off the Bluetooth service.
Next, right-click on the Bluetooth device again and select Enable device to restart the Bluetooth service. If you’re still experiencing issues, you can also try reinstalling the Bluetooth driver. To do this, press the Windows key + X to open the Power User menu, then select Device Manager. In the Device Manager window, expand the Bluetooth category and right-click on the Bluetooth device. Select Uninstall device and follow the on-screen instructions to remove the driver.
After uninstalling the driver, restart your computer. Windows will automatically reinstall the Bluetooth driver on startup. If the issue persists, you can also download the latest Bluetooth driver from the manufacturer’s website and install it manually. These steps should help you fix any Bluetooth issues on your Windows 10 or 11 PC.
Running System File Checker for Repairs
To run System File Checker for repairs, follow these steps:
– Press the Windows key + X and select Command Prompt (Admin) from the menu.
– In the Command Prompt window, type sfc /scannow and press Enter.
– Wait for the scan to complete, which may take some time.
– Once the scan is finished, restart your computer to apply any repairs that were made.
Running System File Checker can help fix any corrupted system files that may be causing issues with your Bluetooth driver. This can be a useful step to take before considering a complete reinstallation of the driver.
Updating to the Latest Bluetooth Driver Version
To update to the latest Bluetooth driver version, first, ensure that your device is connected to the internet. Then, open the Device Manager by right-clicking on the Start button and selecting “Device Manager” from the menu. Look for the “Bluetooth” category and expand it to reveal your Bluetooth device.
Right-click on your Bluetooth device and select “Update driver.” Choose the option to search automatically for updated driver software. If a new driver is found, follow the on-screen instructions to install it. If no updates are found, you may need to visit the manufacturer’s website to manually download and install the latest driver for your specific device model.
If you encounter any issues during the update process, you can also try uninstalling the current Bluetooth driver and then restarting your computer. Upon reboot, Windows should automatically reinstall the driver. If not, you can use the “Update driver” option in the Device Manager to try again.
Once the latest driver is successfully installed, you should now be running the most up-to-date Bluetooth driver version on your Windows 10 or 11 system. This may help resolve any connectivity or performance issues you were experiencing with Bluetooth devices such as headphones, headsets, or mobile phones.
Utilizing Windows Troubleshooter for Bluetooth Problems
If you are experiencing Bluetooth connectivity issues on your Windows 10/11 device, you can utilize the Windows Troubleshooter to help diagnose and fix the problem.
To start, go to the Control Panel and select “Troubleshooting.” Then, click on “View all” and select “Bluetooth.” This will launch the Windows Bluetooth Troubleshooter, which will help identify and resolve any issues with your Bluetooth connectivity.
If the Troubleshooter is unable to fix the problem, you may need to reinstall the Bluetooth driver. To do this, press the Windows key + X and select “Device Manager.” Locate the Bluetooth device, right-click on it, and select “Uninstall device.” Then, restart your computer and Windows will automatically reinstall the Bluetooth driver.
If you are still experiencing issues after reinstalling the driver, you may need to update the driver. To do this, go back to the Device Manager, right-click on the Bluetooth device, and select “Update driver.” You can then choose to search for updated driver software automatically, or browse your computer for driver software.
By utilizing the Windows Troubleshooter and reinstalling the Bluetooth driver, you can effectively troubleshoot and fix Bluetooth connectivity problems on your Windows 10/11 device.


