Dealing with the “Page Fault in Nonpaged Area” error on Windows 10 can be frustrating. In this article, I will outline 8 methods to help you fix this issue and get your computer running smoothly again.
Recently, Fortect has become increasingly popular as a reliable and efficient way to address a wide range of PC issues. It's particularly favored for its user-friendly approach to diagnosing and fixing problems that can hinder a computer's performance, from system errors and malware to registry issues.
- Download and Install: Download Fortect from its official website by clicking here, and install it on your PC.
- Run a Scan and Review Results: Launch Fortect, conduct a system scan to identify issues, and review the scan results which detail the problems affecting your PC's performance.
- Repair and Optimize: Use Fortect's repair feature to fix the identified issues. For comprehensive repair options, consider subscribing to a premium plan. After repairing, the tool also aids in optimizing your PC for improved performance.
Understanding the Causes
The page fault in nonpaged area error can be caused by a variety of factors, including issues with your computer’s memory management, device drivers, or operating system. It can also be triggered by software bugs, viruses, or corrupt system files.
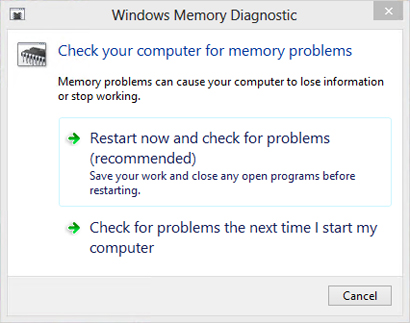
One common cause of this error is faulty RAM. If you suspect that your RAM may be the issue, you can use the Windows Memory Diagnostic tool to check for any problems.
Another potential cause is a corrupt system file. You can use the sfc/scannow command in the Command Prompt to scan and repair any corrupted files.
Device drivers can also be a culprit. Updating your device drivers through the Device Manager can help resolve this issue.
It’s also important to ensure that your system is free from viruses and malware. Running a full scan with a reliable antivirus software like Microsoft Defender Antivirus can help identify and remove any malicious software.
Test and Diagnose RAM Issues
| Method | Description |
|---|---|
| Method 1 | Check RAM for Errors using Windows Memory Diagnostic tool |
| Method 2 | Use Command Prompt to check and repair RAM issues |
| Method 3 | Update or Rollback Device Drivers |
| Method 4 | Disable Automatic Paging File Size Management |
| Method 5 | Check for System File Corruption using SFC and DISM tools |
| Method 6 | Adjust Virtual Memory settings |
| Method 7 | Use System Restore to revert to a previous stable state |
| Method 8 | Perform a Clean Installation of Windows 10 |
Inspect Disk for Errors
To inspect the disk for errors, open File Explorer and right-click on the disk you want to check. Then, select Properties and go to the Tools tab. Under the Error Checking section, click Check. This will initiate a scan for any errors on the disk.
If errors are found, follow the on-screen instructions to fix them. It’s important to regularly inspect your disk for errors to ensure the health and performance of your storage. This method can help identify and resolve potential issues that may be causing the page fault in nonpaged area error on your Windows 10 system.
Update Outdated Device Drivers
To update outdated device drivers, go to Device Manager by right-clicking on the Start button and selecting it from the context menu. Expand the categories and right-click on the device you want to update. Select Update driver and choose whether to search automatically for updated driver software or browse your computer for driver software. If you choose the latter, make sure to download the latest drivers from the manufacturer’s website beforehand.
Once updated, restart your computer to apply the changes. This can help resolve the Page Fault in Nonpaged Area error on Windows 10.
Disable Antivirus Software Temporarily
To fix the Page Fault in Nonpaged Area error in Windows 10, you can temporarily disable your antivirus software to see if it is causing the issue. Sometimes, antivirus programs can conflict with certain operations on your computer, leading to errors like this.
Once you have disabled your antivirus software, you can restart your computer to see if the error has been resolved. If the error no longer occurs, you may need to reinstall or update your antivirus software to ensure it is compatible with your system.
If disabling your antivirus software does not fix the error, you can re-enable it and move on to other troubleshooting methods.
Manage Paging File Size Manually
To manage the paging file size manually, follow these steps. First, right-click on “This PC” and select “Properties. ” Then, click on “Advanced system settings” and go to the “Advanced” tab. Under the “Performance” section, click on “Settings” and go to the “Advanced” tab again.
Next, click on “Change” under the “Virtual memory” section. Here, uncheck the box that says “Automatically manage paging file size for all drives. ” Now, select the drive you want to manage and click on “Custom size. ” Enter the initial and maximum size for the paging file and click “Set.
” Finally, click “OK” on all the windows to save the changes and restart your computer for the changes to take effect.
Utilize Windows Memory Diagnostic
To use Windows Memory Diagnostic to fix the Page Fault in Nonpaged Area error in Windows 10, follow these steps. First, search for Windows Memory Diagnostic in the Windows search bar. Then, click on Windows Memory Diagnostic to open the tool. Next, choose whether to restart the computer and check for memory problems immediately or to check for problems the next time the computer is restarted.
Once the computer restarts, Windows Memory Diagnostic will automatically run and check for memory issues. After the test is complete, check the results for any memory problems. If memory problems are found, consider replacing the faulty memory module. Following these steps can help diagnose and fix memory-related issues causing the Page Fault in Nonpaged Area error in Windows 10.
Apply System File Checker (SFC) Scan
To apply a System File Checker (SFC) scan on Windows 10, you can use the Command Prompt. First, open the Command Prompt as an administrator by searching for “cmd” in the Windows search bar, right-clicking on “Command Prompt,” and selecting “Run as administrator. ” Once the Command Prompt is open, type “sfc /scannow” and press Enter to initiate the scan. The SFC tool will then scan for and repair any corrupted system files. This process may take some time to complete, so it’s important to be patient.
Once the scan is finished, restart your computer to see if the page fault in nonpaged area issue has been resolved. If not, you can try other methods to fix the problem.
Run Built-in Hardware Troubleshooter
To run the built-in hardware troubleshooter in Windows 10:
1. Open the Settings app by pressing the Windows key + I.
2. Click on “Update & Security” and then select “Troubleshoot” from the left-hand menu.
3. Scroll down and click on “Hardware and Devices” and then click on “Run the troubleshooter.”
4. Follow the on-screen instructions to complete the troubleshooting process.
If the troubleshooter identifies any issues, it will attempt to fix them automatically. If it is unable to resolve the problem, it will provide you with further guidance on how to proceed.
Running the built-in hardware troubleshooter can help identify and resolve any hardware-related issues that may be causing the “Page Fault in Nonpaged Area” error in Windows 10.
Consider Resetting the PC
Before resetting your PC, make sure to back up any important files and data to avoid losing them during the reset. Additionally, ensure that you have a stable internet connection and sufficient battery or power source for your computer. After the reset is complete, check to see if the Page Fault in Nonpaged Area error has been resolved. If not, you may need to try other methods to fix the issue.


