Having trouble with Windows 10 installation? Discover effective solutions to troubleshoot common installation errors and successfully resolve them.
Recently, Fortect has become increasingly popular as a reliable and efficient way to address a wide range of PC issues. It's particularly favored for its user-friendly approach to diagnosing and fixing problems that can hinder a computer's performance, from system errors and malware to registry issues.
- Download and Install: Download Fortect from its official website by clicking here, and install it on your PC.
- Run a Scan and Review Results: Launch Fortect, conduct a system scan to identify issues, and review the scan results which detail the problems affecting your PC's performance.
- Repair and Optimize: Use Fortect's repair feature to fix the identified issues. For comprehensive repair options, consider subscribing to a premium plan. After repairing, the tool also aids in optimizing your PC for improved performance.
Remove peripheral devices to fix installation error
If you are experiencing an installation error with Windows 10 and have tried other troubleshooting steps without success, removing peripheral devices may be a solution. Sometimes, conflicts between external devices and the installation process can cause errors.
To resolve this issue, follow these steps:
1. Disconnect all peripheral devices from your computer, including printers, scanners, and external storage devices.
2. Restart your computer and try the installation again.
By removing these peripheral devices, you can eliminate any potential conflicts and improve the chances of a successful installation. Remember to reconnect your devices once the installation is complete.
If you are still encountering the error after removing the peripheral devices, further troubleshooting may be required. Consider seeking assistance from a professional or referring to additional resources provided by Microsoft.
Clear attribute of $WINDOWS.~BT installation folder
The $WINDOWS.~BT installation folder is a crucial component of the Windows 10 installation process. If you encounter any issues during installation, it is important to understand the clear attributes of this folder.
First, ensure that you have enough free space on your hard disk drive or solid-state drive to accommodate the installation files. If you are low on space, consider deleting unnecessary files or moving them to an external storage device.
Next, check for any corrupt or missing files in the $WINDOWS.~BT folder. Use File Explorer to navigate to the folder and look for any files with unusual names or file extensions. If you find any, delete them and restart the installation process.
If you are still experiencing issues, try running the installation in safe mode. To do this, restart your computer and repeatedly press the F8 key until the Advanced Boot Options menu appears. From there, select “Safe Mode” and proceed with the installation.
If none of these steps resolve the issue, it may be necessary to use a data recovery tool such as EaseUS Data Recovery Wizard to recover any important files before attempting a clean installation of Windows 10.
Uninstall language pack
To uninstall a language pack in Windows 10, follow these steps:
1. Open the Start menu and click on “Settings.”
2. In the Settings window, click on “Time & Language.”
3. Select “Language” from the left-hand menu.
4. Under the “Preferred languages” section, click on the language pack you want to uninstall.
5. Click on the “Remove” button.
6. A confirmation prompt will appear. Click “Yes” to continue with the uninstallation.
7. Wait for the uninstallation process to complete. This may take a few moments.
8. Once the language pack is successfully uninstalled, you can close the Settings window.
Please note that uninstalling a language pack may cause some programs or features to no longer display in that language. If you encounter any issues or need to reinstall the language pack in the future, you can follow the same steps and click on “Add a language” to reinstall it.
If you’re still experiencing issues with your Windows 10 installation and are seeing error messages such as “the computer restarted unexpectedly or encountered an unexpected error,” “windows could not complete the installation,” or “error code 0x8007025d,” it’s recommended to troubleshoot further. You can try the following steps:
1. Make sure you have enough disk space on your computer. Free up some space if necessary.
2. Disconnect any external devices, such as printers or scanners, and remove any memory cards or CDs/DVDs from your computer.
3. Check your system’s hardware compatibility with Windows 10. Ensure that all your computer’s components, including the graphics card and drivers, are up to date and supported by Windows 10.
4. Run a disk check to scan for any errors on your hard drive. Open File Explorer, right-click on your system drive (usually C:), and select “Properties.” Go to the “Tools” tab and click on “Check” under the “Error checking” section.
5. If you have recently upgraded from a previous version of Windows, try performing a clean installation instead. This can help resolve any compatibility issues with existing system files.
6. If none of the above steps work, you can try using a reliable data recovery tool like EaseUS Data Recovery Wizard to retrieve any important files from your computer before attempting a clean installation or seeking further assistance.
python

import subprocess
def check_windows_installation_errors():
try:
# Run the Windows installation command
installation_output = subprocess.check_output(['cmd', '/c', 'dism', '/online', '/cleanup-image', '/scanhealth'])
# Convert the output to a string
installation_output = installation_output.decode('utf-8')
# Check for specific error messages in the output
if "No component store corruption detected" in installation_output:
print("No Windows 10 installation errors found.")
else:
print("Windows 10 installation errors detected. Please refer to the output below:")
print(installation_output)
except subprocess.CalledProcessError as e:
print("An error occurred while checking Windows 10 installation errors.")
print("Error code:", e.returncode)
print("Output:", e.output)
# Call the function to check for installation errors
check_windows_installation_errors()
This code uses the `subprocess` module in Python to execute a command-line tool called `dism` (Deployment Image Servicing and Management) that can scan for Windows component store corruption. It captures the output of the command and checks for specific error messages to determine whether any installation errors were found.
Rebuild Boot Configuration Data
If you encounter the error code 0x8007025d during the Windows 10 installation process, it may indicate an issue with the Boot Configuration Data (BCD). To resolve this error and complete the installation successfully, you can rebuild the BCD. Here’s how:
1. Start by inserting your Windows installation media (such as a bootable USB or DVD) into your computer.
2. Restart your computer and boot from the installation media. This may require changing the boot order in your computer’s BIOS settings.
3. When the Windows Setup screen appears, select your language preferences and click “Next.”
4. On the next screen, click “Repair your computer” at the bottom left corner.
5. In the next window, select “Troubleshoot” followed by “Advanced options.”
6. From the list of advanced options, choose “Command Prompt.”
7. In the Command Prompt window, type the following command and press Enter: bootrec /rebuildbcd
8. Follow the on-screen instructions to let the command scan for Windows installations and rebuild the BCD.
9. Once the process is complete, restart your computer and remove the installation media.
10. Your computer should now boot up without encountering the error code 0x8007025d.
If the error persists or if you encounter any other issues during the installation, it’s recommended to seek further assistance from Microsoft support or consult online forums for additional troubleshooting steps.
Perform a clean boot installation
Performing a clean boot installation can help resolve Windows 10 installation errors.
1. Start by creating a bootable installation media, such as a USB flash drive or DVD, containing Windows 10.
2. Connect the bootable media to your computer and restart it.
3. During the startup process, press the necessary key (usually F12 or Esc) to access the boot menu.
4. From the boot menu, select the bootable media as the primary boot device.
5. Follow the on-screen instructions to begin the Windows 10 installation.
6. When you reach the “Where do you want to install Windows?” screen, select the appropriate drive and click “Next”.
7. If you encounter an error such as “the computer restarted unexpectedly” or “Windows could not complete the installation”, follow these steps:
a. Press Shift + F10 to open a command prompt.
b. Type “regedit” and press Enter to open the Registry Editor.
c. Navigate to “HKEY_LOCAL_MACHINE\SYSTEM\Setup\Status\ChildCompletion” in the left-hand pane.
d. Double-click on the “setup.exe” entry in the right-hand pane and change its value from “1” to “3”.
e. Close the Registry Editor and command prompt.
f. Click “OK” on the error message and restart the installation process.
Repair corrupted system files
Repairing Corrupted System Files
If you’re experiencing issues with your Windows 10 installation, such as the computer restarting unexpectedly or encountering unexpected errors, it may be due to corrupted system files. Fortunately, you can easily repair these files to resolve the problem.
To repair corrupted system files in Windows 10, follow these steps:
1. Start by inserting your Windows installation media (such as a USB flash drive or DVD) into your computer.
2. Boot your computer from the installation media. You can do this by restarting your computer and pressing the appropriate key (such as F12 or Esc) to access the boot menu. Select the option that corresponds to your installation media.
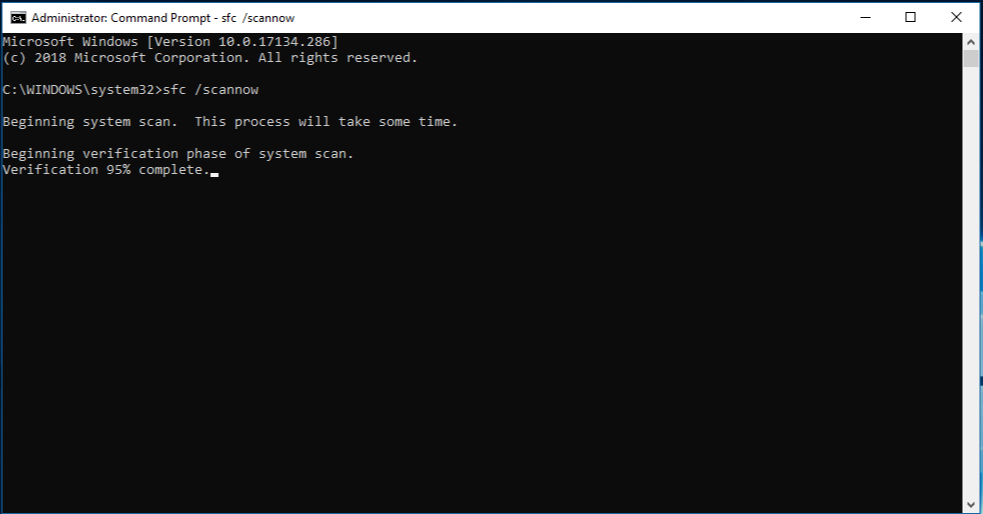
3. Once your computer boots from the installation media, you’ll see the Windows Setup screen. Press Shift + F10 to open a Command Prompt window.
4. In the Command Prompt window, type sfc /scannow and press Enter. This command will scan your system for corrupted files and automatically repair them.
5. Wait for the scan to complete. This may take some time, so be patient.
6. Once the scan is finished, restart your computer and remove the installation media.
7. After your computer restarts, check if the issue is resolved. If not, you may need to perform additional troubleshooting steps.
Check system requirements for successful installation
Before troubleshooting any installation errors, it’s important to ensure that your system meets the necessary requirements for a successful installation of Windows 10. Here’s what you need to check:
1. Operating system: Make sure you’re upgrading from a genuine copy of Windows 7 or Windows 8.1. Windows XP or earlier versions are not supported.
2. Processor: Your computer should have a compatible processor, such as a 1 GHz or faster processor with support for PAE, NX, and SSE2.
3. RAM: Check if your system has sufficient memory for Windows 10. A minimum of 1 GB RAM for 32-bit systems or 2 GB RAM for 64-bit systems is recommended.
4. Storage: Ensure that you have enough free space on your hard disk drive or solid-state drive. Windows 10 requires at least 16 GB of free space for 32-bit systems or 20 GB for 64-bit systems.
5. Graphics card: Verify that your computer has a DirectX 9 graphics device with a WDDM 1.0 driver or higher.
6. Display: Make sure your monitor supports a minimum resolution of 800 x 600 pixels.
7. Internet connection: An internet connection is required for downloading updates and activating Windows 10.
Once you’ve confirmed that your system meets these requirements, you can proceed with the troubleshooting steps to resolve any installation errors you may encounter.
Rebuild BCD to fix installation error
If you encounter an installation error while installing Windows 10, such as the computer restarting unexpectedly or encountering an unexpected media driver, rebuilding the Boot Configuration Data (BCD) can help resolve the issue.
To rebuild the BCD, follow these steps:
1. Insert your Windows installation media or bootable USB drive.
2. Restart your computer and boot from the installation media.
3. On the Windows Setup screen, select your language preferences and click “Next.”
4. Click on “Repair your computer” at the bottom left corner.
5. Select “Troubleshoot” and then choose “Advanced options.”
6. Click on “Command Prompt.”
In the Command Prompt window, follow these commands:
1. Type bootrec /fixmbr and press Enter.
2. Type bootrec /fixboot and press Enter.
3. Type bootrec /scanos and press Enter.
4. Type bootrec /rebuildbcd and press Enter.
After the process completes, restart your computer and check if the installation error is resolved. This method can also be helpful if you encounter other unexpected errors during installation.
Remember to remove the installation media before restarting your computer.
If you need further assistance or encounter any difficulties, please refer to the official Microsoft support website or contact their customer support for personalized help.
Run installation in clean boot mode
To troubleshoot Windows 10 installation errors, you can try running the installation in clean boot mode. Clean boot mode helps eliminate software conflicts that may be causing the installation to fail. Here’s how you can do it:
1. Press the Windows key + R to open the Run dialog box.
2. Type msconfig and press Enter to open the System Configuration window.
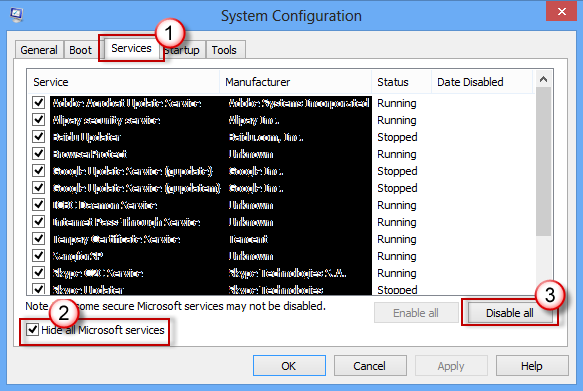
3. In the System Configuration window, go to the Services tab.
4. Check the box next to Hide all Microsoft services.
5. Click on Disable all to disable all third-party services.
6. Go to the Startup tab and click on Open Task Manager.
7. In the Task Manager, disable any startup programs by selecting them and clicking on Disable.
8. Close the Task Manager and go back to the System Configuration window.
9. Click on Apply and then OK.
10. Restart your computer.
By running the installation in clean boot mode, you can minimize the chances of any software conflicts interfering with the installation process. Once the installation is complete, you can go back to the System Configuration window and enable the disabled services and startup programs.
This troubleshooting method can help resolve various installation errors, such as unexpected computer restarts, media driver issues, unexpected errors, and more. Give it a try if you’re encountering any installation problems.
Run Windows Update Troubleshooter to fix installation error
Run the Windows Update Troubleshooter to fix installation errors on your Windows 10. This tool will help identify and resolve any issues that may be preventing successful installation.
To run the Windows Update Troubleshooter, follow these steps:
1. Press the Windows key on your keyboard and type “troubleshoot” in the search bar.
2. Select “Troubleshoot settings” from the search results.
3. Scroll down and click on “Windows Update” under the “Get up and running” section.
4. Click on the “Run the troubleshooter” button.
5. Follow the on-screen instructions to complete the troubleshooting process.
Once the troubleshooter has finished, it will provide you with any potential fixes or solutions. Apply these recommended fixes and try installing Windows 10 again.
If the installation error persists, you may need to explore other troubleshooting methods or seek further assistance.
Turn to Windows installation repair services
If you’re experiencing issues with your Windows 10 installation, turn to our Windows Installation Repair Services for assistance. Our team of experts can help troubleshoot and resolve any errors you may encounter during the installation process.
To start, make sure you have a stable internet connection and enough storage space on your computer. If you’re using a boot disk or USB drive for the installation, ensure it’s properly connected.
If you encounter the error message “the computer restarted unexpectedly or encountered an unexpected error,” try the following steps:
1. Press the arrow keys on your keyboard to select the “Continue” option and proceed with the installation.
2. If the error persists, restart your computer and boot into the installation media again.
3. During the installation process, pay attention to any prompts or options related to the disk partitioning. Issues with the gpt (GUID Partition Table) can sometimes cause this error. Consider deleting all partitions on the disk and recreating them.
4. If you’re upgrading from a previous version of Windows, such as Windows 7 or Windows 8.1, try performing a clean installation instead. This can help eliminate any compatibility issues.
5. Ensure that your computer meets the minimum system requirements for Windows 10, including sufficient random-access memory (RAM) and storage space.
6. If you’re using a laptop, connect it to a power source to prevent any interruptions during the installation process.
If you’re still unable to resolve the error, consider reaching out to our support team for further assistance. Our experts are well-versed in troubleshooting Windows installation errors and can provide personalized solutions to get your system up and running smoothly.
Solutions for “Windows installation has failed” error
- Ensure compatibility: Check if your device meets the minimum system requirements for Windows 10 installation.
- Update drivers: Make sure all your device drivers are up to date to avoid any conflicts during installation.

- Disable antivirus software: Temporarily disable any third-party antivirus software as it may interfere with the installation process.
- Disconnect unnecessary peripherals: Remove any non-essential external devices connected to your computer, such as printers or USB drives.
- Perform a clean boot: Start your computer with a minimal set of startup programs to eliminate any software conflicts.
- Run Windows Update troubleshooter: Use the built-in troubleshooter to automatically detect and fix common Windows Update issues.
- Check available disk space: Ensure that you have enough free space on your hard drive to accommodate the Windows 10 installation.
- Use Media Creation Tool: Create a bootable USB or DVD using the Media Creation Tool and perform a clean installation of Windows 10.
- Repair corrupted system files: Run the System File Checker tool to scan and repair any corrupted or missing system files.
- Perform a system restore: If all else fails, revert your computer to a previous state using a system restore point.