Unveiling the secrets of eliminating the pesky No DC Watermark that haunts the top left corner of your screen, this article offers a comprehensive guide to disabling and fixing this frustrating issue. Bid farewell to the irritating watermark and regain your pristine screen in no time!
Recently, Fortect has become increasingly popular as a reliable and efficient way to address a wide range of PC issues. It's particularly favored for its user-friendly approach to diagnosing and fixing problems that can hinder a computer's performance, from system errors and malware to registry issues.
- Download and Install: Download Fortect from its official website by clicking here, and install it on your PC.
- Run a Scan and Review Results: Launch Fortect, conduct a system scan to identify issues, and review the scan results which detail the problems affecting your PC's performance.
- Repair and Optimize: Use Fortect's repair feature to fix the identified issues. For comprehensive repair options, consider subscribing to a premium plan. After repairing, the tool also aids in optimizing your PC for improved performance.
Troubleshooting Nvidia Control Panel Settings
If you’re experiencing the no DC watermark in the top left corner of your screen while using Nvidia Control Panel settings, there are a few steps you can take to disable and fix this issue.
First, ensure that your GPU drivers are up to date. You can do this by visiting the Nvidia website and downloading the latest drivers for your graphics card.
Next, open the Nvidia Control Panel by right-clicking on your desktop and selecting it from the menu.
In the Control Panel, navigate to the “3D Settings” tab. Here, you can adjust various settings for your games and applications.
To disable the no DC watermark, click on the “Manage 3D settings” option. In the program settings tab, select the application that is displaying the watermark (e.g., Minecraft, Adobe Premiere, etc.).
Scroll down to the “Image Sharpening” section and toggle it off. This should remove the watermark from your screen.
If the issue persists, you can try resetting the Nvidia Control Panel settings to their default values. To do this, click on the “Restore” button in the “Manage 3D settings” tab.
If none of these methods work, it’s possible that there may be a compatibility issue between your GPU and the specific application you’re using. In this case, you may need to reach out to Nvidia support or the application’s support team for further assistance.
Resolving Access Issues on thegeekpage.com
If you’re experiencing access issues on thegeekpage.com and are seeing a “No DC Watermark” in the top left corner, here’s how you can disable and fix it:
1. Launch your web browser and navigate to thegeekpage.com.
2. Press Ctrl+Shift+I (Windows) or Command+Option+I (Mac) to open the developer tools.
3. In the developer tools panel, click on the “Console” tab.
4. Copy and paste the following code into the console: document.getElementById(“dcwatermark”).style.display = “none”;
5. Press Enter to execute the code and remove the watermark.
6. Refresh the page to see the changes.
This method should resolve the “No DC Watermark” issue and allow you to access thegeekpage.com without any interruptions.
Steps to Unblock Site Access
- Clear Browser Cache
- Open Google Chrome
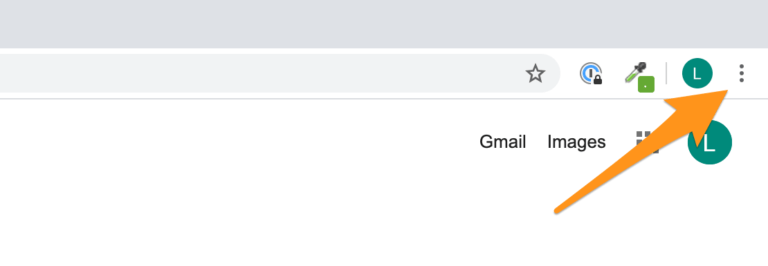
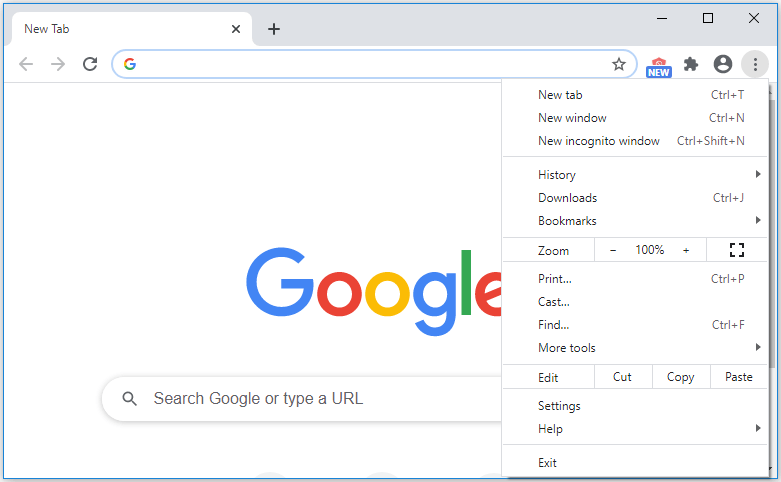
- Click on the three dots in the top-right corner to open the menu
- Select Settings
- Scroll down and click on Advanced
- Under the “Privacy and security” section, click on Clear browsing data
- Choose the time range for which you want to clear the cache
- Make sure the option for “Cached images and files” is selected
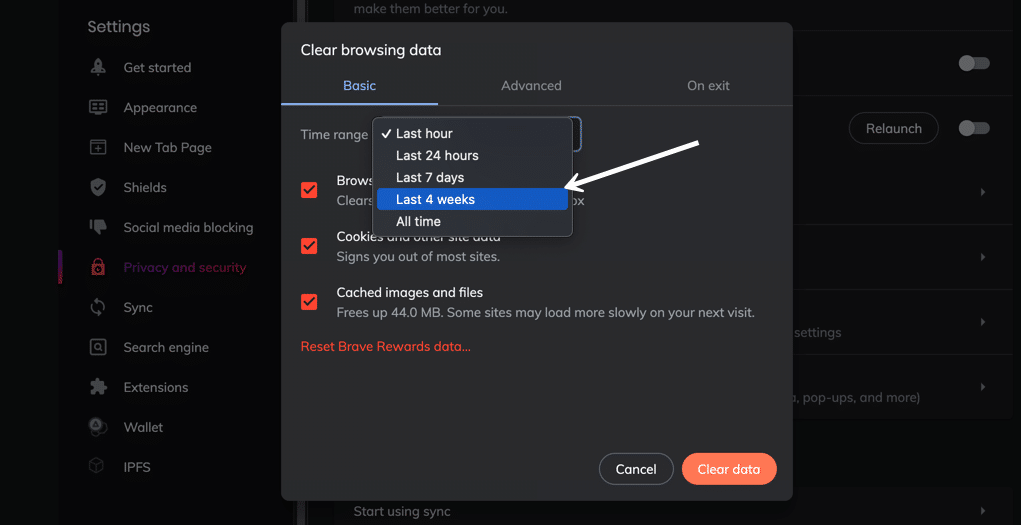
- Click on Clear data
- Disable Browser Extensions
- Open Google Chrome
- Click on the three dots in the top-right corner to open the menu
- Select More tools
- Click on Extensions
- Toggle off the switch next to each extension to disable them
- Check Firewall Settings
- Press the Windows key on your keyboard
- Type Firewall and click on Windows Defender Firewall
- Click on Allow an app or feature through Windows Defender Firewall
- Scroll down and look for the application or program you want to unblock
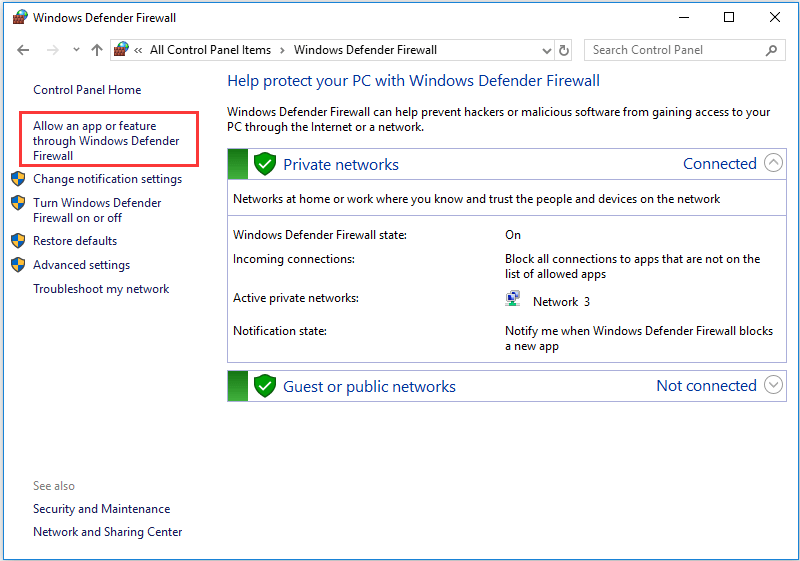
- If the program is not listed, click on Change settings and then Allow another app
- Select the program from the list or click Browse to find it on your computer
- Check the boxes for the networks you want to allow the program to communicate through
- Click on OK to save the changes
- Flush DNS Cache
- Press the Windows key on your keyboard
- Type Command Prompt and right-click on it
- Select Run as administrator
- In the Command Prompt window, type ipconfig /flushdns
- Press Enter to execute the command
- Wait for the confirmation message that the DNS Resolver Cache has been successfully flushed
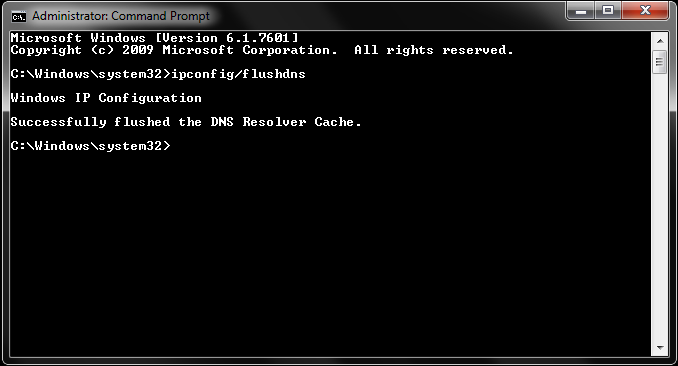
- Close the Command Prompt window
python

import cv2
def remove_top_left_corner(image_path):
# Load image using OpenCV
image = cv2.imread(image_path)
# Check if image is loaded successfully
if image is None:
print("Failed to load the image.")
return
# Get image dimensions
height, width = image.shape[:2]
# Define the region of interest (top left corner)
roi = image[0:height//2, 0:width//2]
# Set the region of interest to black (remove it)
roi[:] = (0, 0, 0) # Black color
# Display the modified image
cv2.imshow("Modified Image", image)
cv2.waitKey(0)
cv2.destroyAllWindows()
# Example usage
remove_top_left_corner("image.jpg")
Resolving Errors and Issues with GPU Drivers
To resolve errors and issues with GPU drivers that result in a “No DC Watermark” appearing in the top left corner of your screen, follow these steps:
1. Update your GPU drivers to the latest version. Visit the manufacturer’s website or use their software to download and install the latest drivers.
2. If updating the drivers doesn’t work, try disabling the watermark through your graphics card settings. Right-click on your desktop and select “Graphics Options” or a similar option. Look for a setting related to watermarks and disable it.
3. If the watermark persists, try using a third-party software or utility to remove it. Conduct a search for “remove watermarks from GPU drivers” and explore available options.
Remember to always exercise caution when downloading third-party software and ensure it is reputable and trustworthy.