In this guide, I will provide a complete overview of how to set up a HomeGroup on Windows 7 through 10.
Recently, Fortect has become increasingly popular as a reliable and efficient way to address a wide range of PC issues. It's particularly favored for its user-friendly approach to diagnosing and fixing problems that can hinder a computer's performance, from system errors and malware to registry issues.
- Download and Install: Download Fortect from its official website by clicking here, and install it on your PC.
- Run a Scan and Review Results: Launch Fortect, conduct a system scan to identify issues, and review the scan results which detail the problems affecting your PC's performance.
- Repair and Optimize: Use Fortect's repair feature to fix the identified issues. For comprehensive repair options, consider subscribing to a premium plan. After repairing, the tool also aids in optimizing your PC for improved performance.
Understanding Homegroups
Homegroups in Windows 7-10 are a convenient way to share files, printers, and other resources with other computers on your home network. To set up a Homegroup, follow these steps:
First, open the Control Panel on your computer and navigate to the “HomeGroup” section. Click on “Create a Homegroup” and follow the instructions to set up a Homegroup password.
Next, go to the File Explorer and select the folders you want to share with other computers in the Homegroup. Right-click on the folder, select “Share with,” and then choose “Homegroup (view)” or “Homegroup (view and edit)”.
Once you’ve set up the Homegroup and shared your folders, you can join other computers to the Homegroup by entering the password you created earlier. This will allow you to access shared files and resources on other computers in the Homegroup.
If you encounter any issues with your Homegroup, you can troubleshoot by going to the Homegroup section in the Control Panel and using the troubleshooter to identify and fix any problems.
Setting Up a Homegroup
- Click on the Start button in the bottom-left corner of your screen.
- Open the Control Panel by clicking on it from the Start menu.
- Click on Network and Internet in the Control Panel window.
- Select Homegroup from the options available.
- Click on Create a Homegroup button to start the setup process.
Adding PCs to Your Homegroup
To add PCs to your Homegroup, first ensure that all the computers you want to include are connected to the same home network.
Next, open the Control Panel on the computer you want to add to the Homegroup. Click on “HomeGroup” and then select “Join now.”
Follow the on-screen instructions to join the existing Homegroup by entering the password provided when you first set up the Homegroup.
Once the computer is added to the Homegroup, you will be able to access shared resources such as files and printers from other PCs in the Homegroup.
Make sure to set your sharing settings to allow access to the specific files and folders you want to share with others in the Homegroup.
If you encounter any issues during the process, you can troubleshoot by checking your network connections, restarting your computer, or running the Homegroup troubleshooter.
By adding PCs to your Homegroup, you can easily share files, printers, and other resources with other computers on your home network.
Accessing and Finding Shared Files
To access and find shared files on your HomeGroup in Windows 7-10, you can use the File Explorer. Simply open File Explorer and navigate to the HomeGroup section in the left-hand pane. Here, you will see a list of shared folders from other computers on the same HomeGroup.
To access a specific shared file, double-click on the computer name to expand the list of shared folders. Then, double-click on the desired folder to view its contents.
If you are having trouble finding a specific file, you can use the search bar at the top of File Explorer to quickly locate it. Simply type in the file name or keywords and press Enter to search within the shared folders on your HomeGroup.
If you want to share a file with others on the HomeGroup, simply drag and drop the file into the shared folder you want it to be located in. The file will then be accessible to other users on the same HomeGroup.
If you encounter any issues with accessing or finding shared files on your HomeGroup, you can troubleshoot by checking your network connection, ensuring that all computers are connected to the same HomeGroup, and restarting your computer if necessary. Additionally, you can check the HomeGroup settings in the Control Panel to make sure that file sharing is enabled.
Sharing Libraries, Devices, and Printers
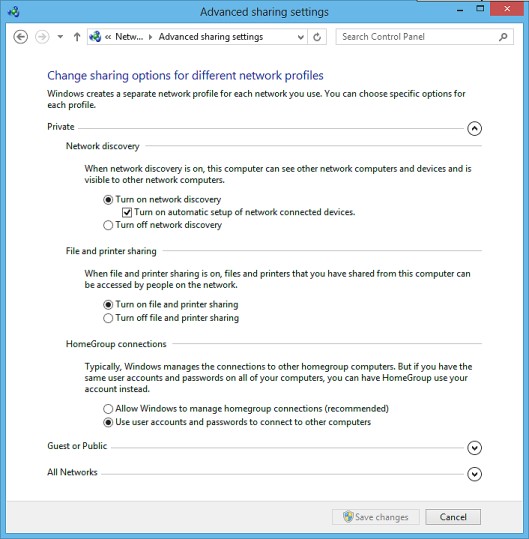
To set up sharing in a HomeGroup on Windows 7-10, first open the Control Panel and navigate to “Network and Sharing Center.”
Click on “Change advanced sharing settings” and make sure network discovery, file and printer sharing, and public folder sharing are turned on.
Next, create or join a HomeGroup by going to the “HomeGroup” section in the Control Panel and following the on-screen instructions.
To share a library, right-click on it in Windows Explorer, select “Properties,” go to the “Sharing” tab, and click on “Share.” Choose who you want to share with and click “Share.”
To share a device, such as a printer, go to the “Devices and Printers” section in the Control Panel, right-click on the device you want to share, and select “Printer properties.” Go to the “Sharing” tab and check the box that says “Share this printer.”
To access shared libraries or devices from another computer in the HomeGroup, open Windows Explorer, click on the “HomeGroup” section in the sidebar, and browse to the shared item you want to access.
If you encounter any issues with sharing or accessing shared resources, you can troubleshoot the problem by checking your network settings, restarting your computer, or running the HomeGroup troubleshooter in the Control Panel.
Managing Individual File or Folder Sharing
To manage individual file or folder sharing in your HomeGroup, you will need to adjust the sharing settings for each specific item.
First, locate the file or folder you want to share on your computer. Right-click on the file or folder and select “Properties” from the context menu.
In the Properties dialog box, navigate to the “Sharing” tab. Here, you can click on the “Share” button to add specific users or groups with whom you want to share the file or folder.
You can also adjust the permissions for each user or group by clicking on the “Permissions” button. This will allow you to control what actions each user can perform on the shared item.
Once you have added the desired users and set the permissions, click “Apply” and then “OK” to save your changes. The file or folder is now shared with the specified users in your HomeGroup.
Repeat these steps for any additional files or folders you want to share individually within your HomeGroup.
Connecting to Homegroup Printers
To connect to Homegroup printers in Windows 7-10, follow these steps:
Step 1: Make sure your computer is connected to the Homegroup network where the printer is shared. You can check this by going to Control Panel > Network and Sharing Center.
Step 2: Once you are connected to the Homegroup network, open the Control Panel and navigate to Devices and Printers.
Step 3: In the Devices and Printers window, click on “Add a printer” at the top of the window.
Step 4: A new window will pop up, prompting you to choose between adding a local or network printer. Select “Add a network, wireless or Bluetooth printer.”
Step 5: Windows will search for available printers on the Homegroup network. Once the printer you want to connect to appears in the list, select it and click “Next.”
Step 6: Follow the on-screen instructions to complete the setup process. Windows will install the necessary drivers and set up the connection to the Homegroup printer.
Step 7: Once the setup is complete, you will be able to print to the Homegroup printer from your Windows 7-10 computer.
Connecting to Homegroup printers is a simple process that allows you to easily access and use shared printers on your network.
Modifying Homegroup Settings
To modify Homegroup settings in Windows 7-10, follow these steps:
1. Open the Control Panel by clicking on the Start menu and selecting Control Panel.
2. In the Control Panel, navigate to the “Network and Sharing Center” section.
3. Under “Change your networking settings,” click on “Homegroup.”
4. Here, you can change the Homegroup settings such as choosing which libraries and devices to share.
5. To change the password for the Homegroup, click on the “Change the password” link.
6. You can also leave the Homegroup if you no longer want to be part of it by clicking on the “Leave the Homegroup” button.
7. If you encounter any issues with your Homegroup settings, you can troubleshoot by clicking on the “Troubleshoot problems” link.
8. Make sure to save any changes you make to the Homegroup settings by clicking on the “Save changes” button.
9. Once you have made all the necessary modifications, you can close the Control Panel.
Browser Compatibility: Chrome, Firefox, Opera
| Browser | Compatibility |
|---|---|
| Chrome | Compatible |
| Firefox | Compatible |
| Opera | Compatible |
F.A.Qs
What has replaced HomeGroup?
HomeGroup has been replaced by OneDrive and Share features in Windows 10 (version 1803) for connecting to a network.
Why did Windows remove HomeGroup?
Windows removed HomeGroup because it is considered unnecessary in today’s world, with file and print sharing being simple enough for users at any skill level to do without it.
How do I get rid of HomeGroup on my computer?
To get rid of HomeGroup on your computer, you can press Win + S keys to open the Windows Search box, type “homegroup,” select HomeGroup from the Best match, scroll down the right sidebar, and click on the Leave the homegroup link under the Other homegroup actions section. In the pop-up window, click on Leave the homegroup.