Having trouble with your laptop’s Wi-Fi connection? Look no further! In this guide, I’ll walk you through troubleshooting steps and effective solutions to fix any Wi-Fi connection issues you may encounter.
Recently, Fortect has become increasingly popular as a reliable and efficient way to address a wide range of PC issues. It's particularly favored for its user-friendly approach to diagnosing and fixing problems that can hinder a computer's performance, from system errors and malware to registry issues.
- Download and Install: Download Fortect from its official website by clicking here, and install it on your PC.
- Run a Scan and Review Results: Launch Fortect, conduct a system scan to identify issues, and review the scan results which detail the problems affecting your PC's performance.
- Repair and Optimize: Use Fortect's repair feature to fix the identified issues. For comprehensive repair options, consider subscribing to a premium plan. After repairing, the tool also aids in optimizing your PC for improved performance.
Fi Connection Issues
If you’re experiencing Wi-Fi connection issues on your laptop, there are a few troubleshooting steps you can take to get it back up and running. Here are some common solutions to common Wi-Fi problems:
1. Check your Wi-Fi signal strength: Make sure your laptop is within range of your wireless router. Walls, furniture, and other obstacles can weaken the signal. If possible, move closer to the router to improve the connection.
2. Restart your laptop and wireless router: Sometimes, a simple restart can solve connectivity issues. Turn off your laptop and unplug your wireless router from the power source. Wait for a few seconds before plugging it back in and turning it on. Then, power on your laptop and see if the Wi-Fi connection is restored.
3. Make sure Wi-Fi is enabled on your laptop: Check that your laptop’s Wi-Fi is turned on. Look for the Wi-Fi icon in the taskbar or in the system tray. If it’s disabled, click on the icon and select “Enable Wi-Fi” from the context menu.
4. Reset your network settings: Resetting your network settings can help fix any software glitches that may be causing the Wi-Fi connection issues. Go to the “Settings” menu on your laptop and select “Network & Internet.” Then, click on “Network reset” and follow the on-screen instructions.
5. Update your network drivers: Outdated or incompatible network drivers can cause Wi-Fi problems. To update your drivers, go to the manufacturer’s website and download the latest drivers for your network interface controller. Install the drivers and restart your laptop.
6. Check for interference: Other electronic devices, such as cordless phones or microwaves, can interfere with your Wi-Fi signal. Move your laptop away from these devices or turn them off to see if it improves the connection.
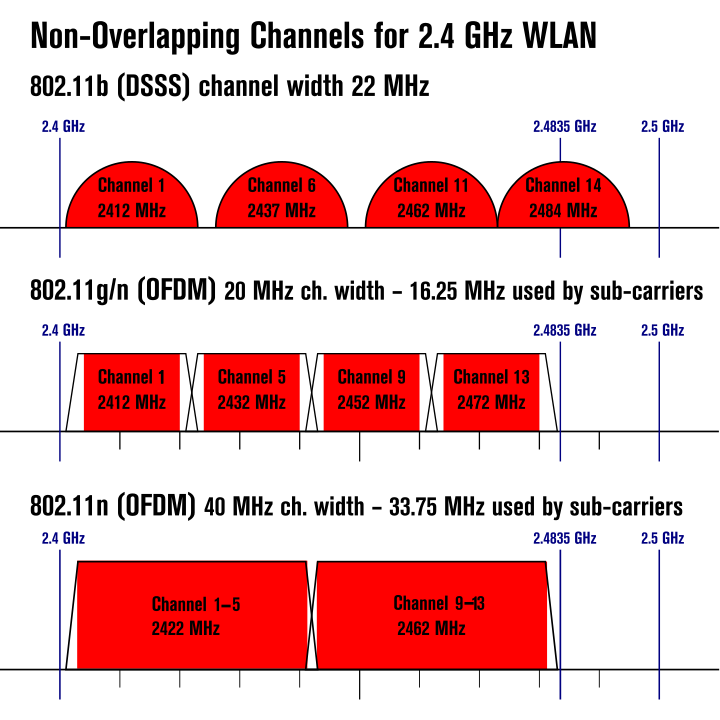
7. Change the Wi-Fi frequency band: Some laptops may have difficulty connecting to certain Wi-Fi bands. Access your router’s settings through a web page and try switching between the 2.4 GHz and 5 GHz frequency bands to see if it improves the connection.
8. Reset your router to factory settings: If all else fails, you can try resetting your wireless router to its default settings. Keep in mind that this will erase any custom settings you’ve made, so make sure to back up any important configurations or passwords before proceeding.
Check the physical Wi-Fi switch
If you’re experiencing Wi-Fi connection issues on your laptop, one of the first things to check is the physical Wi-Fi switch. This switch is usually located on the side or front of your laptop and allows you to toggle the Wi-Fi on and off.
First, locate the physical Wi-Fi switch on your laptop. It may be labeled with a Wi-Fi symbol or have a dedicated button.
Ensure that the switch is in the “on” position. If it is already on, try toggling it off and then back on again. Sometimes, a simple reset of the switch can resolve connection issues.
After toggling the switch, check if your Wi-Fi connection has been restored. If not, move on to other troubleshooting steps to identify and fix the problem.
Disable airplane mode
If you’re experiencing Wi-Fi connection issues on your laptop, it’s worth checking if Airplane mode is enabled. Airplane mode is a setting that disables all wireless connectivity on your device, including Wi-Fi. Here’s how you can disable Airplane mode on your laptop:
1. Open the Start menu by clicking on the Windows icon located on the bottom-left corner of your screen.
2. In the search bar, type “Settings” and click on the Settings app that appears in the search results.
3. Within the Settings app, click on the “Network & Internet” option.
4. On the left-hand side of the Network & Internet settings, click on “Airplane mode“.
5. In the right-hand pane, you’ll see a toggle switch labeled “Airplane mode“. Make sure the toggle switch is set to the “Off” position. This will disable Airplane mode and enable your Wi-Fi connection.
6. After disabling Airplane mode, check if your Wi-Fi connection is working properly. If not, you may need to troubleshoot further or contact your internet service provider for assistance.
Remember, enabling Airplane mode is useful when you want to disconnect from all wireless networks, such as during a flight. However, it’s important to disable Airplane mode when you want to connect to Wi-Fi networks again.
If you’re still experiencing Wi-Fi connection issues after disabling Airplane mode, you may want to explore other troubleshooting steps or seek additional support.
Restart Windows Explorer
![]()
Restarting Windows Explorer can help troubleshoot and fix laptop Wi-Fi connection issues. Here’s how to do it:
1. Press Ctrl + Shift + Esc to open the Task Manager.
2. In the Task Manager window, click on the “Processes” tab.
3. Scroll down and locate “Windows Explorer” in the list of processes.
4. Right-click on “Windows Explorer” and select Restart from the context menu.
5. Wait for a few seconds for Windows Explorer to restart.
6. Once restarted, check if your Wi-Fi connection is working fine.
If restarting Windows Explorer doesn’t resolve your Wi-Fi connection issues, you can try the following additional troubleshooting steps:
1. Restart your laptop.
2. Check if the Wi-Fi switch on your laptop is turned on.
3. Ensure that your laptop is within range of your Wi-Fi network and that the signal strength is strong.
4. Restart your modem and router.
5. If you’re using a wireless network adapter, try disabling and re-enabling it in the Device Manager.
6. Make sure you have the latest drivers installed for your Wi-Fi adapter.
7. Reset your network settings by going to Settings > Network & Internet > Network reset.
8. Contact your Internet service provider to check if there’s an outage in your area.
Forget saved wireless network
If you’re experiencing Wi-Fi connection issues on your laptop, one troubleshooting step you can try is to forget the saved wireless network. This can help resolve any issues caused by incorrect network settings or a corrupted network profile.
To forget a saved wireless network on your laptop, follow these steps:
1. Open the Network & Internet settings on your laptop. You can do this by clicking on the network icon in the taskbar and selecting Network & Internet settings.
2. In the Network & Internet settings, click on Wi-Fi in the left-hand menu.
3. Under the Wi-Fi section, click on Manage known networks.
4. You’ll see a list of all the saved wireless networks on your laptop. Find the network that you want to forget and click on it.
5. Click on the Forget button to remove the network from your laptop’s saved networks.
By forgetting the saved wireless network, you are essentially deleting the network profile from your laptop. This means that the next time you connect to the same network, your laptop will treat it as a new network and create a fresh profile.
This can be helpful if you’re experiencing issues with the network, such as trouble connecting or slow speeds. Forgetting the network and reconnecting can often resolve these issues.
Remember that after forgetting a network, you’ll need to reconnect to it by entering the network password. Make sure you have the correct password handy before you forget the network.
If you’re still experiencing Wi-Fi connection issues after forgetting the saved network, there may be other factors at play. Consider troubleshooting other aspects such as your router, modem, or checking for any interference that may be affecting your connection.
For more advanced troubleshooting steps and solutions, check out our comprehensive guide on troubleshooting and fixing laptop Wi-Fi connection issues on the Microsoft website.
Run network troubleshooter
If you’re experiencing Wi-Fi connection issues on your laptop, running the network troubleshooter can help identify and resolve the problem. The network troubleshooter is a built-in tool in Microsoft Windows that can automatically diagnose and fix common network issues.
To run the network troubleshooter:
1. Open the Start menu and click on the Settings icon.
2. In the Settings window, click on “Network & Internet”.
3. On the left-hand side, select “Status”.
4. Scroll down and click on “Network troubleshooter”.
5. The troubleshooter will start scanning your network connection and detecting any issues.
6. Follow the on-screen instructions provided by the troubleshooter to fix the problem.
If the network troubleshooter is unable to resolve the issue, here are a few additional steps you can try:
– Restart your laptop and router: Sometimes, a simple restart can solve connectivity problems. Turn off your laptop, unplug your router from the power source, wait for a few seconds, and then plug it back in. Turn on your laptop and see if the Wi-Fi connection is restored.
– Check your Wi-Fi signal: Make sure you are within range of your Wi-Fi network. Walls, distance, and obstructions can weaken the signal. If possible, move closer to the router or try connecting to a different network.
– Update your network drivers: Outdated or corrupt network drivers can cause connection problems. Visit the manufacturer’s website to download and install the latest drivers for your network adapter.
– Disable and re-enable Wi-Fi: Sometimes, toggling the Wi-Fi connection can help resolve connectivity issues. Open the Network & Internet settings, click on “Wi-Fi” on the left-hand side, and toggle the “Wi-Fi” switch off and then on again.
– Reset your network settings: If all else fails, you can try resetting your network settings. Open the Network & Internet settings, click on “Status” on the left-hand side, scroll down and click on “Network reset”. Keep in mind that this will remove all saved Wi-Fi networks and VPN connections, so you’ll need to reconnect to them afterward.
Connect to a different network frequency band
If you’re experiencing Wi-Fi connection issues on your laptop, one troubleshooting step you can take is to connect to a different network frequency band. This can help improve your connection and resolve any interference issues you may be experiencing.
To connect to a different network frequency band:
1. Check your Wi-Fi adapter: Ensure that your laptop has a Wi-Fi adapter that supports multiple frequency bands. Most modern laptops have adapters that can connect to both 2.4 GHz and 5 GHz bands. You can check the specifications of your laptop or refer to the manufacturer’s website for more information.
2. Determine the frequency bands available: Check the settings of your wireless router or access point to see which frequency bands it supports. Most routers will have both 2.4 GHz and 5 GHz bands available. If you’re unsure how to access your router’s settings, refer to the user manual or contact your Internet service provider for assistance.
3. Connect to a different frequency band: Once you’ve determined the available frequency bands, you can connect to a different band to see if it improves your Wi-Fi connection. Follow these steps to connect:
– On your laptop, go to the network settings. In Windows, you can do this by clicking on the Wi-Fi icon in the taskbar and selecting “Network & Internet settings.”
– In the network settings, select “Wi-Fi” or “Wireless” and look for the option to “Manage known networks” or “Wi-Fi settings.”
– You should see a list of available networks. Look for your network name and click on it.
– If your network has both a 2.4 GHz and a 5 GHz band, you may see two separate network names. Choose the one you want to connect to.
– Click on the “Connect” button to connect to the selected frequency band.
4. Test your connection: After connecting to the different frequency band, test your Wi-Fi connection to see if the issue is resolved. Open a web browser and try accessing different websites to ensure a stable connection. If you’re still experiencing issues, you may need to try other troubleshooting steps or contact your Internet service provider for further assistance.
Connecting to a different network frequency band can help improve your laptop’s Wi-Fi connection by reducing interference and providing a more stable signal. If you’re facing Wi-Fi connection issues, give this troubleshooting step a try to see if it resolves the problem.
Restart router and modem
Restarting your router and modem can often resolve Wi-Fi connection issues on your laptop. Follow these simple steps to troubleshoot and fix the problem:
1. Begin by locating your router and modem. These devices are usually connected to each other and are connected to your internet service provider’s network.
2. Once you have located your router and modem, find the power cables connected to them. Unplug both the router and modem from their power source.
3. Wait for about 30 seconds to 1 minute. This allows the devices to fully power down and reset. During this time, you may also want to power off your laptop and any other devices connected to the Wi-Fi network.
4. After the waiting period, plug the power cables back into the router and modem. Make sure they are securely connected.
5. Wait for the devices to fully power up and establish a connection. This may take a few minutes.
6. Once the router and modem are fully powered up, turn on your laptop and any other devices you powered off earlier.
7. Check if your Wi-Fi connection is now working. Open your laptop’s settings and navigate to the network settings. Look for your Wi-Fi network and see if it is available.
8. If your Wi-Fi network is available, select it and enter the password if prompted. You should now be connected to the internet.
9. If your Wi-Fi network is still not available or you are unable to connect, try restarting your laptop as well. Sometimes a simple restart can resolve any remaining connection issues.
Reduce wireless signal interference

1. Check your surroundings: Position your laptop in an area with minimal obstructions. Avoid placing it near other electronic devices that may interfere with the Wi-Fi signal. If possible, move closer to the router to improve signal strength.
2. Update your Wi-Fi driver: Outdated drivers can cause connection problems. Open File Explorer, right-click on “This PC,” and select “Manage.” In the Computer Management window, go to “Device Manager” and expand the “Network adapters” section. Right-click on your Wi-Fi adapter and select “Update driver.” Follow the on-screen instructions to complete the update.
3. Change Wi-Fi channels: If you live in an area with multiple Wi-Fi networks, they may be interfering with each other. Access your router’s settings by typing its IP address into a web browser. Look for the wireless settings and change the channel to one that is less congested. Experiment with different channels to find the best one for your environment.
4. Use a wired connection: If possible, connect your laptop directly to the router using an Ethernet cable. This eliminates any potential wireless interference and provides a more stable connection.
5. Disable background applications: Some applications running in the background can consume bandwidth and affect your Wi-Fi connection. Press Ctrl + Shift + Esc to open the Task Manager. Go to the “Processes” tab and close any unnecessary applications.
6. Reset your network settings: In the search bar, type “Network reset” and select the corresponding result. Click on “Reset now” to reset your network settings to their default configurations. Note that this will remove any saved Wi-Fi networks and VPN connections.
7. Update your router’s firmware: Visit the manufacturer’s website to check if there are any available firmware updates for your router. Follow the instructions provided to install the latest firmware. This can improve the performance and stability of your Wi-Fi connection.
Reinstall or update network adapter
To troubleshoot and fix laptop Wi-Fi connection issues, you may need to reinstall or update your network adapter. This can help resolve common connectivity problems and ensure a stable connection. Here’s how you can do it:
1. Open File Explorer and navigate to the “Device Manager” by right-clicking on the Start button and selecting it from the menu.
2. In Device Manager, locate and expand the “Network adapters” section.
3. Look for your network adapter from the list. It may be named differently depending on your laptop’s manufacturer.
4. Right-click on the network adapter and select “Uninstall device.” Confirm the action if prompted.
5. Once the driver is uninstalled, restart your laptop.
6. After the restart, Windows will automatically reinstall the network adapter driver. However, if it fails to do so, you can manually install it.
7. Go back to Device Manager, right-click on the “Network adapters” section, and select “Scan for hardware changes.” This will trigger Windows to search for and install the appropriate driver.
8. If Windows still fails to find the driver, you can visit your laptop manufacturer’s website or the network adapter manufacturer’s website to download the latest driver.
9. Once you have downloaded the driver, double-click on the downloaded file and follow the on-screen instructions to install it.
10. After the installation is complete, restart your laptop again to ensure the changes take effect.
By reinstalling or updating your network adapter, you can resolve many Wi-Fi connection issues on your laptop. This process helps refresh the driver and ensure compatibility with your laptop’s hardware. Remember to restart your laptop after each step to allow the changes to take effect.
If you’re still experiencing Wi-Fi connection problems after reinstalling or updating the network adapter, it’s recommended to check other possible sources of the issue, such as your router, network switch, or any other devices that may be causing interference. Additionally, you can try connecting to a different Wi-Fi network or using an Ethernet cable to troubleshoot further.
For more troubleshooting tips and resources, you can visit the Microsoft website or consult the support documentation specific to your laptop model.
Restore advanced internet settings
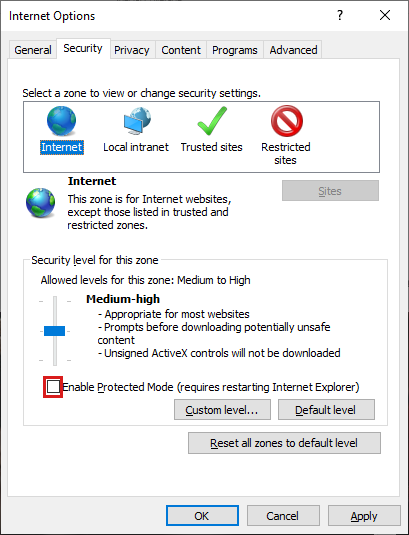
If you’re experiencing Wi-Fi connection issues on your laptop, there may be a problem with your advanced internet settings. Fortunately, troubleshooting and fixing this issue is straightforward. Here’s how you can restore your advanced internet settings to resolve laptop Wi-Fi connection problems.
1. Open the Network and Sharing Center by right-clicking on the network icon in the taskbar and selecting “Open Network and Sharing Center.”
2. In the Network and Sharing Center, click on “Change adapter settings” in the left-hand menu.
3. Locate your Wi-Fi adapter, right-click on it, and select “Properties.”
4. In the Wi-Fi adapter properties window, click on the “Configure” button.
5. In the next window, navigate to the “Advanced” tab.
6. Look for options related to your Wi-Fi connection, such as “Wireless Mode,” “Channel Width,” or “Transmission Power.” The specific options may vary depending on your laptop’s Wi-Fi adapter.
7. Reset these options to their default values by clicking on the “Restore Defaults” or “Reset” button.
8. Click “OK” to save the changes and close the properties window.
9. Restart your laptop to apply the restored advanced internet settings.
Once your laptop restarts, check if the Wi-Fi connection issues have been resolved. If not, you may need to further troubleshoot or seek additional assistance. Remember to also ensure that your router and modem are functioning properly, and there are no other external factors causing interference.
By following these steps, you can quickly restore your advanced internet settings and potentially resolve Wi-Fi connection problems on your laptop. Stay connected and enjoy uninterrupted browsing, streaming, and online activities.
Note: If you’re not comfortable making changes to your advanced internet settings, it’s always a good idea to seek guidance from a professional or refer to manufacturer documentation for your specific laptop model.
Check if network services are running
1. Open the Network Connections settings by pressing the Windows key + R on your keyboard, then type “ncpa.cpl” and hit Enter.
2. Look for the Wi-Fi adapter in the list of network connections. It will typically be labeled as “Wi-Fi” or “Wireless Network Connection“. If the adapter is disabled, you will see a red X or a grayed-out icon next to it.
3. Right-click on the Wi-Fi adapter and select “Enable“. This will turn on the Wi-Fi adapter and initiate a search for available networks.
4. If the Wi-Fi adapter is already enabled, right-click on it and select “Disable“. Wait for a few seconds, then right-click again and select “Enable“. This will refresh the Wi-Fi adapter and trigger a new search for networks.
5. If the Wi-Fi adapter is enabled but still not connecting to any networks, try restarting your laptop. Sometimes a simple restart can resolve temporary network issues.
6. If you’re still unable to connect to Wi-Fi, try resetting your router. Locate the router’s power button and switch it off. Wait for about 10 seconds, then turn it back on. Wait for the router to fully reboot before attempting to connect again.
7. If none of these steps work, it’s possible that there may be a problem with your Wi-Fi hardware or drivers. Try updating the drivers for your Wi-Fi adapter by visiting the manufacturer’s website and downloading the latest version.
Remember to also check if other devices are able to connect to Wi-Fi, as this can help determine if the issue is specific to your laptop or the network itself.
Hopefully, following these steps will help you troubleshoot and fix any Wi-Fi connection issues on your laptop. If you need further assistance, feel free to contact our support team or refer to our online resources for more detailed instructions.
Renew IP address
Renewing your IP address can help troubleshoot and fix laptop Wi-Fi connection issues. Here’s how to do it:
1. Open the “Command Prompt” on your laptop. You can do this by pressing the Windows key + R, typing “cmd” in the “Run” dialog box, and hitting Enter.
2. In the Command Prompt window, type the following command: ipconfig /release. This will release your current IP address.
3. After releasing the IP address, type the command: ipconfig /renew. This will request a new IP address from your network.
4. Wait for a few seconds until the process completes. You will see a new IP address assigned to your laptop.
5. Once the IP address is renewed, try reconnecting to your Wi-Fi network. Check if the connection issues are resolved.
If renewing the IP address doesn’t fix the problem, here are a few additional steps you can try:
1. Restart your laptop and router. Sometimes, a simple restart can resolve connectivity issues.
2. Check if other devices can connect to the Wi-Fi network. If not, there might be an issue with your router or the internet service provider.
3. Move closer to the router to ensure a stronger Wi-Fi signal. Sometimes, distance can cause connectivity problems.
4. Disable and re-enable your Wi-Fi adapter. Right-click on the Wi-Fi icon in the system tray, select “Open Network & Internet settings,” click on “Change adapter options,” right-click on your Wi-Fi adapter, and choose “Disable.” After a few seconds, right-click again and select “Enable.”
5. Update your Wi-Fi adapter driver. Go to the manufacturer’s website or use Windows Update to check for the latest driver version.
6. Reset your network settings. Open the “Command Prompt” as mentioned earlier and type the command: netsh int ip reset. This will reset your TCP/IP stack.
Perform network reset
Performing a network reset can help troubleshoot and fix laptop Wi-Fi connection issues.
To perform a network reset on your laptop, follow these steps:
1. Press the Windows key on your computer keyboard to open the Start menu.
2. Type “Network reset” in the search bar and select the “Network reset” option from the search results.
3. In the Network reset window, click on the “Reset now” button. A warning message will appear, informing you that this action will remove all network adapters and set networking components to their default settings.
4. Read the warning message carefully and click on the “Yes” button to proceed with the network reset.
5. Your laptop will restart, and the network reset process will begin. This may take a few minutes.
6. Once the network reset is complete, your laptop will restart again. After the restart, you’ll need to reconnect to your Wi-Fi network and enter the password if required.
Performing a network reset can help resolve common Wi-Fi connection issues, such as slow or unstable connections, inability to connect to a network, or limited connectivity. This process resets your network adapters and restores them to their default settings, which can often fix software-related problems.
It’s important to note that performing a network reset will remove all network adapters from your laptop. After the reset, you’ll need to reinstall any network adapters or drivers that were previously installed. If you’re unsure about how to do this, you can visit the manufacturer’s website or contact their support for assistance.
If you’re still experiencing issues with your laptop Wi-Fi connection after performing a network reset, there may be other underlying factors causing the problem. It could be related to your router, network settings, or even external factors like an internet outage or interference from other devices. In such cases, it’s recommended to seek further troubleshooting steps or contact technical support for additional assistance.
Remember to create a backup of your important files and data before performing any troubleshooting steps to avoid any loss of information. Taking regular backups is a good practice to ensure the safety of your files and prevent any potential data loss.


