In today’s tech-driven world, a stable and reliable internet connection is essential, especially when it comes to laptops. However, encountering the frustrating issue of a missing WiFi network can bring productivity to a screeching halt. This article explores the possible causes behind the disappearance of laptop WiFi networks and provides effective solutions to get you swiftly back online.
Recently, Fortect has become increasingly popular as a reliable and efficient way to address a wide range of PC issues. It's particularly favored for its user-friendly approach to diagnosing and fixing problems that can hinder a computer's performance, from system errors and malware to registry issues.
- Download and Install: Download Fortect from its official website by clicking here, and install it on your PC.
- Run a Scan and Review Results: Launch Fortect, conduct a system scan to identify issues, and review the scan results which detail the problems affecting your PC's performance.
- Repair and Optimize: Use Fortect's repair feature to fix the identified issues. For comprehensive repair options, consider subscribing to a premium plan. After repairing, the tool also aids in optimizing your PC for improved performance.
Enable the Wi-Fi service on your laptop
To enable Wi-Fi service on your laptop, follow these simple steps:
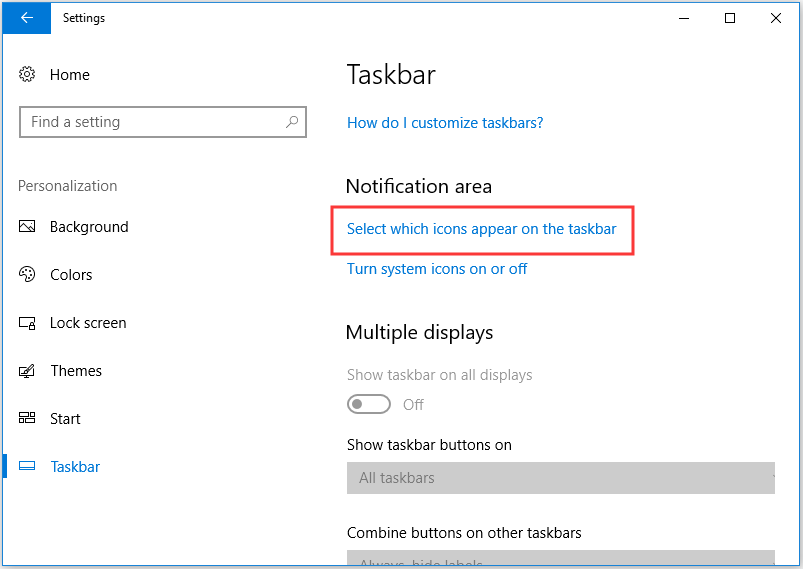
1. Check the Wi-Fi icon: Look for the Wi-Fi icon in your taskbar or system tray. If it’s not visible, it may be hidden. Click the up arrow to expand the hidden icons.
2. Enable Wi-Fi: Right-click the Wi-Fi icon and select “Open Network and Internet Settings.” In the Settings window, click “Wi-Fi” on the left sidebar. Toggle the switch to the “On” position to enable Wi-Fi.
3. Check airplane mode: If Wi-Fi is still not showing up, make sure airplane mode is turned off. Open the Action Center by clicking the speech bubble icon in the taskbar. If airplane mode is enabled, click the airplane mode tile to turn it off.
4. Update Wi-Fi drivers: Outdated or corrupted Wi-Fi drivers can cause connectivity issues. To update your drivers, right-click the Start button, select “Device Manager,” and expand the “Network adapters” category. Right-click your Wi-Fi adapter and select “Update driver.” Follow the on-screen instructions to complete the update.
5. Restart your laptop: Sometimes, a simple restart can resolve Wi-Fi issues. Click the Start button, select “Power,” and choose “Restart” to reboot your laptop.
If none of these solutions work, you may need to troubleshoot further or seek assistance from your laptop manufacturer’s support website.
Check network settings and update drivers
To resolve the issue of your laptop’s WiFi not showing, you can check the network settings and update drivers. Here’s how:
1. Check network settings:
– Click on the WiFi icon in the taskbar (bottom right corner).
– Select “Open Network & Internet settings” from the context menu.
– In the Settings window, select “Network & Internet” (Windows 10) or “Network and Sharing Center” (Windows 7).
– Click on “Change adapter options” or “Change adapter settings”.
– Right-click on the WiFi connection and select “Enable” if it’s disabled.
2. Update drivers:
– Press the Windows key + X and choose “Device Manager”.
– Expand the “Network adapters” category.
– Right-click on the WiFi adapter and select “Update driver”.
– Choose “Search automatically for updated driver software”.
– If an update is found, follow the on-screen instructions to install it.
If the WiFi issue persists, you can try the following additional steps:
3. Reset network settings:
– Press the Windows key + X and select “Command Prompt (Admin)”.
– Type the following commands one by one and press Enter after each:
netsh winsock reset
netsh int ip reset
ipconfig /release
ipconfig /renew
– Restart your laptop and check if the WiFi is now showing.
4. Disable power saving mode:
– Open the Device Manager as mentioned earlier.
– Right-click on the WiFi adapter and select “Properties”.
– Go to the “Power Management” tab.
– Uncheck the option “Allow the computer to turn off this device to save power”.
– Click “OK” to save the changes.
Restart modem and Wi-Fi router
To fix the issue of your laptop’s WiFi not showing, one of the simplest solutions is to restart your modem and Wi-Fi router. This can help resolve any temporary connectivity issues or glitches.
Here’s how you can restart your modem and Wi-Fi router:
1. Locate your modem and Wi-Fi router. These devices are typically found near each other and connected by cables.
2. Unplug the power cords from both the modem and router. Wait for about 10-15 seconds to ensure that all power is drained from the devices.
3. After the waiting period, plug the power cord back into the modem first. Allow a few moments for the modem to fully boot up and establish a stable internet connection.
4. Once the modem is up and running, plug the power cord back into the Wi-Fi router. Again, give it a few moments to fully boot up and establish its connection to the modem and the internet.
5. Check your laptop to see if the WiFi icon appears in the taskbar or system tray. If not, proceed to other troubleshooting steps or contact your internet service provider for further assistance.
Remember to perform these steps in the exact order mentioned. Restarting your modem and Wi-Fi router can help resolve various connectivity issues and get your laptop’s WiFi back up and running smoothly.
If the issue persists, it may be necessary to explore other troubleshooting methods or seek professional technical support.
python

import subprocess
def check_wifi_status():
try:
output = subprocess.check_output(["netsh", "wlan", "show", "interfaces"]).decode("utf-8")
return output
except subprocess.CalledProcessError:
return None
def restart_wifi_interface():
try:
subprocess.check_output(["netsh", "interface", "set", "interface", "Wi-Fi", "disable"])
subprocess.check_output(["netsh", "interface", "set", "interface", "Wi-Fi", "enable"])
return True
except subprocess.CalledProcessError:
return False
# Check Wi-Fi status
wifi_status = check_wifi_status()
if wifi_status is not None:
print("Wi-Fi status:")
print(wifi_status)
else:
print("Failed to retrieve Wi-Fi status.")
# Restart Wi-Fi interface
restart_success = restart_wifi_interface()
if restart_success:
print("Wi-Fi interface restarted successfully.")
else:
print("Failed to restart Wi-Fi interface.")
This code uses the `subprocess` module to execute Windows command-line commands (`netsh`) to check the Wi-Fi status and restart the Wi-Fi interface. It prints the status and whether the interface restart was successful or not. However, please note that this code may not solve all Wi-Fi-related issues, and it is always recommended to consult specific troubleshooting guides or contact technical support for assistance with your laptop’s Wi-Fi problems.
Enable SSID broadcast for your Wi-Fi
To enable SSID broadcast for your Wi-Fi, follow these steps:
1. Open the Start menu and search for “Control Panel.”
2. Click on “Control Panel” in the search results to open it.
3. In the Control Panel window, click on “Network and Internet.”
4. Next, click on “Network and Sharing Center.”
5. In the Network and Sharing Center, click on “Change adapter settings” from the left-hand menu.
6. Right-click on your Wi-Fi network adapter and select “Properties” from the context menu.
7. In the Wi-Fi Properties window, click on the “Configure” button.
8. Go to the “Advanced” tab in the Wi-Fi adapter properties.
9. Look for an option called “Enable SSID Broadcast” or “Broadcast SSID” and select it.
10. Click on “OK” to save the changes and exit the properties window.
By enabling SSID broadcast, your Wi-Fi network name will be visible to other devices, making it easier for them to connect.
Note: Keep in mind that enabling SSID broadcast may slightly increase the visibility of your network to potential unauthorized users. To enhance security, make sure to use strong passwords and enable other wireless security features like WPA2 encryption.
If you encounter any issues or need further assistance, feel free to reach out to Microsoft Support.
Troubleshoot network connectivity issues
- Click on the Start menu and select Restart.
- Wait for the laptop to restart and check if the WiFi icon appears in the system tray.
Check Airplane Mode
- Click on the Start menu and go to Settings.
- Click on Network & Internet and select Airplane mode from the left panel.
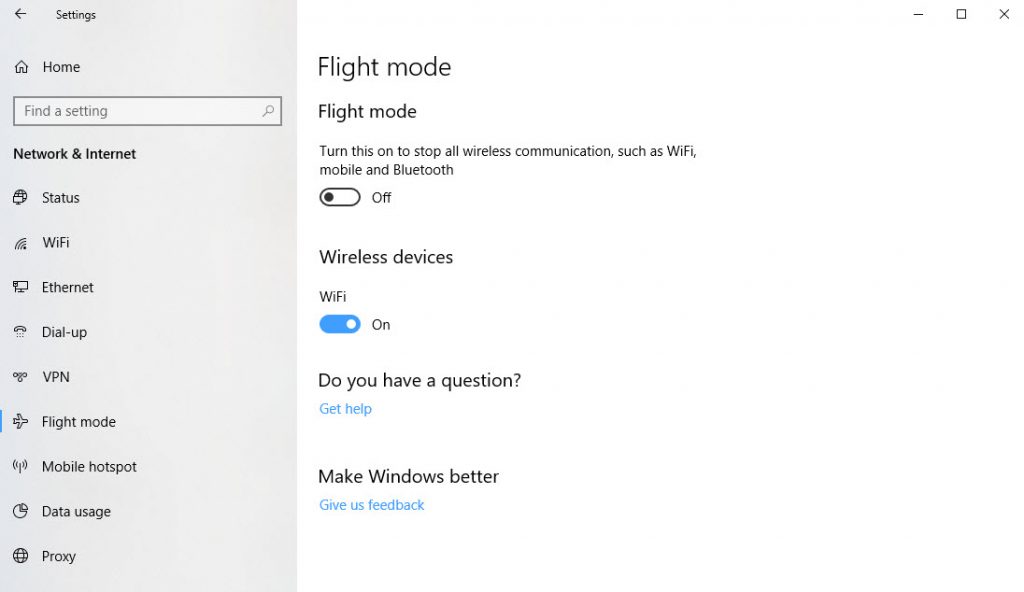
- Make sure that the Airplane mode toggle is turned off. If it is on, turn it off and check if the WiFi icon reappears.
Update WiFi Driver
- Press Windows key + X and select Device Manager from the menu.
- In the Device Manager window, expand the Network adapters category.
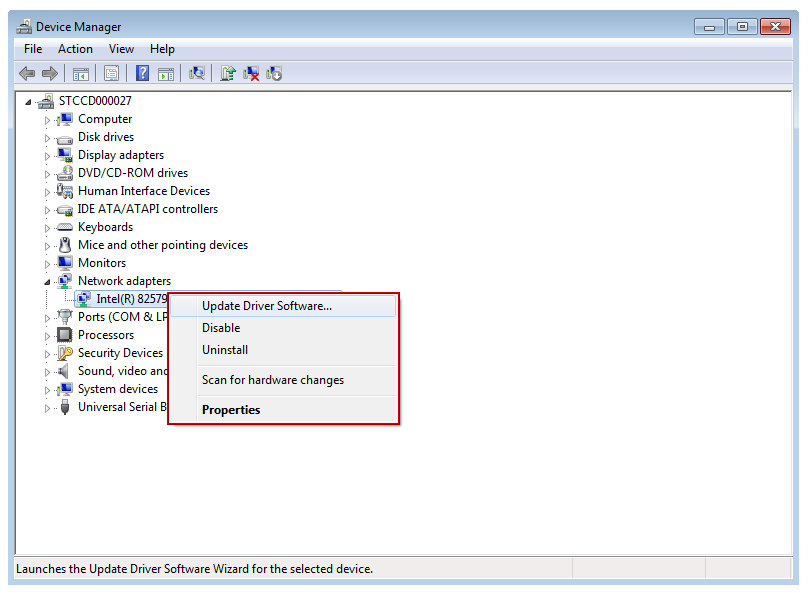
- Right-click on the WiFi adapter and select Update driver.
- Choose the Search automatically for updated driver software option and follow the on-screen instructions to update the driver.
Restart Network Adapter
- Press Windows key + X and select Device Manager from the menu.
- In the Device Manager window, expand the Network adapters category.
- Right-click on the WiFi adapter and select Disable device.
- Wait for a few seconds, then right-click on the WiFi adapter again and select Enable device.
Reset TCP/IP Stack
- Press Windows key + X and select Command Prompt (Admin) or Windows PowerShell (Admin).
- In the Command Prompt or Windows PowerShell window, type the following command and press Enter:
netsh int ip reset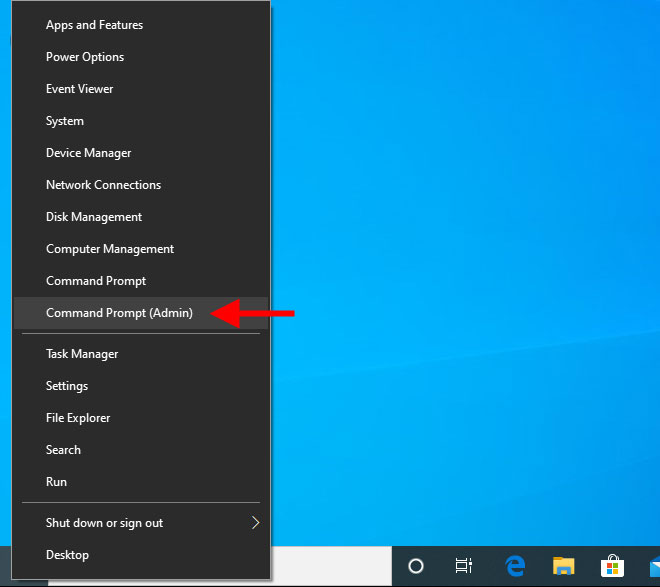
- Wait for the command to complete, then restart your laptop.
Contact your internet service provider (ISP) if needed
If your laptop’s WiFi is not showing, it may be necessary to contact your internet service provider (ISP) for assistance. They can help troubleshoot and resolve any network connectivity issues you may be experiencing.
To contact your ISP, follow these steps:
1. Identify your ISP’s contact information. This can typically be found on your monthly bill or on their website.
2. Call or email your ISP’s customer support line. Explain the issue you are facing with your laptop’s WiFi not showing.
3. Provide any necessary information requested by the ISP representative, such as your account details or specific error messages you may have encountered.
4. Follow any instructions provided by your ISP to troubleshoot the issue. This may involve resetting your modem, checking network settings, or updating firmware.
5. If the issue persists, ask your ISP for further assistance or inquire about sending a technician to your location for further troubleshooting.
Remember to stay patient and cooperative during the troubleshooting process. Your ISP’s support team is there to help you resolve the issue and restore your WiFi connection.
For additional guidance, you can also consult online resources provided by your ISP or visit their support forums for troubleshooting tips specific to your internet service provider.
If you have any other questions or need further assistance, feel free to reach out to us.


