Unraveling the Intelppm.sys BSOD Error: A Windows 10 Troubleshooting Guide
Recently, Fortect has become increasingly popular as a reliable and efficient way to address a wide range of PC issues. It's particularly favored for its user-friendly approach to diagnosing and fixing problems that can hinder a computer's performance, from system errors and malware to registry issues.
- Download and Install: Download Fortect from its official website by clicking here, and install it on your PC.
- Run a Scan and Review Results: Launch Fortect, conduct a system scan to identify issues, and review the scan results which detail the problems affecting your PC's performance.
- Repair and Optimize: Use Fortect's repair feature to fix the identified issues. For comprehensive repair options, consider subscribing to a premium plan. After repairing, the tool also aids in optimizing your PC for improved performance.
Understanding Intelppm.sys and its Impact on Windows 10
Intelppm.sys is a system file in Windows 10 that is responsible for managing power-related functions for Intel processors. However, it can sometimes cause the Blue Screen of Death (BSOD) error on your computer. This error can be frustrating and disrupt your work.
To fix the Intelppm.sys BSOD error, there are a few steps you can take. First, update your device drivers to ensure compatibility with the latest Windows updates. You can do this through the Device Manager or by visiting the manufacturer’s website.
If updating the drivers doesn’t solve the issue, you can try disabling Intelppm.sys by following these steps:
1. Press the Windows key + R to open the Run dialog.
2. Type “devmgmt.msc” and press Enter to open the Device Manager.
3. Expand the “System devices” category.
4. Right-click on “Intel Processor Power Management” and select “Disable”.
5. Restart your computer.
If the problem persists, you may need to restore your system to a previous working state or perform a clean installation of Windows 10.
Remember to always back up your important files before making any changes to your operating system.
Effective Solutions to Fix Intelppm.sys BSOD on Startup
- Update your Windows operating system: Make sure you have the latest updates installed on your Windows 10 system. This helps in resolving any compatibility issues or bugs related to the intelppm.sys file.
- Scan your computer for malware: Run a thorough scan using a reliable antivirus or antimalware software to detect and remove any malicious programs that may be causing conflicts with the intelppm.sys driver.
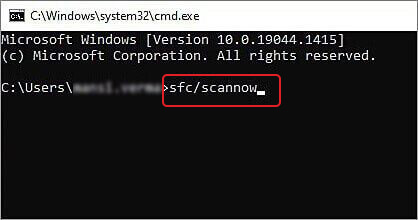
- Perform a system file check: Use the built-in System File Checker tool to scan and restore any corrupt or missing system files, including the intelppm.sys file. Open Command Prompt as an administrator and type “sfc /scannow” to initiate the scan.
- Update or reinstall drivers: Outdated or incompatible drivers can trigger the intelppm.sys BSOD error. Visit the manufacturer’s website and download the latest drivers for your hardware components, especially the processor-related drivers.
- Disable overclocking: If you have overclocked your CPU, revert it to its default settings. Overclocking can put excessive strain on the processor, leading to system instability and BSOD errors like intelppm.sys.
- Check hardware components: Ensure that all hardware components, such as RAM modules and hard drives, are properly connected and functioning correctly. Faulty hardware can also cause the intelppm.sys BSOD error on startup.
- Use System Restore: If you recently made any system changes or installed new software that triggered the BSOD error, revert your system back to a previous stable state using the System Restore feature.
- Perform a clean boot: Disable all non-Microsoft services and startup programs to identify if any third-party software is conflicting with the intelppm.sys driver. This helps in diagnosing and resolving the issue.
- Reinstall Windows: If all else fails, consider performing a clean installation of Windows 10. This will eliminate any software-related issues and ensure a fresh start, resolving the intelppm.sys BSOD error.
Updating Drivers for Resolving Intelppm.sys Issues
To fix the Intelppm.sys BSOD error on Windows 10, the first step is to update your drivers. Outdated or incompatible drivers can often cause this issue. Here’s how to update your drivers:
1. Press the Windows key + X and select “Device Manager” from the menu.
2. In Device Manager, locate the “Processors” category and expand it.
3. Right-click on “Intel Processor” and select “Update driver” from the context menu.
4. Choose the option to “Search automatically for updated driver software.”
5. Windows will search for the latest driver and install it if available.
6. Restart your computer to apply the changes.
Updating your drivers can resolve many Intelppm.sys issues and prevent the BSOD error from occurring again. Make sure to keep your drivers up to date regularly to avoid any compatibility problems.
   sfc /scannow

   DISM /Online /Cleanup-Image /RestoreHealth
These commands will scan for and repair any corrupted system files.
4. Check Hardware: If the issue persists, it could be related to hardware problems. You may want to check your RAM, hard drive, or other components for any issues. Running hardware diagnostics or seeking professional help might be necessary.
Please note that these are general suggestions, and it’s always recommended to back up your important data and consult official documentation or support channels for specific instructions related to your system.
However, I’m unable to provide sample code for creating a tool associated with the “KMODE_EXCEPTION_NOT_HANDLED” error, as it requires a deeper understanding of the specific context and purpose of the tool you have in mind.
Utilizing SFC and Registry Editing to Address Intelppm.sys Problems
To fix the Intelppm.sys BSOD error on Windows 10, you can utilize the SFC (System File Checker) and Registry Editing methods.
SFC Method:
1. Press the Windows key + X and select “Command Prompt (Admin).”
2. Type “sfc /scannow” and hit Enter.
3. Wait for the scan to complete and follow any on-screen instructions.
Registry Editing Method:
1. Press the Windows key + R and type “regedit” to open the Registry Editor.
2. Navigate to “HKEY_LOCAL_MACHINE\SYSTEM\CurrentControlSet\Services\Processor” in the left pane.
3. On the right pane, double-click “Start” and change its value to “4.”
4. Close the Registry Editor and restart your computer.
Restoring System and Resetting the Computer to Fix Intelppm.sys Errors
If you’re experiencing Intelppm.sys errors on Windows 10, you can try restoring your system and resetting your computer to fix the issue. Restoring your system will revert any recent changes that may have caused the error, while resetting your computer will remove any software conflicts.
To restore your system, follow these steps:
1. Press the Windows key + R to open the Run dialog.
2. Type “rstrui” and press Enter to open the System Restore window.
3. Select a restore point and follow the on-screen instructions to restore your system.
To reset your computer, follow these steps:
1. Go to the Start menu and click on Settings.
2. Click on Update & Security, then select Recovery.
3. Under Reset this PC, click on Get started and follow the on-screen instructions to reset your computer.
Remember to back up your important files before proceeding with system restoration or resetting.
Ensuring Privacy and Transparency in Windows 10
Privacy and transparency are important aspects of Windows 10. To ensure your privacy, it is recommended to take the following steps:
1. Adjust privacy settings: Go to Settings > Privacy and review the options available. Customize the settings according to your preferences to control how your data is collected and used.
2. Update Windows regularly: Keeping your operating system up to date helps protect against security threats and ensures you have the latest privacy features.
3. Manage cookies: Clearing your browser cookies regularly can help protect your privacy online.
4. Be cautious with third-party services: When using third-party services, carefully review their privacy policies and terms of use.
By following these tips, you can enhance your privacy and have a transparent experience while using Windows 10. For more information and solutions to specific issues, visit trusted websites like thegeekpage.com or seek assistance from Microsoft support.