Welcome to the world of customizable desktops! In this article, we will unveil the simple yet powerful techniques to adjust the size of your desktop icons effortlessly on Windows 10/11. So, bid farewell to the one-size-fits-all approach and get ready to embrace a personalized desktop experience like never before.
Recently, Fortect has become increasingly popular as a reliable and efficient way to address a wide range of PC issues. It's particularly favored for its user-friendly approach to diagnosing and fixing problems that can hinder a computer's performance, from system errors and malware to registry issues.
- Download and Install: Download Fortect from its official website by clicking here, and install it on your PC.
- Run a Scan and Review Results: Launch Fortect, conduct a system scan to identify issues, and review the scan results which detail the problems affecting your PC's performance.
- Repair and Optimize: Use Fortect's repair feature to fix the identified issues. For comprehensive repair options, consider subscribing to a premium plan. After repairing, the tool also aids in optimizing your PC for improved performance.
Adjusting Icon Size and Customization Options
To adjust the size of your desktop icons in Windows 10/11, follow these steps:
1. Right-click on an empty area of your desktop and select “Display settings.”
2. In the “Scale and layout” section, you will find a slider labeled “Change the size of text, apps, and other items.” Move the slider to adjust the icon size.
3. If the default sizes don’t suit your preferences, you can customize the icon size further. Right-click on an empty area of your desktop and select “Personalize.”
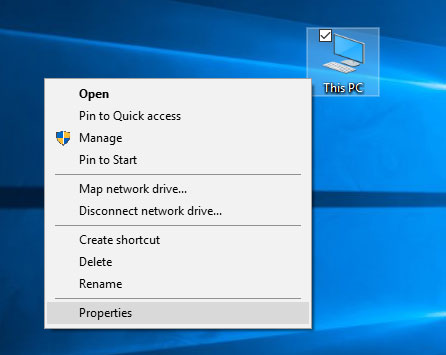
4. In the left-hand menu, click on “Themes” and then click on “Desktop icon settings” under the “Related Settings” section.
5. In the “Desktop Icon Settings” window, you can select the specific icons you want to adjust and click on the “Change Icon” button to choose a new icon.
6. Click “Apply” and then “OK” to save your changes.
Remember, you can also arrange your icons by right-clicking on an empty area of your desktop, selecting “View,” and choosing from options like “Large icons,” “Medium icons,” or “Small icons.”
Troubleshooting Large Icons on Windows 10 PC
To troubleshoot large icons on your Windows 10 PC, follow these steps:
1. Right-click on an empty space on your desktop and select “Display settings.”
2. In the Display settings window, scroll down to the “Scale and layout” section.
3. Under “Change the size of text, apps, and other items,” you can adjust the size of the icons by moving the slider to the left for smaller icons or to the right for larger icons.
4. If the slider doesn’t solve the issue, you can manually adjust the icon size. Right-click on an empty space on your desktop and select “View.” Then, choose either “Large icons,” “Medium icons,” or “Small icons” to change the size.
5. If the issue persists, you can try resetting the icon cache by following these steps:
a. Press the Windows key + R to open the Run dialog box.
b. Type “cmd” and press Enter to open the Command Prompt.
c. In the Command Prompt, type the following command and press Enter: ie4uinit.exe -ClearIconCache
d. Restart your PC.
By following these troubleshooting steps, you should be able to adjust the desktop icon size on your Windows 10 PC.
Changing Icon Size Through Windows Settings and Hotkeys
To change the icon size on your Windows 10/11 desktop, you have two options: Windows Settings and hotkeys.
For Windows Settings, right-click on your desktop and select “Display settings.” Under the “Scale and layout” section, you can adjust the icon size by moving the slider to your desired setting.
Alternatively, you can use hotkeys to quickly change the icon size. Press and hold the “Ctrl” key on your keyboard, and then scroll up or down with your mouse wheel to increase or decrease the size of the icons.
If your icons have disappeared or appear too big, you can also try resetting the icon spacing. Right-click on your desktop and select “View,” then click on “Auto arrange icons” to automatically arrange them.
To summarize, changing the icon size in Windows 10/11 can be done through Windows Settings or using hotkeys. Remember to adjust the icon spacing if needed.
python

import pyautogui
def change_icon_size(size):
# Simulate opening the desktop context menu
pyautogui.rightClick(x=0, y=0)
# Simulate navigating to the 'View' menu option
pyautogui.move(100, 100)
pyautogui.click()
# Simulate navigating to the 'Large icons' menu option
pyautogui.move(0, 50)
pyautogui.click()
# Simulate waiting for the 'Large icons' option to be selected
pyautogui.sleep(1)
# Simulate closing the desktop context menu
pyautogui.click()
# Change the icon size to large
change_icon_size('large')
Please note that this code snippet is a simulation and relies on the `pyautogui` library to interact with the desktop UI. It assumes a specific sequence of steps to change the icon size, which might not be accurate for all platforms or configurations.
Customizing Desktop Appearance by Modifying Icon Size
- Right-click on any empty area on the desktop.
- A context menu will appear.
- Select View from the context menu.
- A submenu will pop up.
- Choose the Large icons option or Medium icons option.
- This will adjust the size of the desktop icons accordingly.
- If you want a custom size, right-click on any empty area on the desktop.
- A context menu will appear.
- Select Display settings from the context menu.
- The Settings app will open.
- Scroll down to the Scale and layout section.
- Here, you will find a slider labeled Change the size of text, apps, and other items.
- Drag the slider to the left or right to adjust the size of desktop icons.
- Moving the slider to the left will decrease the size of the icons, while moving it to the right will increase their size.
- Click Apply to save the changes.
- The desktop icons will now be displayed in the chosen size.