Welcome to our article on how to activate the front panel audio jack on your Windows 10/11 operating system. If you are experiencing issues with your audio jack not working, fret not! We have got you covered with simple and effective solutions to get your audio up and running again. So let’s dive right in and resolve this problem together.
Recently, Fortect has become increasingly popular as a reliable and efficient way to address a wide range of PC issues. It's particularly favored for its user-friendly approach to diagnosing and fixing problems that can hinder a computer's performance, from system errors and malware to registry issues.
- Download and Install: Download Fortect from its official website by clicking here, and install it on your PC.
- Run a Scan and Review Results: Launch Fortect, conduct a system scan to identify issues, and review the scan results which detail the problems affecting your PC's performance.
- Repair and Optimize: Use Fortect's repair feature to fix the identified issues. For comprehensive repair options, consider subscribing to a premium plan. After repairing, the tool also aids in optimizing your PC for improved performance.
Enable Front Panel Jack Detection
To enable front panel jack detection for your audio device on Windows 10/11 and fix any issues you may be experiencing, follow these steps:
Step 1: Open the Control Panel by searching for it in the Windows search box or clicking on the gear button in the Start menu.
Step 2: In the Control Panel, navigate to Hardware and Sound.
Step 3: Under the Sound category, click on “Manage audio devices.”
Step 4: In the Sound window, go to the Playback tab and select your audio device from the list.
Step 5: Click on the Properties button below the list.
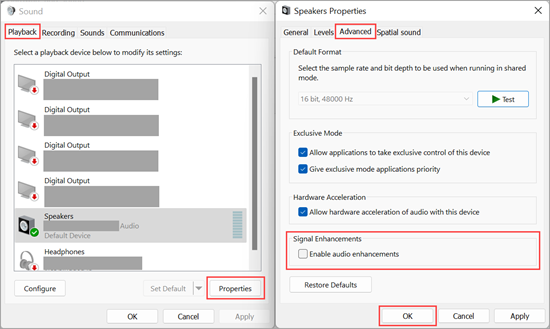
Step 6: In the Properties window, go to the Advanced tab.
Step 7: Check the box next to “Enable audio jack detection” or a similar option.
Step 8: Click OK to save the changes.
Set the Required Audio Device as Default
To set the required audio device as default on Windows 10/11 and fix any issues with the front panel audio jack, follow these steps:
Step 1: Search for “Sound” in the search box next to the Start menu and open the Sound settings.
Step 2: In the Sound settings, go to the “Playback” tab and right-click on the audio device you want to set as default.
Step 3: From the context menu, select “Set as Default Device” to make it the default audio device for your Windows PC.
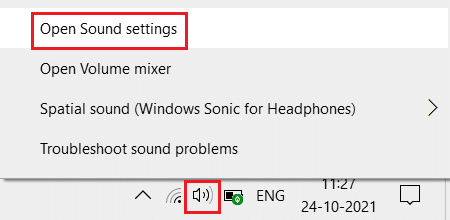
Step 4: You can also access the audio device settings through the sound icon in the system tray. Simply click on the icon, then click on the gear button to open the Sound settings.
By following these steps, you can easily set the required audio device as default and resolve any issues with the front panel audio jack on your Windows 10/11 PC. Remember to check for any updates or driver fixes through Windows Update or the manufacturer’s website if you encounter any further problems.
[Source: Tutorial on steemit.com]
Update or Reinstall Your Audio Device Driver
To activate the front panel audio jack on Windows 10/11 and fix any issues with it not working, you may need to update or reinstall your audio device driver. Here are the steps to do so:
1. Open the Device Manager by right-clicking on the Start menu and selecting “Device Manager”.
2. Expand the “Sound, video, and game controllers” category.
3. Locate your audio device driver, which is usually labeled as “Realtek HD Audio” or something similar.
4. Right-click on the driver and select “Update driver” from the context menu.
5. Choose the option to automatically search for updated driver software. If Windows Update doesn’t find any updates, you can also try downloading the latest driver from the manufacturer’s website.
6. If updating the driver doesn’t resolve the issue, you can try uninstalling the driver by right-clicking on it and selecting “Uninstall device”. Then restart your computer and Windows will automatically reinstall the driver.
python

import ctypes

from pycaw.pycaw import AudioUtilities, IAudioEndpointVolume
# Enumerate audio devices
devices = AudioUtilities.GetSpeakers()
interface = devices.Activate(IAudioEndpointVolume._iid_, ctypes.CLSCTX_ALL, None)
# Control audio settings
volume = ctypes.cast(interface, ctypes.POINTER(IAudioEndpointVolume))
volume.SetMasterVolumeLevel(-10.0, None) # Example: Set volume level to -10.0 dB
# Get current volume level
current_volume = volume.GetMasterVolumeLevel()
# Mute/unmute audio
volume.SetMute(1, None) # Example: Mute audio
volume.SetMute(0, None) # Example: Unmute audio
Please note that this code snippet is meant to demonstrate the usage of the `pycaw` library to control audio settings on Windows. It may require additional setup and configuration, and it does not directly address activating front panel audio. The `pycaw` library provides more functionalities to manipulate audio settings, so you can explore its documentation for further details.
If you have a specific platform or programming language in mind, please let me know, and I’ll be happy to assist you further.
Connect the Audio Jack to the Back of Your Computer
To connect the audio jack to the back of your computer, follow these steps:
1. Make sure your computer is turned off.
2. Locate the audio jack on the back of your computer. It is usually color-coded green.
3. Take your audio cable and plug one end into the audio jack on your computer.
4. Plug the other end of the cable into the audio device you want to connect, such as headphones or speakers.
5. Turn on your computer and wait for it to boot up.
6. Once your computer has booted up, open the audio device settings. You can usually find this in the control panel or by right-clicking on the speaker icon in the taskbar.
7. In the audio device settings, select the option to activate the front panel audio jack.
8. Save the changes and test the audio device to make sure it is working properly.
If you are still experiencing issues with the front panel audio jack not working, there are a few things you can try:
1. Update your audio driver: Visit the manufacturer’s website or use a third-party software like MiniTool to download and install the latest audio driver for your computer.
2. Check the audio ports: Make sure the audio ports on your computer are clean and free from any debris that may be blocking the connection.
3. Check the motherboard: Some motherboards have specific settings in the BIOS that need to be enabled for the front panel audio jack to work. Check your motherboard’s manual or visit the manufacturer’s website for instructions on how to enable this setting.
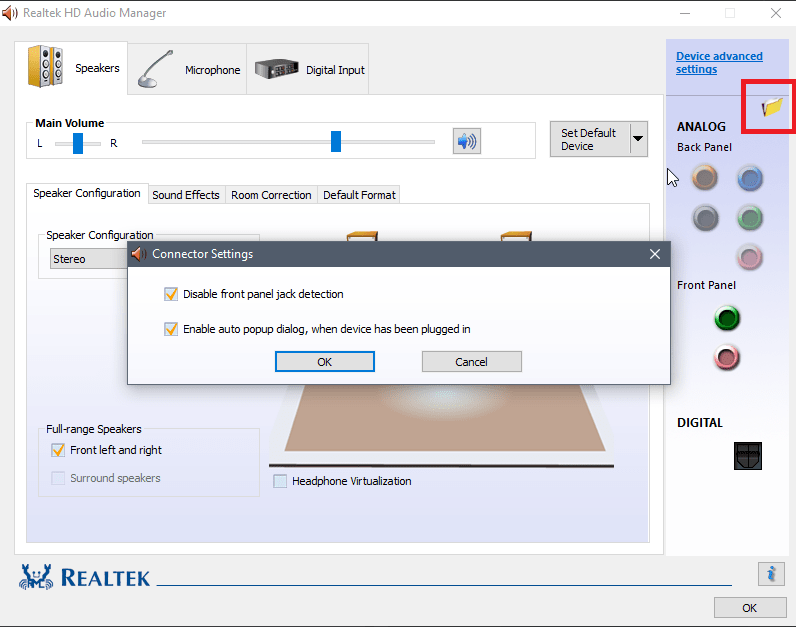
4. Use the HD Audio Manager: If you have a Realtek audio card, you can use the HD Audio Manager to configure the front panel audio jack. Open the HD Audio Manager and look for options related to the front panel audio jack.
5. Consult the community: If none of the above fixes work, consider reaching out to online forums, blogs, or communities like Steemit for additional troubleshooting options. Many people have dealt with similar issues and may have found alternative solutions.
Troubleshoot Playing Audio
- Check audio settings: Ensure that the audio output is set to the correct device and the volume is not muted.
- Update audio drivers: Install the latest drivers for your audio device from the manufacturer’s website or use Windows Update.
- Verify physical connections: Ensure that your speakers or headphones are properly plugged into the front panel audio jack.
- Check for disabled audio device: Confirm that the front panel audio device is enabled in the Sound settings.
- Run the audio troubleshooter: Utilize the built-in Windows audio troubleshooter to automatically diagnose and fix common audio issues.
- Restart Windows Audio service: Restart the Windows Audio service to resolve any potential software conflicts.
- Disable audio enhancements: Disable any audio enhancements that might be affecting the front panel audio output.
- Disable exclusive mode: Prevent applications from taking exclusive control of the audio device through the Sound settings.
- Scan for malware: Perform a thorough scan for malware and viruses that could be interfering with the audio functionality.
- Check for Windows updates: Ensure that your system has all the latest updates installed, as they can include important audio-related fixes.
Turn on/off front panel jack detection
- Right-click on the sound icon in the system tray and select Open Sound settings.
- In the Sound settings window, scroll down to the section labeled Related Settings and click on Sound Control Panel.
- In the Sound Control Panel, navigate to the Playback tab.
- Locate the audio device labeled Speakers or Headphones (depending on your setup) and right-click on it.
- From the context menu, select Properties.
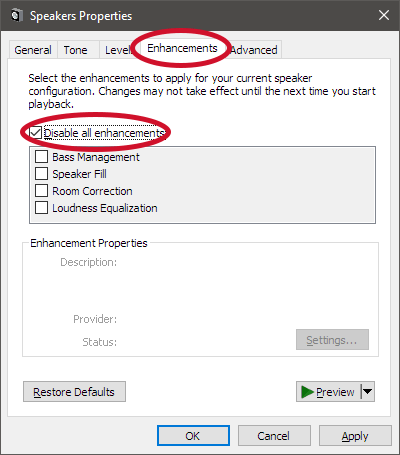
- In the Properties window, go to the Enhancements tab.
- Look for the option labeled Disable front panel jack detection or Enable front panel jack detection.
- If the option is currently enabled, click on it to disable front panel jack detection.
- If the option is currently disabled, click on it to enable front panel jack detection.
- Click Apply and then OK to save the changes.

- Restart your computer for the changes to take effect.
Additional Resources and Tutorials
| Resource | Description |
|---|---|
| 1. Microsoft Support |
Microsoft’s official support page provides step-by-step instructions on troubleshooting and enabling front panel audio jack on Windows 10/11. |
| 2. YouTube Tutorial by TechGuru |
TechGuru’s YouTube tutorial demonstrates the process of activating front panel audio jack on Windows 10/11 visually. It covers various troubleshooting techniques and provides easy-to-follow instructions. Link: YouTube Tutorial – Activate Front Panel Audio Jack on Windows 10/11 |
| 3. Tom’s Hardware Forum |
The Tom’s Hardware forum is a community-driven platform where users can discuss and find solutions to hardware-related issues. The forum thread on activating front panel audio jack on Windows 10/11 provides valuable insights and troubleshooting tips shared by experienced users. Link: Tom’s Hardware Forum – Front Panel Audio Jack Activation |
| 4. How-To Geek Article |
The How-To Geek article offers a detailed guide on troubleshooting and fixing front panel audio jack issues on Windows 10/11. It covers both software and hardware-related solutions along with useful tips and tricks. Link: How-To Geek – Activate Front Panel Audio Jack on Windows 10/11 |
| 5. Official Motherboard Manufacturer’s Website |
Visiting the official website of your motherboard manufacturer can be helpful in finding specific drivers or firmware updates related to front panel audio jack functionality. Look for support pages or downloads section on the website. Example: www.example.com/support |


