ACPI BIOS errors can be frustrating and disruptive for Windows and Linux users. In this article, we’ll explore effective solutions and fixes to overcome these issues.
Recently, Fortect has become increasingly popular as a reliable and efficient way to address a wide range of PC issues. It's particularly favored for its user-friendly approach to diagnosing and fixing problems that can hinder a computer's performance, from system errors and malware to registry issues.
- Download and Install: Download Fortect from its official website by clicking here, and install it on your PC.
- Run a Scan and Review Results: Launch Fortect, conduct a system scan to identify issues, and review the scan results which detail the problems affecting your PC's performance.
- Repair and Optimize: Use Fortect's repair feature to fix the identified issues. For comprehensive repair options, consider subscribing to a premium plan. After repairing, the tool also aids in optimizing your PC for improved performance.
Understanding ACPI and ACPI_BIOS_ERROR
ACPI (Advanced Configuration and Power Interface) is a standard that defines how an operating system interacts with computer hardware. It plays a crucial role in managing power and hardware resources in a computer system.
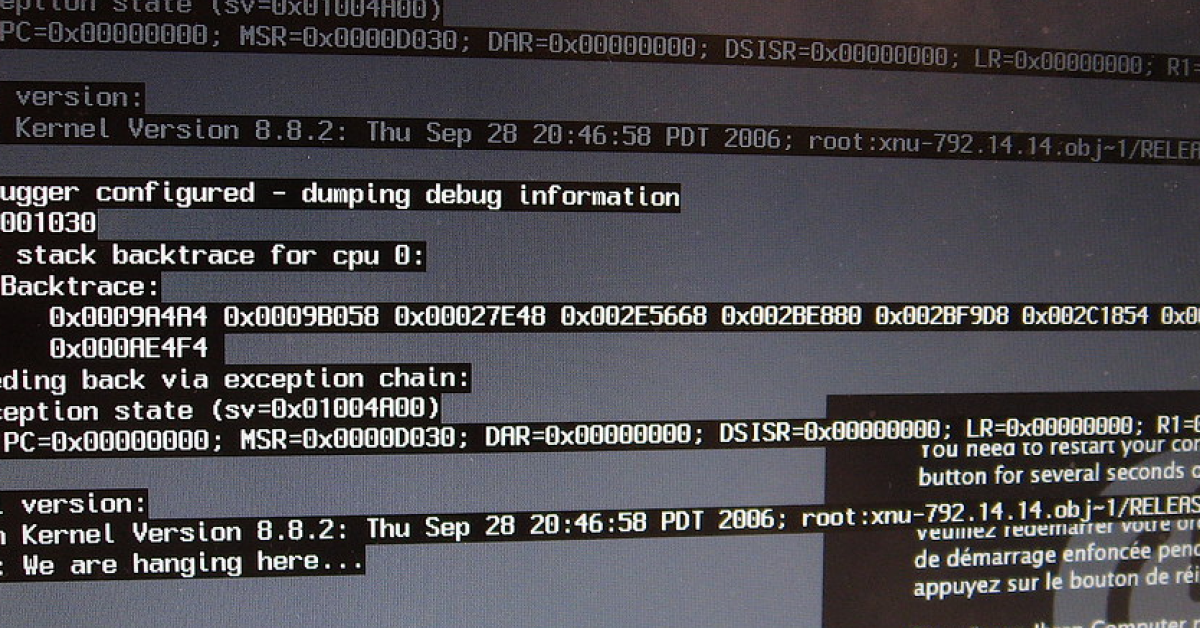
ACPI_BIOS_ERROR is an error message that appears when there is a problem with the ACPI BIOS on your computer. This error can cause your system to crash or prevent it from booting properly.
To fix the ACPI BIOS error, follow these steps:
1. Restart your computer and press the specified key (usually F2, F10, or Del) to enter the BIOS setup.
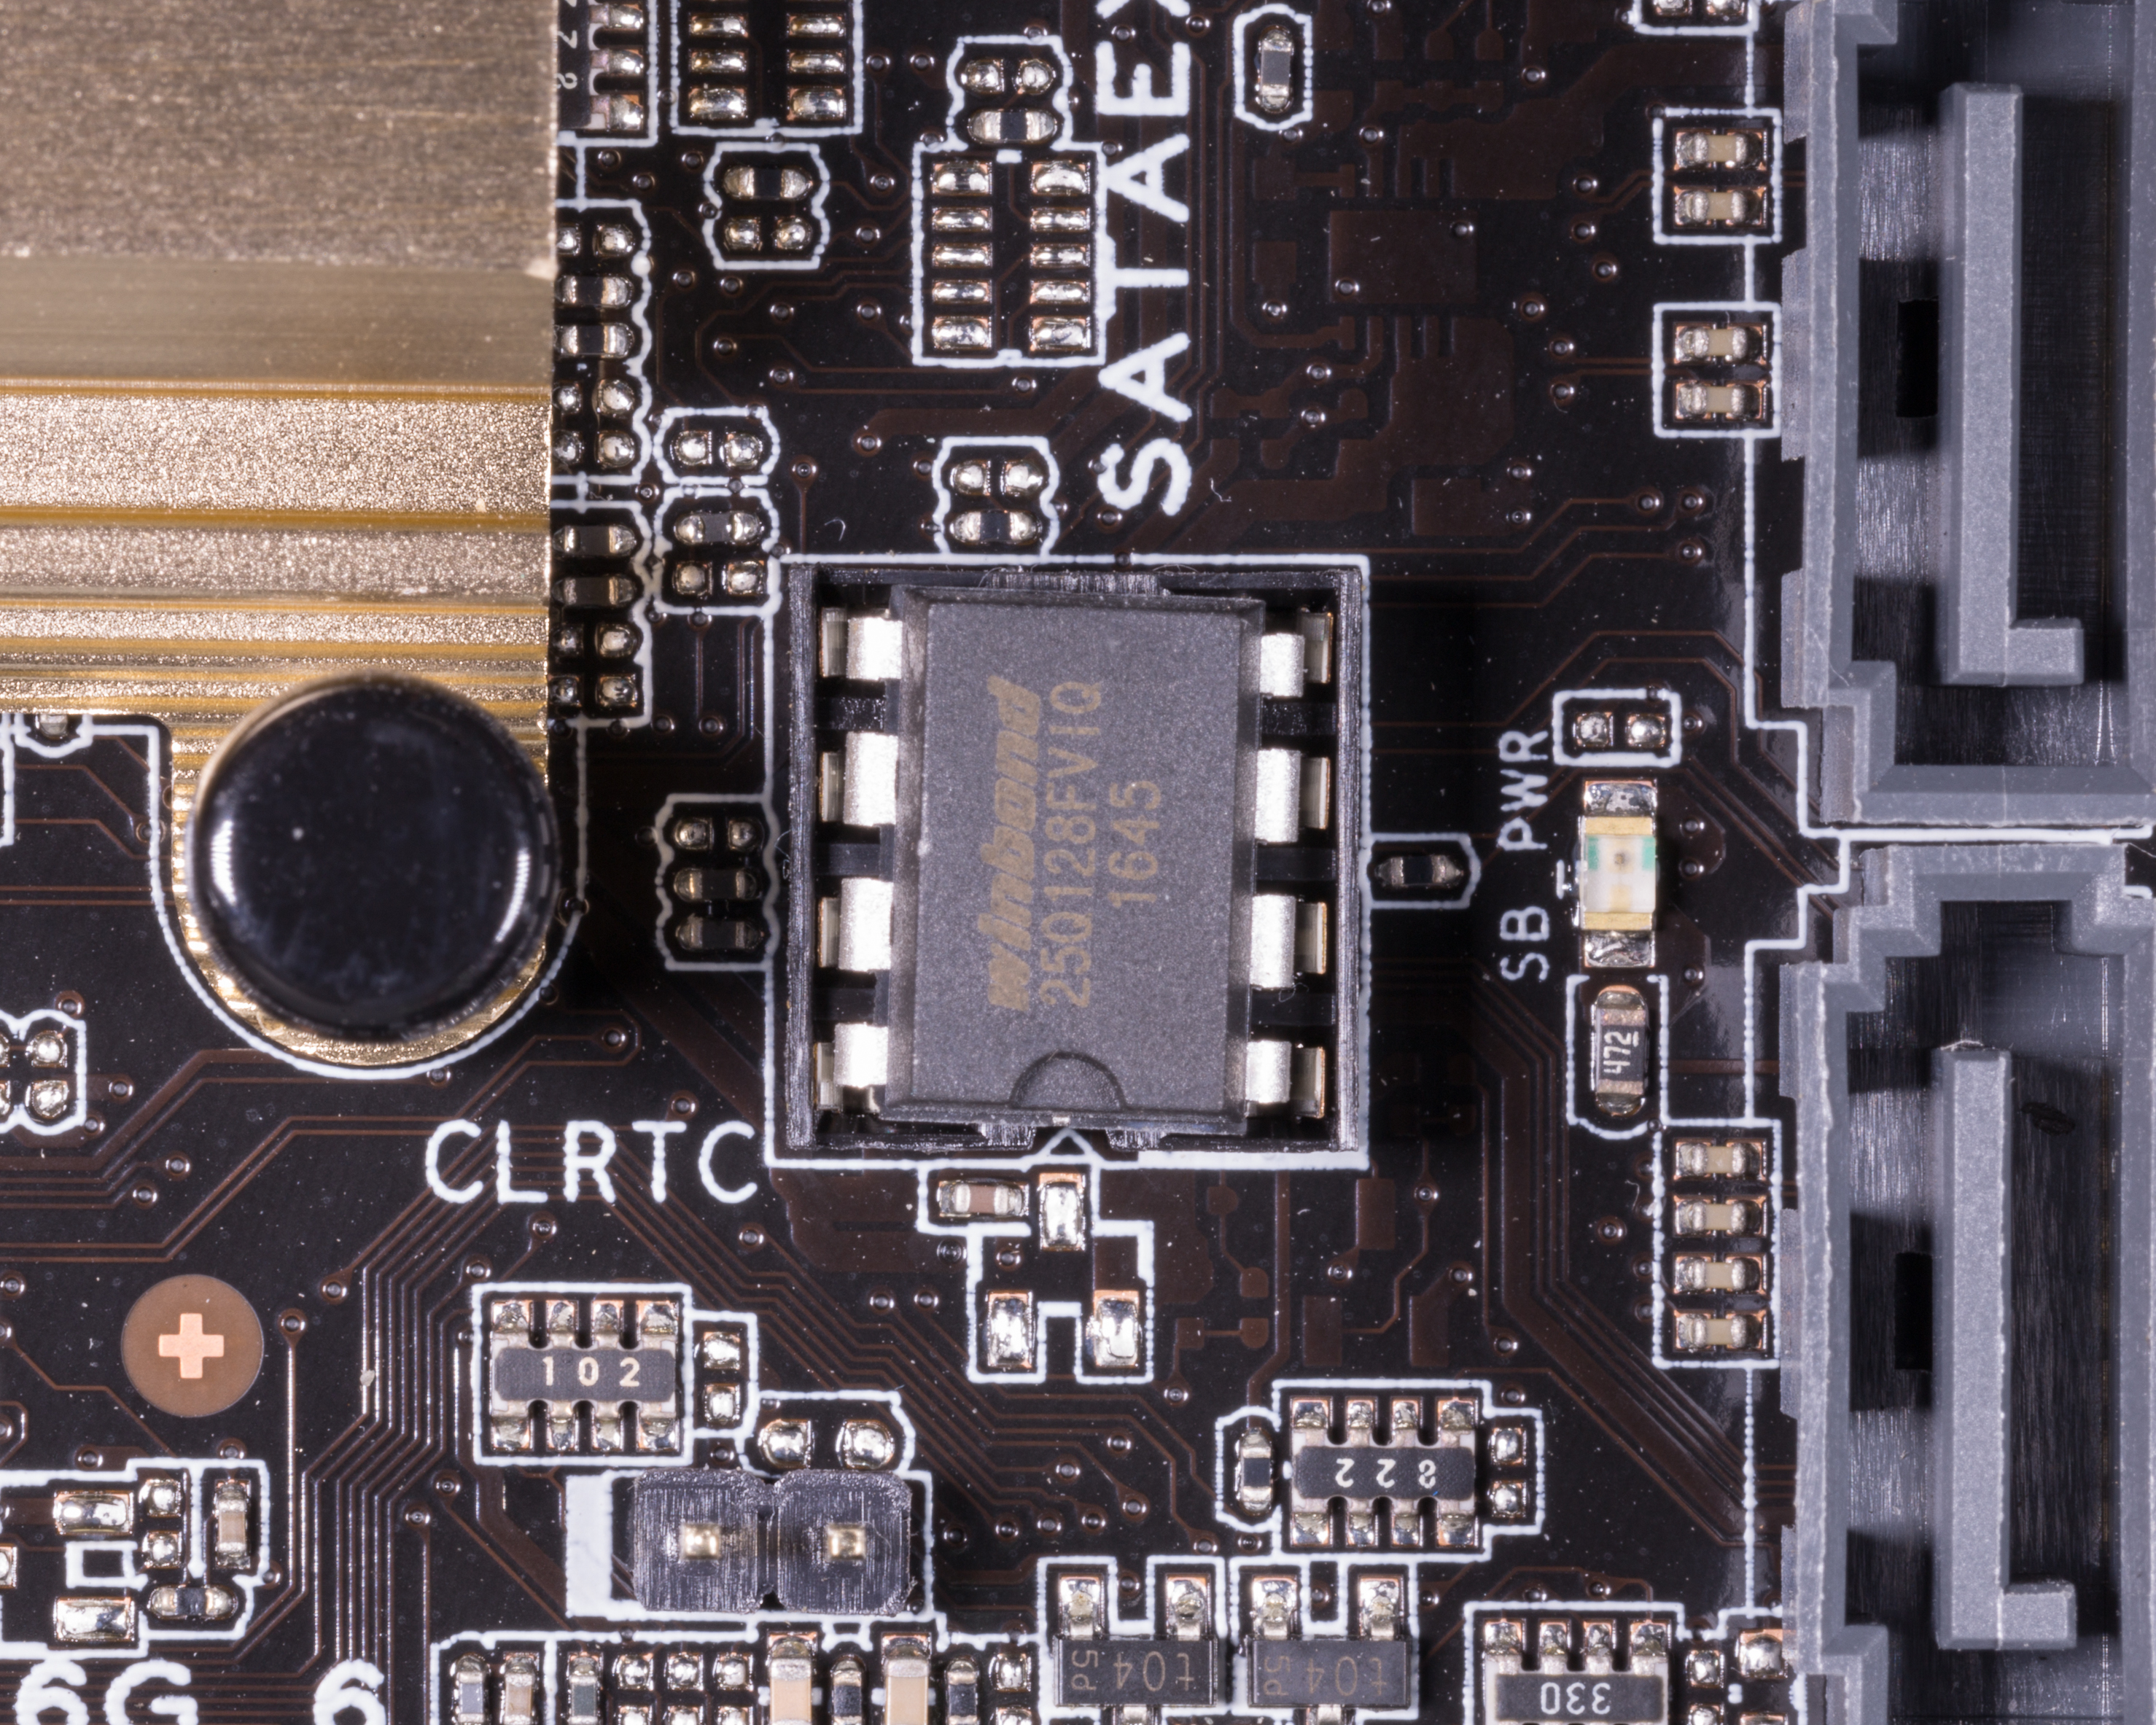
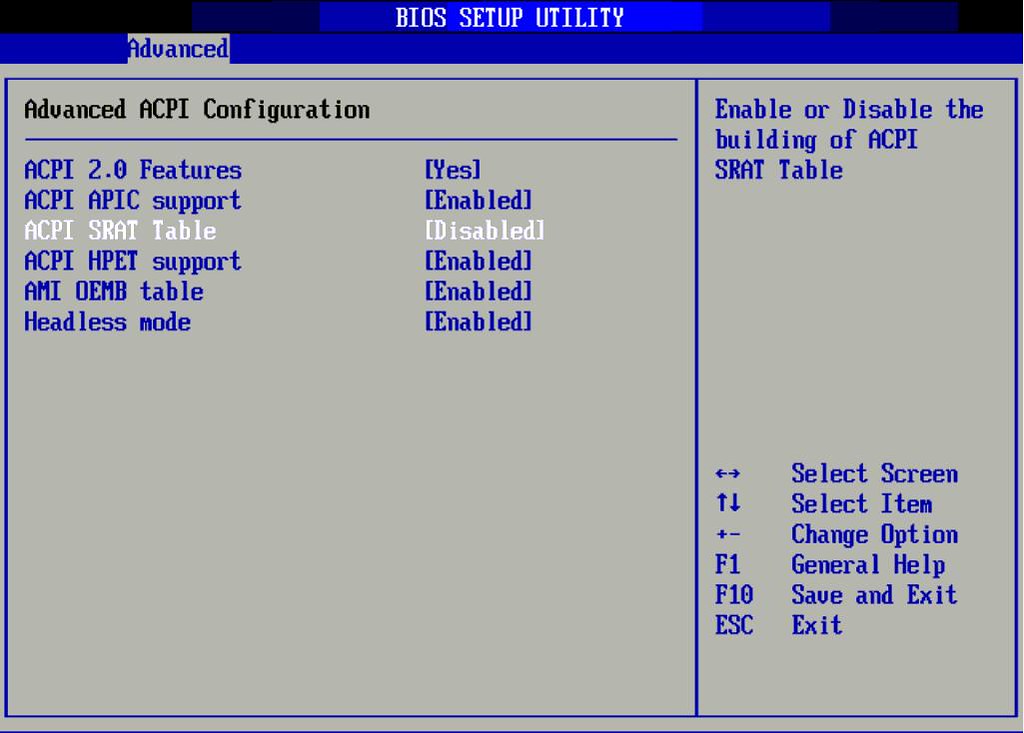
2. Look for an option related to ACPI or power management and disable it. This will force your system to use a generic power management driver instead of the ACPI BIOS.
3. Save the changes and exit the BIOS setup.
4. Restart your computer and check if the error message still appears. If it does, proceed to the next step.
5. Update your BIOS firmware. Visit the manufacturer’s website and download the latest BIOS update for your specific model. Follow the instructions provided to install the update.
6. Restart your computer and check if the ACPI BIOS error is resolved.
If the error persists, it may be caused by other factors such as incompatible hardware or software conflicts. In such cases, it is recommended to seek assistance from a technical expert or consult the manufacturer’s support team for further troubleshooting.
Fixing ACPI_BIOS_ERROR on Windows 10 and 11
If you’re encountering the ACPI_BIOS_ERROR on your Windows 10 or 11 system, there are several solutions and fixes you can try.
First, make sure your computer’s BIOS is up to date. Check the manufacturer’s website for any available BIOS updates and follow their instructions to install them.
Next, try resetting the BIOS settings to default. This can help resolve any conflicts or errors that may be causing the ACPI_BIOS_ERROR. To do this, restart your computer and enter the BIOS setup by pressing the designated key (such as F2 or Del) during startup. Look for an option to reset the BIOS settings to default or load optimized defaults. Save the changes and exit the BIOS.
If resetting the BIOS doesn’t work, you can try disabling certain ACPI features that may be causing the error. Again, enter the BIOS setup and look for options related to ACPI. Disable features like “ACPI 2.0 Support” or “ACPI Suspend Type” and see if it resolves the issue.
Updating or reinstalling device drivers can also help fix ACPI_BIOS_ERROR. Visit the manufacturer’s website for your motherboard, graphics card, and other hardware components, and download the latest drivers. Install them and restart your computer.
If none of these solutions work, you may need to perform a clean installation of Windows. Backup your important files and create a USB flash drive with a Windows 10 or 11 installation media. Boot from the USB and follow the on-screen instructions to reinstall Windows.
Solutions for ACPI_BIOS_ERROR
- Update BIOS
- Visit the manufacturer’s website to download the latest BIOS update for your computer model.
- Follow the instructions provided by the manufacturer to flash the BIOS with the updated version.
- Reset BIOS Settings
- Restart your computer and enter the BIOS setup by pressing a specific key (usually displayed during the boot process).
- Navigate to the “Reset BIOS” or “Load Default Settings” option.
- Select the option and confirm the reset.
- Save the changes and exit the BIOS setup.
- Check Hardware Connections
- Turn off your computer and unplug all external devices.
- Open the computer case and ensure all internal hardware components (RAM, hard drive, etc.) are properly connected.
- If any connections are loose, carefully reseat the components.
- Close the computer case and reconnect any external devices.
- Restart your computer and check if the ACPI BIOS Error persists.
- Update Drivers
- Open Device Manager by pressing Win + X and selecting Device Manager from the menu.
- Expand the categories and locate any devices with a yellow exclamation mark indicating a driver issue.
- Right-click on the device and select Update driver.
- Choose the option to automatically search for updated driver software.
- Follow the on-screen instructions to install the updated drivers.
- Repeat this process for all devices with driver issues.
- Run System File Checker (SFC)
- Open Command Prompt as an administrator by pressing Win + X and selecting Command Prompt (Admin).
- Type sfc /scannow and press Enter to initiate the system file check.
- Wait for the process to complete and restart your computer.
- Perform a Clean Boot
- Press Win + R to open the Run dialog box.
- Type msconfig and press Enter.
- In the System Configuration window, navigate to the Services tab.
- Check the box that says “Hide all Microsoft services“.
- Click on Disable all to disable all non-Microsoft services.
- Switch to the Startup tab and click on Open Task Manager.
- In the Task Manager, disable all startup programs by right-clicking on each and selecting Disable.
- Close the Task Manager and go back to the System Configuration window.
- Click on Apply and then OK.
- Restart your computer and check if the ACPI BIOS Error still occurs.
- Perform a System Restore
- Press Win + R to open the Run dialog box.
- Type rstrui and press Enter to launch the System Restore wizard.
- Follow the on-screen instructions to choose a restore point before the ACPI BIOS Error occurred.
- Confirm the restore and wait for the process to complete.
- Once the system is restored, check if the ACPI BIOS Error is resolved.
python

import pyudev
def get_acpi_devices():
context = pyudev.Context()
devices = context.list_devices(subsystem='acpi')
acpi_devices = []
for device in devices:
acpi_devices.append(device.device_path)
return acpi_devices
if __name__ == "__main__":
acpi_devices = get_acpi_devices()
for device in acpi_devices:
print(device)
The above code snippet uses the `pyudev` library to list all ACPI devices on a Linux system. It retrieves the device paths of ACPI devices and prints them. This code provides a starting point for exploring ACPI-related information but would need further development and integration with specific ACPI functionalities to address issues or perform actions associated with ACPI.
Updating BIOS and drivers to resolve ACPI_BIOS_ERROR
To resolve the ACPI_BIOS_ERROR, updating your BIOS and drivers can often be an effective solution. This process ensures that your computer’s firmware and device drivers are up to date, which can help resolve compatibility issues and improve overall system stability.
Updating BIOS: Begin by identifying your computer’s manufacturer and model. Visit the manufacturer’s website and navigate to the support or downloads section. Look for the latest BIOS update for your specific model and download it onto a USB flash drive.
Booting from USB: Restart your computer and enter the BIOS setup by pressing the designated key during the boot process (this key varies depending on your computer’s manufacturer). Within the BIOS setup, locate the option to change the boot order and prioritize the USB flash drive. Save the changes and exit the BIOS setup.
Installing BIOS update: With the USB flash drive inserted, restart your computer. It should now boot from the USB drive and automatically begin the BIOS update process. Follow the on-screen prompts and be patient, as this process may take some time. Once the update is complete, your computer will restart.
Updating drivers: After updating the BIOS, it’s important to also update your device drivers. Visit the manufacturer’s website and download the latest drivers for your specific hardware components, such as graphics card, network adapter, and audio device.
Installing drivers: Once the drivers are downloaded, locate the installation files and run them. Follow the on-screen prompts to complete the installation for each driver. Restart your computer after installing all the necessary drivers.
By updating your BIOS and drivers, you can often resolve the ACPI_BIOS_ERROR and improve your computer’s performance and stability.
Disabling AHCI mode and changing ACPI mode to S1

To disable AHCI mode and change ACPI mode to S1, follow these steps:
1. Restart your computer and enter the BIOS settings by pressing the designated key (usually Del, F2, or F10) during startup.
2. Navigate to the “Advanced” or “Storage” section in the BIOS menu.
3. Look for an option related to AHCI mode or SATA configuration. Change it to “Disabled” or “IDE” mode. This will disable AHCI mode.
4. Save the changes and exit the BIOS.
5. Restart your computer and let it boot into the operating system.
6. Open the Device Manager by right-clicking on the Start menu and selecting “Device Manager.”
7. Expand the “System devices” category and locate the “ACPI x64-based PC” or a similar entry.
8. Right-click on the ACPI entry and select “Properties.”
9. Go to the “Driver” tab and click on “Update Driver.”
10. Choose the option to browse your computer for the driver software.
11. Select “Let me pick from a list of available drivers on my computer.”
12. Look for an option that includes “Standard PC” or “Standard Dual Channel PCI IDE Controller.” Choose this option and click “Next” to install the driver.
13. Restart your computer for the changes to take effect.
By disabling AHCI mode and changing ACPI mode to S1, you may resolve ACPI BIOS errors that are causing issues on your Windows or Linux system.
Uninstalling Microsoft ACPI Compliant driver
To uninstall the Microsoft ACPI Compliant driver, follow these steps:
1. Press the Windows key + X and select Device Manager from the menu.
2. In the Device Manager window, locate and expand the System devices category.
3. Right-click on Microsoft ACPI Compliant System and select Uninstall device.
4. Check the box that says “Delete the driver software for this device” and click Uninstall.
5. Restart your computer to complete the uninstallation process.
By uninstalling the Microsoft ACPI Compliant driver, you may be able to troubleshoot ACPI BIOS errors on your Windows or Linux system. This driver is responsible for managing power-related functions on your computer, and uninstalling it can help resolve issues related to sleep mode, power consumption, or device compatibility.
It’s important to note that uninstalling this driver should only be done if you are facing specific issues related to ACPI BIOS errors. If you’re unsure about whether to uninstall the driver or need further assistance, it’s recommended to consult an expert or reach out to the manufacturer of your computer.
Additional steps to fix ACPI_BIOS_ERROR
1. Check for BIOS Updates: Visit the manufacturer’s website for your computer or motherboard and download the latest BIOS updates. Follow the instructions provided to install the updates properly.
2. Reset BIOS Settings: Access the BIOS settings by restarting your computer and pressing the designated key (usually displayed during startup). Look for an option to reset the settings to default. Save the changes and restart the computer.
3. Update Device Drivers: Outdated or incompatible device drivers can cause ACPI BIOS errors. Visit the manufacturer’s website for each device (such as graphics card, sound card, etc.) and download the latest drivers. Install them and restart the computer.
4. Disable Overclocking: If you have overclocked your computer’s hardware, it might be causing the ACPI BIOS error. Enter the BIOS settings and disable any overclocking options. Save the changes and restart the computer.
5. Check Hardware Connections: Make sure all the hardware components are properly connected to your computer. Open the case and reseat the components such as RAM, graphics card, and hard drive. Ensure all cables are securely plugged in.
6. Run a System File Check: Windows has a built-in tool called System File Checker (SFC) that can scan and repair corrupted system files. Open the Command Prompt as an administrator and type “sfc /scannow” (without quotes). Press Enter and wait for the scan to complete.
7. Perform a Clean Boot: A clean boot helps identify if a third-party program is causing the ACPI BIOS error. Open the System Configuration tool and disable all startup items and non-Microsoft services. Restart the computer and see if the error persists.


