I recently experienced the frustration of accidentally unplugging my external hard drive, only to find that it was no longer recognized by my computer. If you’re facing the same issue, read on for some potential solutions.
Recently, Fortect has become increasingly popular as a reliable and efficient way to address a wide range of PC issues. It's particularly favored for its user-friendly approach to diagnosing and fixing problems that can hinder a computer's performance, from system errors and malware to registry issues.
- Download and Install: Download Fortect from its official website by clicking here, and install it on your PC.
- Run a Scan and Review Results: Launch Fortect, conduct a system scan to identify issues, and review the scan results which detail the problems affecting your PC's performance.
- Repair and Optimize: Use Fortect's repair feature to fix the identified issues. For comprehensive repair options, consider subscribing to a premium plan. After repairing, the tool also aids in optimizing your PC for improved performance.
Assigning a Drive Letter and Updating Drivers
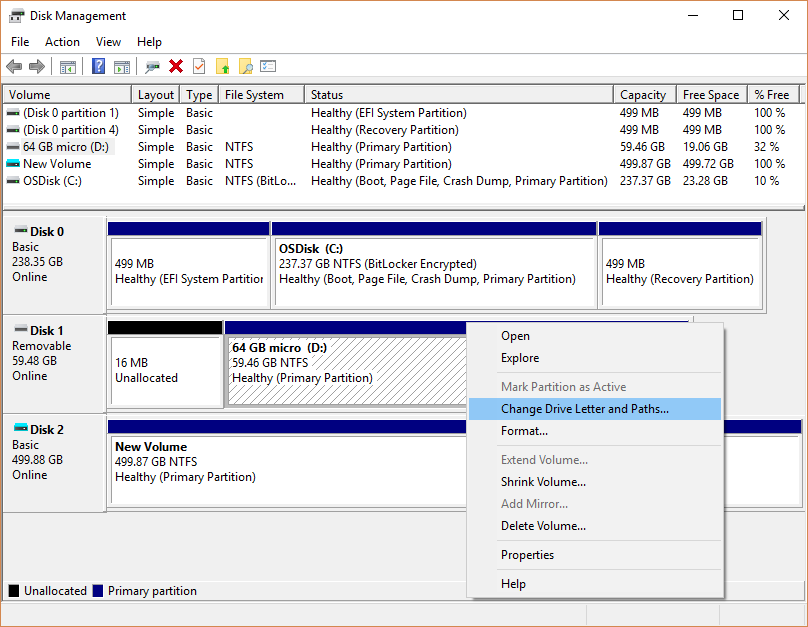
To assign a drive letter to your external hard drive, first, make sure the drive is connected to your computer. Then, right-click on the Start menu and select “Disk Management” from the context menu. Look for your external hard drive in the list of volumes and partitions. Right-click on it and choose “Change Drive Letter and Paths”. Select “Add” and choose a letter for your drive. Click “OK” to confirm.
If your external hard drive is still not recognized, it may be due to outdated or corrupted drivers. To update the drivers, go to the Start menu, right-click on “This PC”, and select “Manage”. In the Computer Management window, click on “Device Manager” in the left-hand pane. Look for your external hard drive under “Disk drives” or “USB controllers”, right-click on it, and select “Update driver”. Choose “Search automatically for updated driver software” and follow the on-screen instructions to complete the process.
Updating the drivers should help your computer recognize the external hard drive. If you continue to experience issues, it may be a good idea to check the drive for errors using a tool like “CHKDSK” in Windows or Disk Utility on MacOS.
Using Disk Utility and CMD for Repairs
If your external hard drive is not being recognized, you can attempt to repair it using Disk Utility on MacOS or CMD on Windows. First, connect the external hard drive to your computer and open Disk Utility on MacOS or CMD on Windows.
In Disk Utility on MacOS, select the external hard drive from the sidebar and click on the “First Aid” tab. Then, click on “Run” to begin the repair process. If the repair is successful, your external hard drive should be recognized again.
For CMD on Windows, open a Command Prompt as an administrator and type chkdsk /f X: (replace X with the drive letter of your external hard drive) and press Enter. This will initiate a scan and repair process for the external hard drive. If the repair is successful, your external hard drive should be recognized again.
If the repair process does not resolve the issue and your external hard drive is still not recognized, it may be a hardware problem. In this case, you may need to seek professional assistance for further troubleshooting and repairs.
Data Recovery and Reformatting Solutions
- Check physical connection
- Ensure the USB cable is securely plugged into the external hard drive and the computer.
- Try using a different USB port on the computer.
- Test the USB cable with another device to rule out a faulty cable.
- Restart the computer
- Shut down the computer completely.
- Unplug the power cable and wait for 30 seconds.
- Plug the power cable back in and turn on the computer.
- Update device drivers
- Open Device Manager by pressing Windows Key + X and selecting Device Manager.
- Expand the “Disk drives” category and right-click on the external hard drive.
- Select “Update driver” and follow the on-screen instructions.
Troubleshooting with Alternate Hardware
First, try connecting the external hard drive to a different USB port on your computer. If the drive is still not recognized, try using a different USB cable.
If the drive is recognized after changing the USB port or cable, the issue may have been with the original port or cable.
If the drive is still not recognized, try connecting it to a different computer to see if it is detected.
If the drive is recognized on another computer, the issue may be with your computer’s hardware or software. You can try updating the device driver for the external hard drive, or checking for any error messages in the Windows Registry.
If the drive is still not recognized on another computer, there may be a problem with the drive itself.
You can try using a disk enclosure to connect the drive directly to your computer, or using data recovery software such as EaseUS Data Recovery Wizard to attempt to recover any lost data.
If these troubleshooting steps do not resolve the issue, the drive may have suffered from data loss or hardware failure. In this case, it may be necessary to seek professional assistance for recovery.


