In this digital era, maintaining the security and performance of our computers is of utmost importance. However, what if you find yourself needing to wipe and clean your computer without a disk? Fear not, as we bring you a comprehensive guide to achieving this task effortlessly and effectively.
Recently, Fortect has become increasingly popular as a reliable and efficient way to address a wide range of PC issues. It's particularly favored for its user-friendly approach to diagnosing and fixing problems that can hinder a computer's performance, from system errors and malware to registry issues.
- Download and Install: Download Fortect from its official website by clicking here, and install it on your PC.
- Run a Scan and Review Results: Launch Fortect, conduct a system scan to identify issues, and review the scan results which detail the problems affecting your PC's performance.
- Repair and Optimize: Use Fortect's repair feature to fix the identified issues. For comprehensive repair options, consider subscribing to a premium plan. After repairing, the tool also aids in optimizing your PC for improved performance.
Wiping a Hard Drive Without Deleting Windows
To wipe a hard drive without deleting Windows, you can use the built-in Disk Cleanup tool on your Windows PC. Here are the steps:
1. Press the Windows key + R to open the Run dialog box.
2. Type “cleanmgr” and press Enter to open Disk Cleanup.
3. Select the drive you want to clean, usually the C: drive.
4. Click on “Clean up system files” and wait for the tool to scan your drive.
5. Check the boxes next to the file types you want to delete, such as Temporary files and Recycle Bin.
6. Click OK, then click Delete Files to confirm.
7. The tool will clean your drive, removing unnecessary files without deleting Windows.
Alternatively, you can use third-party software like EaseUS BitWiper to securely wipe your hard drive while preserving Windows. Just follow the software’s instructions for wiping your drive without deleting the operating system.
Wiping Data Partitions and System Partition
- Ensure your data is securely erased by wiping data partitions and the system partition.
- Protect your privacy by permanently deleting sensitive information from your computer.
- Efficiently clean your computer without the need for a disk or external media.
- Safeguard against data recovery by thoroughly wiping all data partitions and the system partition.
- Easily free up storage space by removing unnecessary files and folders.
- Improve your computer’s performance by wiping data partitions and the system partition to eliminate clutter.
- Ensure a fresh start by erasing all traces of your previous usage on the computer.
- Follow a step-by-step guide to safely wipe and clean your computer without the need for a disk.
- Protect your personal and financial information by securely wiping your computer’s data.
- Keep your computer running smoothly by regularly wiping data partitions and the system partition.

Reinstalling Windows and Wiping an Entire Hard Drive
To reinstall Windows and wipe an entire hard drive without a disk, follow these steps:
1. Back up your important files and data to an external drive or cloud storage.
2. Restart your PC and boot from a USB jump drive with Windows 10 installation media.
3. Press any key to start the installation process.
4. Select your language preferences and click “Next.”
5. Click “Install Now” and follow the on-screen prompts.
6. When prompted to choose where to install Windows, select the hard drive you want to wipe.
7. Click “Drive options (advanced)” and then “Format.”
8. Confirm your choice and proceed with the installation.
9. Once Windows is installed, go to the Settings app and select “Update & Security.”
10. Choose “Recovery” and click “Get started” under “Reset this PC.”
11. Select “Remove everything” and follow the on-screen instructions to complete the reset.
Remember, wiping your hard drive permanently deletes all data, so ensure you have a backup.
python

import os

import random
def wipe_file(file_path):
with open(file_path, 'ab') as f:
file_size = os.path.getsize(file_path)
f.seek(0)
f.write(os.urandom(file_size))
f.flush()
os.fsync(f.fileno())
f.truncate()
def wipe_directory(directory_path):
for root, _, files in os.walk(directory_path):
for file in files:
file_path = os.path.join(root, file)
wipe_file(file_path)
# Usage example:
wipe_directory('/path/to/directory')
This code defines two functions: `wipe_file` and `wipe_directory`. The `wipe_file` function overwrites the contents of a file with random data, making it difficult to recover. The `wipe_directory` function recursively traverses a directory and calls `wipe_file` for each file found.
Please ensure you have a backup of any important data before using such a tool, as the erased data will not be recoverable.
Keeping Files and Restoring to a Past State
| Section | Steps |
|---|---|
| Keeping Files |
|
| Restoring to a Past State |
|

Uninstalling Unwanted Programs and Cleaning the Registry
To wipe and clean your computer without a disk, follow these steps:
1. Uninstall Unwanted Programs:
– Press the Windows key + R to open the Run dialog box.
– Type “appwiz.cpl” and press Enter to open the Programs and Features window.
– Select the program you want to uninstall and click Uninstall.
– Follow the on-screen instructions to complete the uninstallation process.
2. Clean the Registry:
– Press the Windows key + R to open the Run dialog box.
– Type “regedit” and press Enter to open the Registry Editor.
– Backup your registry by clicking File, then Export.
– Navigate to HKEY_CURRENT_USER\Software and delete any unwanted entries.
– Navigate to HKEY_LOCAL_MACHINE\Software and delete any unwanted entries.
– Close the Registry Editor.
Remember to be cautious when making changes to the registry, as incorrect modifications can cause system issues. Always back up your data before performing any major changes to your computer.
Restoring Windows Operating System and Firewall Defaults
If you want to wipe and clean your computer without a disk, you can restore the Windows Operating System and Firewall defaults. Follow these steps:
1. Press the Windows key + R to open the Run dialog box.
2. Type “control” and press Enter to open the Control Panel.
3. Click on “System and Security” and then “Windows Defender Firewall.”
4. On the left side, click on “Restore defaults.”
5. A warning message will appear. Click “Yes” to continue.
6. Next, open the Control Panel again and click on “System.”
7. Click on “Advanced system settings” on the left side.
8. In the System Properties window, click on the “System Protection” tab.
9. Click on “System Restore” and then “Next.”
10. Choose a restore point and click “Next” again.
11. Finally, click “Finish” to start the restoration process.
Wiping a Hard Drive Securely and Clean Installing Windows 10
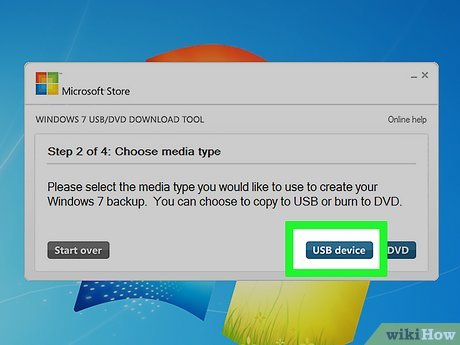
To wipe a hard drive securely and clean install Windows 10 without a disk, you have a few options. One method is to use a USB jump drive to create a bootable Windows 10 installation media.
First, download the Windows 10 Media Creation Tool from the Microsoft website. Insert the jump drive and run the tool, selecting the option to create installation media.
Once the media is created, restart your computer and boot from the jump drive. Follow the on-screen instructions to install Windows 10.
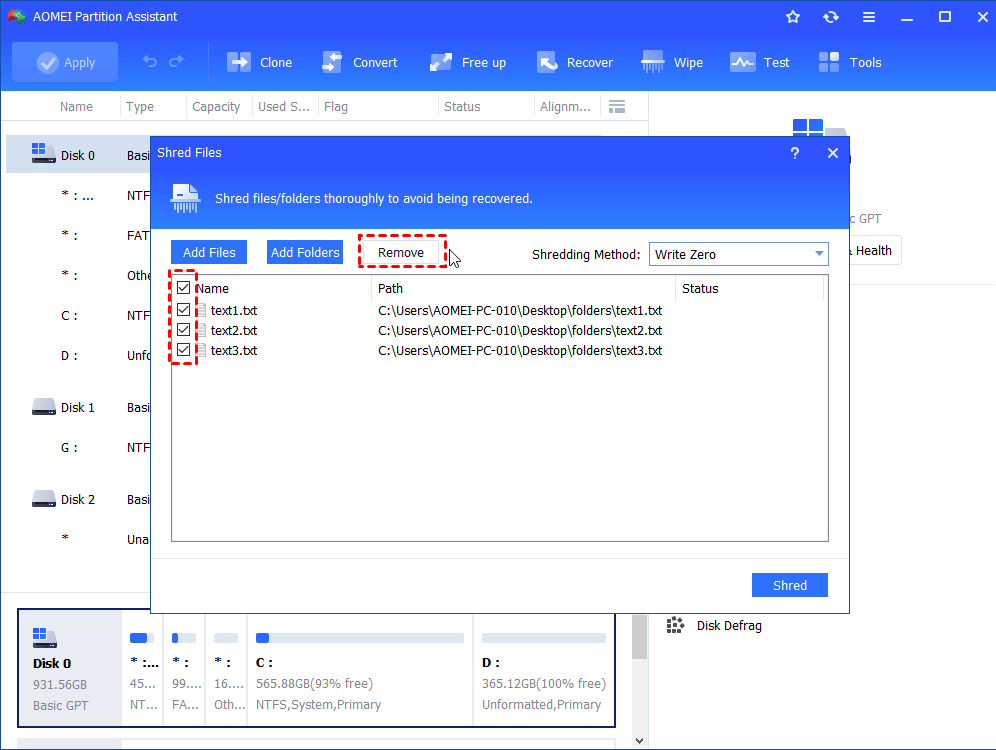
Another option is to use third-party software like EaseUS BitWiper to securely wipe the hard drive.
To use EaseUS BitWiper, download and install the software on a working computer. Connect the hard drive you want to wipe as a secondary drive. Open EaseUS BitWiper and select the System Partition Data wipe option. Follow the instructions to wipe the drive securely.
Remember to back up any important data before wiping the drive, as this process will delete all data.