Inefficient disk usage can be a frustrating experience for Windows users. Fortunately, Microsoft’s Windows Defender has found a solution to this problem.
Recently, Fortect has become increasingly popular as a reliable and efficient way to address a wide range of PC issues. It's particularly favored for its user-friendly approach to diagnosing and fixing problems that can hinder a computer's performance, from system errors and malware to registry issues.
- Download and Install: Download Fortect from its official website by clicking here, and install it on your PC.
- Run a Scan and Review Results: Launch Fortect, conduct a system scan to identify issues, and review the scan results which detail the problems affecting your PC's performance.
- Repair and Optimize: Use Fortect's repair feature to fix the identified issues. For comprehensive repair options, consider subscribing to a premium plan. After repairing, the tool also aids in optimizing your PC for improved performance.
Understanding Windows Defender’s Antimalware Service Executable
The Antimalware Service Executable is a process that runs in the background of your computer as part of the Windows Defender feature. However, it can cause high disk usage and slow down your computer’s performance. To fix this issue, you can try a few methods. First, schedule scans to occur at a time when you won’t be using your computer. Second, limit the resources that the Antimalware Service Executable uses by going to Settings > Update & Security > Windows Security > Virus & threat protection > Manage settings and turning off Real-Time protection. Another method is to perform a disk cleanup or a Windows Update Cleanup to free up memory. If the problem persists, you can try a Defender Offline Scan or use a third-party partition management tool like Partition Master Free to format partitions or clone your system.
Reasons Behind High Disk Usage by Windows Defender
- Large number of files to scan: When Windows Defender scans your system, it might take a long time if there are a lot of files to scan. This can cause high disk usage.
- High CPU usage: If Windows Defender is using a lot of CPU resources, it can also cause high disk usage because the system is working harder to complete the tasks.
- Real-time protection: Windows Defender’s real-time protection can also cause high disk usage as it scans files in the background as soon as they are accessed.
- Outdated software: If your Windows Defender software is outdated, it can cause high disk usage as it struggles to keep up with the latest threats.
- Malware infection: If your computer is infected with malware, it can cause high disk usage as Windows Defender tries to scan and remove the malicious files.
Methods to Prevent Windows Defender from Slowing Down Your PC
To prevent Windows Defender from slowing down your PC, there are a few simple methods you can try. First, schedule regular antimalware scans instead of running them constantly, which can cause high disk usage and slow down your computer. You can also try temporarily disabling real-time protection when running memory-intensive applications to free up CPU usage. Another option is to use a partition management tool like Partition Master Free to format partitions and optimize your file system. If you’re experiencing high memory usage, try running a defender offline scan or performing a windows update cleanup and disk cleanup. Finally, if you notice high CPU usage caused by the antimalware service executable, you can use the task manager to identify the issue and troubleshoot accordingly.
import os
def check_disk_space():
total, used, free = os.disk_usage('/')
return used
def delete_files():
for root, dirs, files in os.walk('/'):
for file in files:
if file.endswith('.log'):
os.remove(os.path.join(root, file))
used_space = check_disk_space()
print(f"Used disk space: {used_space/1024/1024} MB")
if used_space > 1024*1024*1024:
delete_files()
print("Files deleted to free up disk space.")
else:
print("Disk space is sufficient.")
The sample code above uses the `os` module to check the used disk space of the root directory (`’/’`) and deletes all log files to free up disk space if the used space is greater than 1 GB. The code could be modified to target specific folders or files, or to perform other disk management tasks. However, it is important to note that modifying or deleting system files could have unintended consequences, and caution should be exercised when writing code that interacts directly with the file system.
Disabling Real-Time Protection and Scheduling Options
To resolve high disk usage caused by Windows Defender, users can try disabling Real-Time Protection and scheduling options. To disable Real-Time Protection, navigate to Windows Security and click on Virus & threat protection. From here, click on Manage settings, then toggle the Real-Time Protection switch off. To disable scheduling options, go to Task Scheduler and locate the Windows Defender Scheduled Scan task. Right-click on it and select Disable. This will prevent Windows Defender from running scheduled scans. Disabling Real-Time Protection and scheduling options can improve computer performance and fix antimalware service executable high memory usage problems. Users can also monitor CPU and RAM usage in Task Manager to identify any other processes causing high disk usage.
Adding Antimalware Service Executable to Exclusion List
- Open Windows Security by clicking on the shield icon in the taskbar or searching for it in the Start menu.
- Click on Virus & threat protection in the left-hand menu.

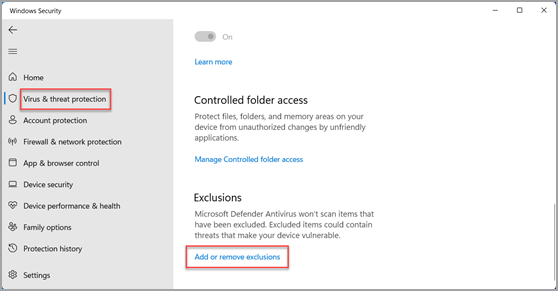
- Scroll down to Manage settings under the Virus & threat protection settings.
- Scroll down to Exclusions and click on Add or remove exclusions.
- Click on Add an exclusion and select Folder.
- Navigate to C:\Program Files\Windows Defender and select the Antimalware folder.
- Click on Select Folder to add it to the exclusion list.
- Restart your computer to apply the changes.
Disabling Windows Defender Using Group Policy or Registry
If you’re experiencing high disk usage due to Windows Defender, you may want to disable it temporarily. Here’s how to do it using Group Policy or Registry:
Using Group Policy:
1. Press Windows Key + R to open the Run dialog box.
2. Type ‘gpedit.msc’ and press Enter.
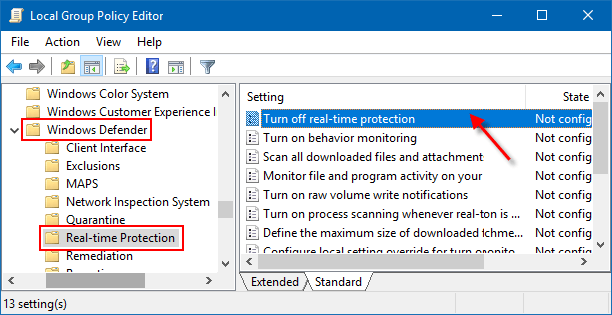
3. In the Group Policy Editor window, navigate to Computer Configuration > Administrative Templates > Windows Components > Windows Defender.
4. Double-click ‘Turn off Windows Defender’ and select ‘Enabled’.
5. Click ‘Apply’ and then ‘OK’.
Using Registry:
1. Press Windows Key + R to open the Run dialog box.
2. Type ‘regedit’ and press Enter.
3. In the Registry Editor window, navigate to ‘HKEY_LOCAL_MACHINE\SOFTWARE\Policies\Microsoft\Windows Defender’.
4. Right-click in the empty space on the right and select ‘New > DWORD (32-bit) Value’.
5. Name the new value ‘DisableAntiSpyware’.
6. Double-click the new value and change the value data to ‘1’.
7. Click ‘OK’.
Remember to enable Windows Defender again afterwards to ensure your computer remains protected.
Updating Device Drivers to Fix Disk Usage Issues
Updating your device drivers is one of the best methods to resolve the high disk usage issue caused by the Windows Defender antimalware service executable. This process can improve your computer performance and reduce the CPU usage. Here’s how you can update your device drivers:
1. Press the Win + R keys to open the Run dialog box.
2. Type “devmgmt.msc” and press Enter to open the Device Manager.
3. Expand the category that you want to update the drivers for.
4. Right-click on the device and select Update driver.
5. Follow the on-screen instructions to complete the process.
Updating the device drivers can fix disk usage issues caused by outdated, missing, or corrupted drivers. It can also resolve problems with other system resources such as RAM and CPU usage that may be affecting your computer’s performance. By following these simple steps, you can improve your computer’s disk usage and get everything running smoothly.
Backing Up Important Data to Prevent Loss
Backing up important data is crucial to prevent loss, especially when experiencing high disk usage or CPU usage due to Windows Defender’s antimalware service executable. To avoid losing everything in case of a system crash or failure, clone your hard drive regularly or use a cloud-based backup service.
Additionally, you can troubleshoot the issue by following these steps:
– Open Task Manager and locate the antimalware executable (MsMpEng.exe)
– Right-click on it and select “Open file location”
– Go back to Task Manager and end the process
– In the file location, rename the executable to something else
– Restart your computer and the antimalware service should restart with lower CPU and disk usage
Remember to regularly back up your important files and data to avoid losing everything in case of a system failure. This simple precaution can save you a lot of stress and hassle in the long run.
Bonus: Partitioning Hard Drives on Windows 11/10/8/7 for Free
Partitioning hard drives on Windows 11/10/8/7 is easy and free. To get started, open the Disk Management tool by pressing the Windows key + X and selecting Disk Management. Right-click on the unallocated space and select New Simple Volume. Follow the prompts to partition your hard drive.
If you’re experiencing high disk usage due to Antimalware Service Executable, Windows Defender can help. Open Windows Security and navigate to Virus & threat protection > Manage settings. Turn off real-time protection and see if your CPU usage decreases. If it does, you can add MsMpEng.exe to the Windows Defender exclusion list by going to Virus & threat protection settings > Manage settings > Exclusions.
These methods should help resolve any high disk usage issues you may be experiencing. If you continue to have problems, try troubleshooting other system resources or seek additional fixes online.