Unraveling the Mysteries: Unveiling Solutions for Windows’ Communication Hurdles with Primary DNS Server
Recently, Fortect has become increasingly popular as a reliable and efficient way to address a wide range of PC issues. It's particularly favored for its user-friendly approach to diagnosing and fixing problems that can hinder a computer's performance, from system errors and malware to registry issues.
- Download and Install: Download Fortect from its official website by clicking here, and install it on your PC.
- Run a Scan and Review Results: Launch Fortect, conduct a system scan to identify issues, and review the scan results which detail the problems affecting your PC's performance.
- Repair and Optimize: Use Fortect's repair feature to fix the identified issues. For comprehensive repair options, consider subscribing to a premium plan. After repairing, the tool also aids in optimizing your PC for improved performance.
Causes of Windows can’t communicate with the primary DNS server error
If you’re encountering the “Windows can’t communicate with the primary DNS server” error, there are a few potential causes and solutions to consider.
Firstly, check your network settings and ensure that you are connected to the internet. You can do this by going to the Network and Internet settings in Windows and verifying the connection status.
Next, try running the Windows Network Diagnostics tool. This tool can help identify and fix issues related to your network connection. To run it, go to the Network and Internet settings, click on “Network Troubleshooter,” and then follow the on-screen instructions.
Another potential solution is to change your DNS settings. You can do this by going to the Network and Internet settings, selecting “Change adapter options,” right-clicking on your network adapter, and choosing “Properties.” From there, select “Internet Protocol Version 4 (TCP/IPv4)” and click on “Properties.” Here, you can manually enter the DNS server addresses.
If none of these solutions work, you can also try resetting your network adapter. Open the Command Prompt as an administrator and enter the command “netsh winsock reset“. This will reset the Winsock catalog and may resolve any issues with your network adapter.
Updating drivers and clearing the DNS cache
- Open the Device Manager by pressing Windows key + X and selecting Device Manager from the menu.
- Expand the category of the device you want to update the driver for.
- Right-click on the device and select Update driver.
- Choose the option to Search automatically for updated driver software.
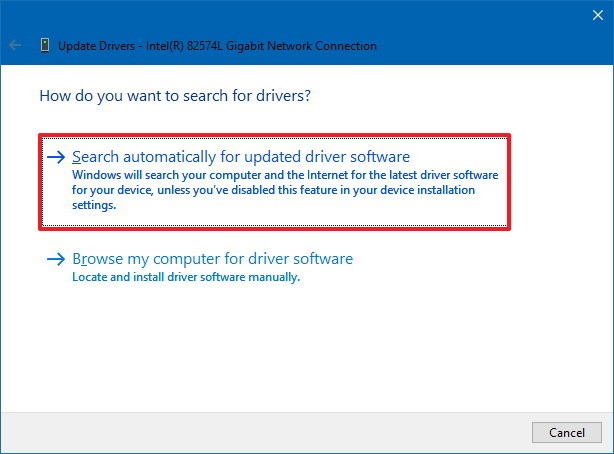
- Follow the on-screen instructions to complete the driver update process.
Clearing the DNS cache
- Open the Command Prompt by pressing Windows key + R, typing cmd and pressing Enter.
- Type the command ipconfig /flushdns and press Enter to clear the DNS cache.
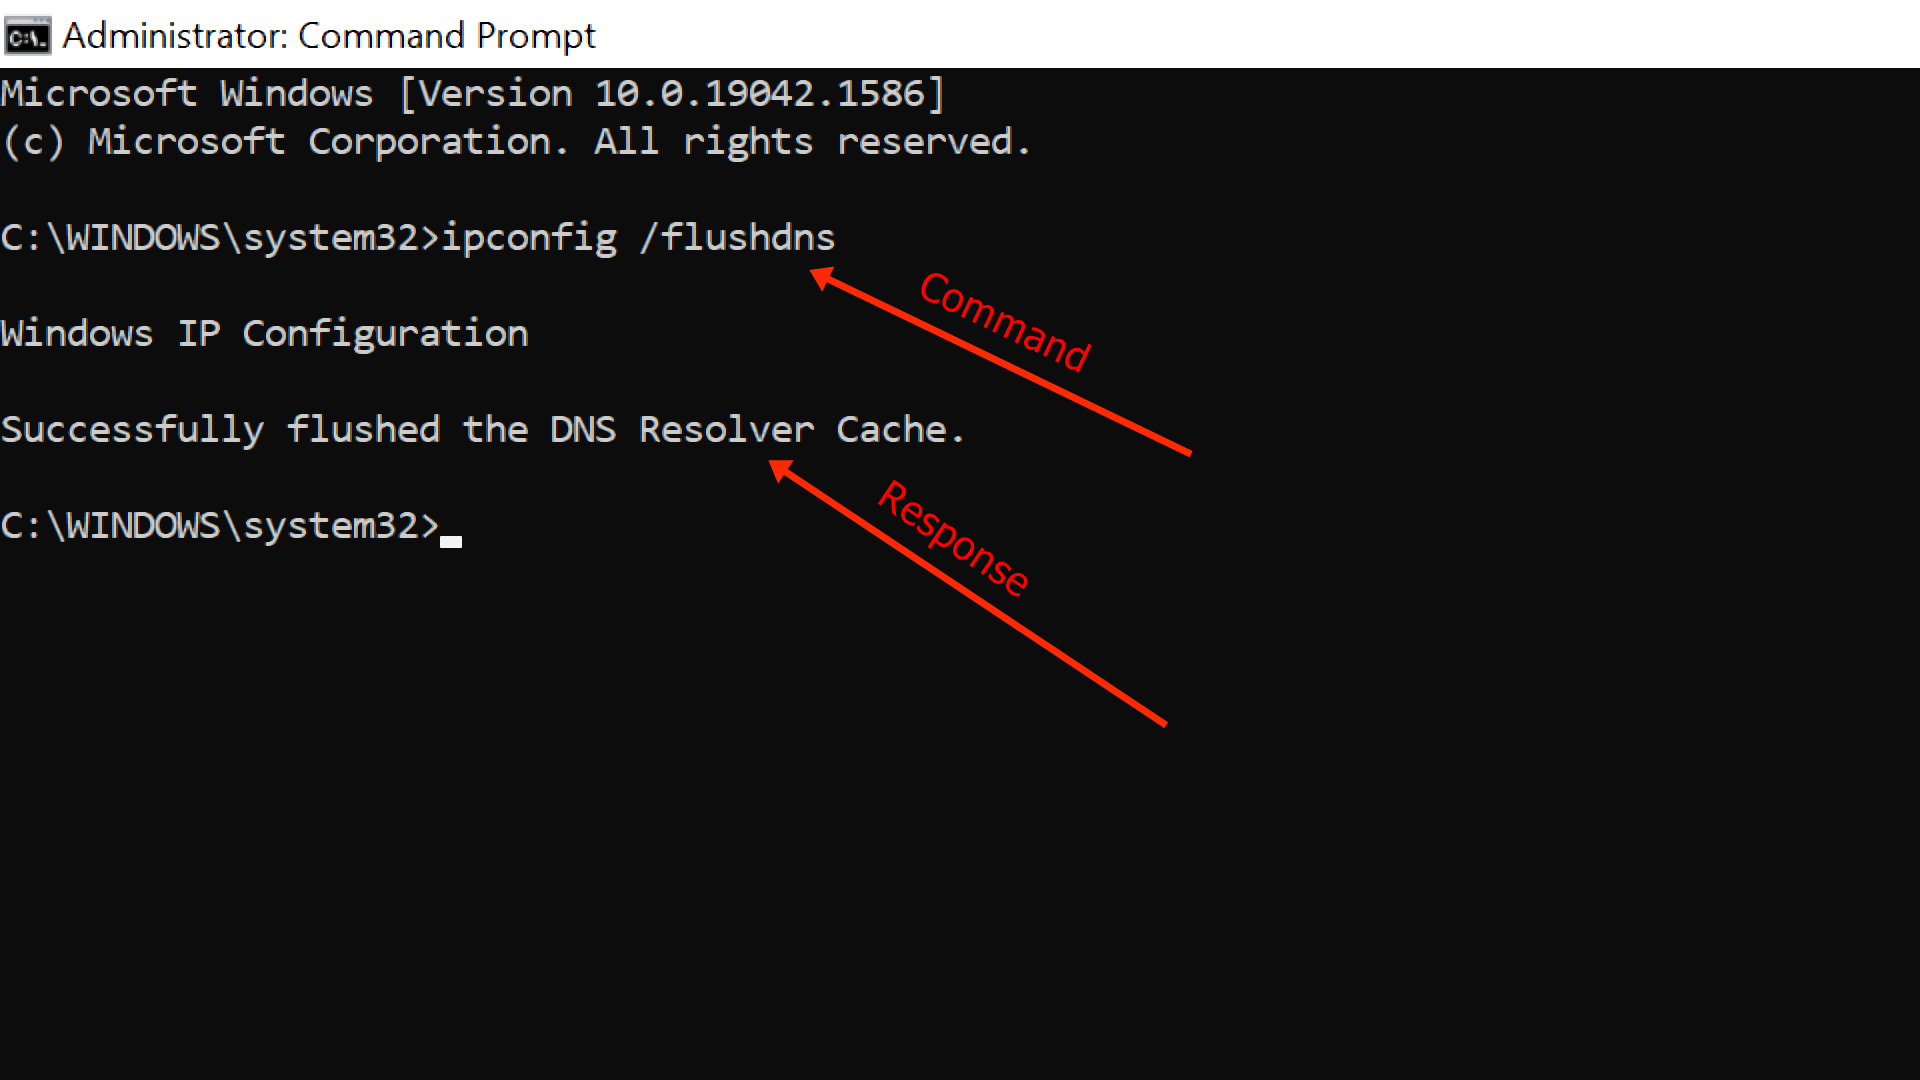
- Wait for the process to complete and for the message “Successfully flushed the DNS Resolver Cache” to appear.
- Close the Command Prompt and restart your computer.
Resetting connection settings and changing IPV4 and IPV6 settings
To fix the issue of Windows being unable to communicate with the primary DNS server, you can try resetting your connection settings and changing your IPv4 and IPv6 settings. Here’s how:
1. Open the Control Panel and go to “Network and Internet” > “Network and Sharing Center.”
2. Click on “Change adapter settings” in the left-hand menu.
3. Right-click on your active network adapter (e.g., Ethernet) and select “Properties.”
4. Scroll down and double-click on “Internet Protocol Version 4 (TCP/IPv4)” or “Internet Protocol Version 6 (TCP/IPv6), depending on the type of IP address you want to change.
5. In the properties window, select the option to obtain an IP address automatically or enter the preferred DNS server addresses manually.
6. Click “OK” to save the changes.
7. Restart your computer and check if the issue is resolved.
If you still encounter the problem, you can try running Windows Network Diagnostics or seek further assistance from Microsoft support.
python

import subprocess
def check_dns_connectivity():
try:
# Run a command to check DNS connectivity
result = subprocess.run(['nslookup', 'www.example.com'], capture_output=True, text=True)
if result.returncode == 0:
# DNS lookup successful
print("DNS connectivity is working fine.")
else:
# DNS lookup failed
print("Windows can't communicate with the primary DNS server.")
print("Error:", result.stderr)
except Exception as e:
print("An error occurred while checking DNS connectivity:", str(e))
# Call the function to check DNS connectivity
check_dns_connectivity()
In the above code, the `check_dns_connectivity` function attempts to perform a DNS lookup using the `nslookup` command. It captures the command’s output and checks the return code to determine if the DNS lookup was successful. If the return code is non-zero, it indicates that Windows cannot communicate with the primary DNS server. The code then prints the error message received from the command.
Resetting TCP/IP and network device drivers
If you’re experiencing trouble connecting to the internet and receiving the “Windows can’t communicate with the primary DNS server” error message, resetting TCP/IP and network device drivers may help resolve the issue. Here’s how you can do it:
1. Press the Windows key + X on your keyboard and select “Network Connections” from the menu.
2. In the Network Connections window, right-click on your active network connection and choose “Properties.”
3. Scroll down and click on “Internet Protocol Version 4 (TCP/IPv4)” to highlight it, then click the “Properties” button.
4. In the IPv4 Properties window, select the option to “Obtain an IP address automatically” and “Obtain DNS server address automatically.”
5. Click “OK” to save the changes and close the windows.
6. Now, press the Windows key + X again and select “Device Manager.”
7. Expand the “Network Adapters” category and right-click on your network adapter, then choose “Uninstall device.”
8. Confirm the uninstallation and wait for the process to complete.
9. After uninstalling the network adapter, restart your computer.
10. Upon restart, Windows will automatically reinstall the network adapter drivers.
11. Try connecting to the internet again and check if the issue is resolved.
These steps should help in fixing the “Windows can’t communicate with the primary DNS server” error and restore your internet connection.
Clearing DNS cache and scanning for malware
Fix Windows Can’t Communicate with Primary DNS Server
In this article, we will discuss how to resolve the issue of Windows being unable to communicate with the primary DNS server. This issue can cause problems with internet connectivity and accessing websites. We will cover two potential solutions: clearing the DNS cache and scanning for malware.
Clearing DNS Cache
Clearing the DNS cache can help resolve DNS-related issues. Follow the steps below to clear the DNS cache:
| Step | Description |
|---|---|
| Step 1 | Open the Command Prompt by pressing Windows Key + R, typing cmd, and hitting Enter. |
| Step 2 | In the Command Prompt, type ipconfig /flushdns and press Enter. |
| Step 3 | Wait for the confirmation message indicating that the DNS cache has been successfully flushed. |
Scanning for Malware
In some cases, malware or viruses can interfere with the DNS settings. Scanning your computer for malware can help identify and remove any malicious software. Follow these steps to scan for malware:
| Step | Description |
|---|---|
| Step 1 | Install a reputable antivirus or anti-malware software if you don’t have one already. |
| Step 2 | Update the antivirus software to ensure it has the latest virus definitions. |
| Step 3 | Perform a full system scan to detect and remove any malware. |
| Step 4 | Once the scan is complete, follow the software’s instructions to remove any threats found. |


