In today’s increasingly digital world, a stable internet connection is essential. However, Windows 10 users may sometimes encounter the frustrating issue of having no internet access on their laptops despite being connected to Wi-Fi. In this article, we explore some simple solutions to fix this problem and get you back online.
Recently, Fortect has become increasingly popular as a reliable and efficient way to address a wide range of PC issues. It's particularly favored for its user-friendly approach to diagnosing and fixing problems that can hinder a computer's performance, from system errors and malware to registry issues.
- Download and Install: Download Fortect from its official website by clicking here, and install it on your PC.
- Run a Scan and Review Results: Launch Fortect, conduct a system scan to identify issues, and review the scan results which detail the problems affecting your PC's performance.
- Repair and Optimize: Use Fortect's repair feature to fix the identified issues. For comprehensive repair options, consider subscribing to a premium plan. After repairing, the tool also aids in optimizing your PC for improved performance.
Basic Troubleshooting Steps
1. Check if Wi-Fi is on and connected: Go to the taskbar and click on the Wi-Fi icon in the bottom right corner. If it’s not turned on, turn it on and connect to a Wi-Fi network.
2. Restart the computer: Restarting the computer can help resolve Internet connection issues.
3. Check if other devices can connect to the Wi-Fi: If other devices can connect, it may mean the problem is with the laptop. If not, it may be a network problem.
4. Run the Network Troubleshooter: Press the Windows key + I > Network & Internet > Network troubleshooter. This will identify and fix common network problems.
5. Update the network driver: Press the Windows key + X > Device Manager > Network adapters > right-click on the network driver > Update driver.
6. Reset the network settings: Press the Windows key + X > Settings > Network & Internet > scroll down and click on Network reset > Reset now.
7. Use Driver Easy: If the network driver is outdated or corrupted, use Driver Easy to update it.
Remember to trust only reliable sources when downloading software or drivers. These basic troubleshooting steps can help fix most Internet access issues on a Windows 10 laptop with Wi-Fi connection.
Configuring Network Functions
| Step # | Configuration Task | Description |
|---|---|---|
| Step 1 | Check Wi-Fi Connection | Verify that the laptop is connected to the correct Wi-Fi network and that the signal strength is strong enough to provide a stable connection. |
| Step 2 | Reset Wi-Fi Adapter | Disable and then re-enable the Wi-Fi adapter to reset the connection and clear any temporary issues. |
| Step 3 | Update Wi-Fi Driver | Check for and install any available updates for the laptop’s Wi-Fi driver to improve compatibility and performance. |
| Step 4 | Configure DNS Settings | Manually configure the laptop’s DNS settings to use a specific server, such as Google DNS, to resolve any connection issues related to DNS lookup. |
| Step 5 | Flush DNS Cache | Clear the laptop’s DNS cache to remove any outdated or incorrect entries that could be causing connection issues. |
| Step 6 | Disable Firewall | Temporarily disable any firewall software to rule out any conflicts that could be blocking the laptop’s Wi-Fi connection. |
| Step 7 | Restart Router | Power cycle the router by unplugging it for 30 seconds and then plugging it back in to ensure a fresh start and clear any potential issues with the network. |
Updating or Reinstalling Network Driver
To update or reinstall your network driver on a Windows 10 laptop with a Wi-Fi connection, follow these steps:
1. Press the Windows key + X and select “Device Manager” from the list.
2. Locate the “Network Adapters” section and expand it.
3. Right-click on your Wi-Fi adapter and select “Update driver”.
4. Choose “Search automatically for updated driver software” and follow the prompts to complete the update.
5. If updating the driver doesn’t work, you can try uninstalling it and then reinstalling it. Right-click on the adapter and select “Uninstall device”, and then restart your laptop.
6. After the restart, Windows will automatically reinstall the driver. If it doesn’t, you can manually install it by repeating steps 1-2 and then selecting “Action” > “Scan for hardware changes”.
Updating or reinstalling the network driver can often fix no internet access issues due to network problems. If you still experience issues, consider contacting support or referring to the manufacturer’s website for further information.
import subprocess
def check_internet_connection():
try:
subprocess.check_call(['ping', '-n', '1', 'google.com'])
return True
except subprocess.CalledProcessError:
return False
def enable_internet_connection():
subprocess.check_call(['netsh', 'interface', 'set', 'interface', 'Wi-Fi', 'enable'])
def disable_internet_connection():
subprocess.check_call(['netsh', 'interface', 'set', 'interface', 'Wi-Fi', 'disable'])
The `check_internet_connection()` function checks if the laptop has an active internet connection by pinging Google’s server. If it returns `True`, it means the laptop is connected to the internet, else it returns `False`.
The `enable_internet_connection()` function enables the Wi-Fi interface, which is assumed to be the interface through which the laptop connects to the internet.
The `disable_internet_connection()` function disables the Wi-Fi interface, which would effectively cut the internet connection.
You could use these functions to build a tool that can monitor the internet connection status and enable/disable it as needed.
Power Cycling Router
If you’re experiencing a no internet access issue on your Windows 10 laptop with a Wi-Fi connection, power cycling your router can often help fix the problem. Here’s how to do it:
1. Unplug your router from the power source.
2. Wait for about 30 seconds before plugging it back in.
3. Once your router has fully restarted, check if your internet connection is back.
If power cycling your router doesn’t work, try resetting your network settings or updating your Windows 10 laptop. You can also try connecting to a different Wi-Fi network or using a LAN cable instead. Remember to trust the Wi-Fi network you’re connecting to if it’s secured. With these simple steps, chances are you’ll be able to fix your internet connection issue and get back to browsing the web, streaming music, and sending emails.
Fixing Wi-Fi Connection without Internet Access
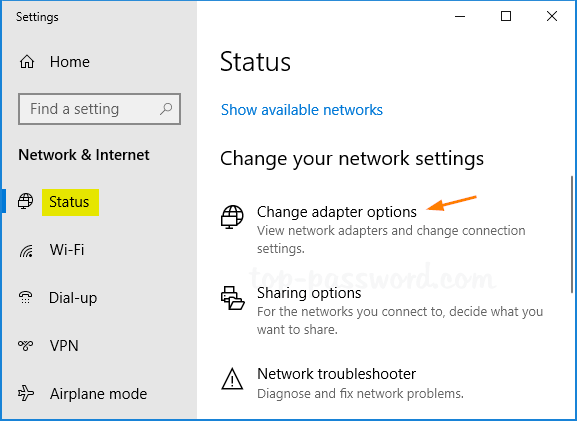
To fix a Wi-Fi connection without internet access issue on a Windows 10 laptop, there are a few things you can try. First, check if your Wi-Fi is connected by looking for the network icon in the taskbar. If it’s not showing, try restarting your laptop or toggling the Wi-Fi on and off. If that doesn’t work, run the Windows Network Troubleshooter by going to Settings > Network & Internet > Status > Network Troubleshooter. If the troubleshooter doesn’t fix the issue, open Command Prompt and type ipconfig /release followed by ipconfig /renew. You can also try forgetting the Wi-Fi network and reconnecting to it. If all else fails, try connecting with a LAN cable or creating a mobile hotspot.
Workable Fixes to Solve Wi-Fi Connected But No Internet Error Message
- Turn off your router and modem by unplugging them from the power source.
- Wait for a few minutes and then plug them back in.
- Wait for your internet connection to be re-established, and then try connecting to the internet on your laptop again.
Method 2: Reset Your Network Connection
- Open Settings by clicking on the Windows icon and selecting Settings.
- Select Network & Internet from the settings menu.
- Click on Network reset at the bottom of the page.
- Click on Reset now to begin the network reset process.
- Restart your laptop and try connecting to the internet again.
Method 3: Update Your Network Drivers
- Open Device Manager by searching for it in the Windows search bar.
- Expand the Network adapters category.
- Right-click on your Wi-Fi adapter and select Update driver.
- Choose Search automatically for updated driver software.
- Wait for Windows to search for and install any available updates for your network driver.
- Restart your laptop and try connecting to the internet again.
Method 4: Disable Your Firewall
- Open Control Panel by searching for it in the Windows search bar.
- Select System and Security.
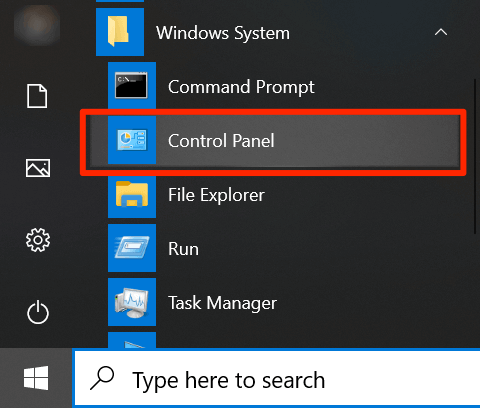
- Click on Windows Defender Firewall.
- Click on Turn Windows Defender Firewall on or off.
- Select the Turn off Windows Defender Firewall option for both private and public networks.
- Restart your laptop and try connecting to the internet again.
Method 5: Perform a System Restore
- Open Control Panel by searching for it in the Windows search bar.
- Select Recovery.
- Click on Open System Restore.
- Select a restore point from before the issue began.
- Follow the prompts to restore your system.
- Restart your laptop and try connecting to the internet again.
Restarting PC
If you’re having trouble accessing the internet on your Windows 10 laptop with a Wi-Fi connection, restarting your PC might help resolve the issue.
To restart your computer, click on the Windows Start menu in the bottom left corner of your screen. Select the Power icon and then click on Restart. Wait for your computer to fully restart, then try connecting to your Wi-Fi network again.
If restarting your PC doesn’t solve the problem, try resetting your Wi-Fi router or contacting your internet service provider for support.
Remember to check if your Wi-Fi network is secured and that you have the correct login details. If you’re still experiencing issues, consider updating your Windows software or checking for any error messages that might give you more information on the problem.
Checking Modem Lights
| Modem Lights | Description | Status |
|---|---|---|
| Power | Indicates that the modem is receiving power | On |
| DS (Downstream) | Indicates the quality and strength of the signal the modem is receiving from the internet service provider | On |
| US (Upstream) | Indicates the quality and strength of the signal the modem is sending to the internet service provider | On |
| Online | Indicates that the modem has successfully established a connection with the internet service provider | On |
| Wi-Fi | Indicates that the modem is broadcasting a Wi-Fi signal | On |
Running Built-in Troubleshooter
To troubleshoot a Windows 10 laptop with a Wi-Fi connection that has no internet access, try running the built-in troubleshooter. First, click on the network icon in the taskbar and look for the information mark on the Wi-Fi network you’re connected to. Then, select “Troubleshoot problems” and follow the prompts. If the troubleshooter doesn’t solve the issue, try resetting the network adapter by going to Device Manager, finding the Wi-Fi adapter, right-clicking on it, and selecting “Uninstall device.” After that, restart your laptop and let Windows automatically install the adapter again. If none of these steps work, check for any available Windows updates, and make sure your laptop is connected to the correct Wi-Fi network.
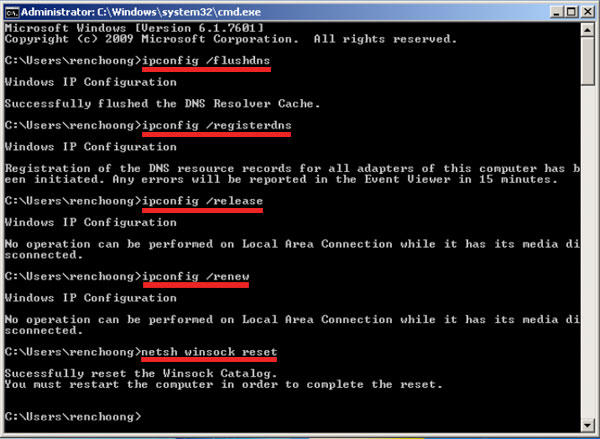
Obtaining IP and DNS Automatically
To obtain IP and DNS automatically on a Windows 10 laptop with Wi-Fi connection, follow these steps:
1. Press the Windows key + X and select Network Connections.
2. Right-click on your Wi-Fi network and select Properties.
3. In the Properties window, select Internet Protocol Version 4 (TCP/IPv4) and click Properties.
4. Select Obtain an IP address automatically and Obtain DNS server address automatically.
5. Click OK to save the changes.
6. Restart your laptop and see if the internet connection issue is resolved.
If you’re still having issues, try resetting your Wi-Fi network adapter by typing the following command in Command Prompt:
netsh winsock reset
Then restart your laptop and check if the issue is resolved. If not, you may need to troubleshoot further or contact your internet service provider for assistance.
Checking Time Synchronization
To fix internet access issues on your Windows 10 laptop with a Wi-Fi connection, it’s essential to check the time synchronization settings. Your device’s clock needs to be in sync with the internet time server, or you may face connection problems.
To check your time synchronization settings, click on the clock on your taskbar and select “Date and Time Settings.” Scroll down to “Additional date, time, & regional settings” and click on “Set the time and date.” Ensure that the “Set time automatically” option is turned on.
If the time is still not syncing correctly, you can try changing the internet time server. Click on “Change settings” and then “Update now.” If your device is connected to a Wi-Fi network, it should sync automatically.
By ensuring your device’s time is in sync with the internet time server, you can fix no internet access issues on your Windows 10 laptop with a Wi-Fi connection.
Disabling Fast Startup
To fix the “No Internet Access” issue on a Windows 10 laptop with Wi-Fi connection, try disabling Fast Startup. This setting can cause problems with network connections. To disable Fast Startup, follow these steps:
1. Press the Windows key and type “Control Panel.”
2. Open Control Panel and click “Power Options.”
3. Click “Choose what the power buttons do.”
4. Click “Change settings that are currently unavailable.”
5. Uncheck “Turn on fast startup (recommended).”
6. Click “Save changes” and restart your laptop.
This should fix the problem, but if it persists, try resetting your network settings or updating your network drivers.
Resetting Network
- Open Command Prompt by pressing Windows key + X and selecting Command Prompt (Admin)
- Type netsh winsock reset and press Enter
- Type netsh int ip reset and press Enter
- Type ipconfig /release and press Enter

- Type ipconfig /renew and press Enter
- Type ipconfig /flushdns and press Enter
- Close Command Prompt and restart your laptop


