Are you uncertain whether your trusty PC can handle the power of Windows 10? Fear not, as we delve into the perplexing world of system requirements to help you determine if your computer is up to the challenge.
Recently, Fortect has become increasingly popular as a reliable and efficient way to address a wide range of PC issues. It's particularly favored for its user-friendly approach to diagnosing and fixing problems that can hinder a computer's performance, from system errors and malware to registry issues.
- Download and Install: Download Fortect from its official website by clicking here, and install it on your PC.
- Run a Scan and Review Results: Launch Fortect, conduct a system scan to identify issues, and review the scan results which detail the problems affecting your PC's performance.
- Repair and Optimize: Use Fortect's repair feature to fix the identified issues. For comprehensive repair options, consider subscribing to a premium plan. After repairing, the tool also aids in optimizing your PC for improved performance.
Privacy & Transparency on Windows 10
When it comes to determining if your PC can run Windows 10, Microsoft prioritizes your privacy and transparency. To ensure a smooth installation process, here are some helpful steps:
1. Check system requirements: Visit the Windows 10 home page or Microsoft’s website to review the minimum hardware and space requirements.
2. Run the Windows 10 Upgrade Assistant: This tool will assess your computer’s compatibility and identify any potential issues or driver updates needed.
3. Resolve compatibility issues: If the Upgrade Assistant reports any problems, follow the recommended solutions or seek assistance from Microsoft’s support team.
4. Update BIOS and drivers: Make sure your computer’s BIOS and drivers are up to date. Check your device manufacturer’s website for the latest versions.
5. Clear space and fix system errors: Use disk cleanup tools like Outbyte or Fortect Mac Washing Machine X9 to free up storage and address any system errors.
Methods to Free up Disk Space and Improve Performance
- Remove unnecessary files:
- Open File Explorer by pressing Windows key + E.
- Select the C: drive or the drive you want to clean up.
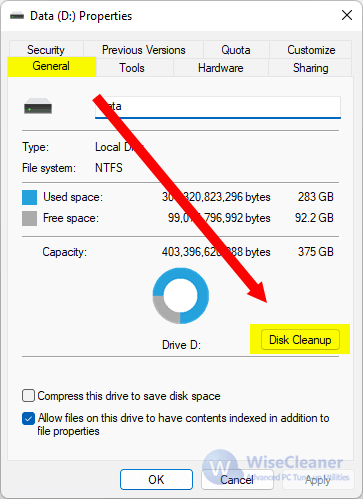
- Right-click on the drive and choose Properties.
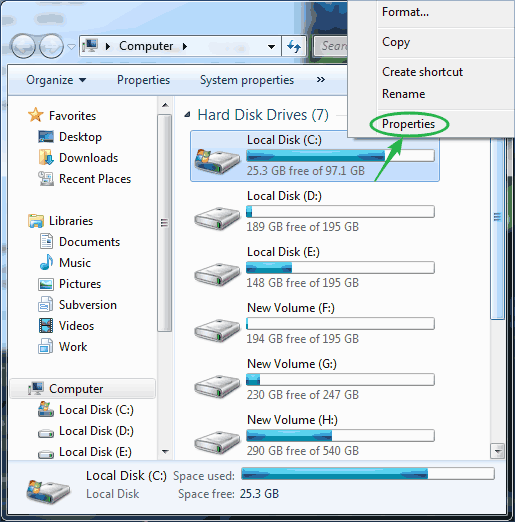
- In the General tab, click on Disk Cleanup.
- Check the boxes for the types of files you want to delete and click OK.

- Click Delete Files to confirm.
- Uninstall unused programs:
- Open Settings by pressing Windows key + I.
- Click on Apps.

- In the Apps & features section, scroll through the list of installed programs.
- Select the program you want to uninstall and click Uninstall.
- Follow the prompts to complete the uninstallation process.
- Disable startup programs:
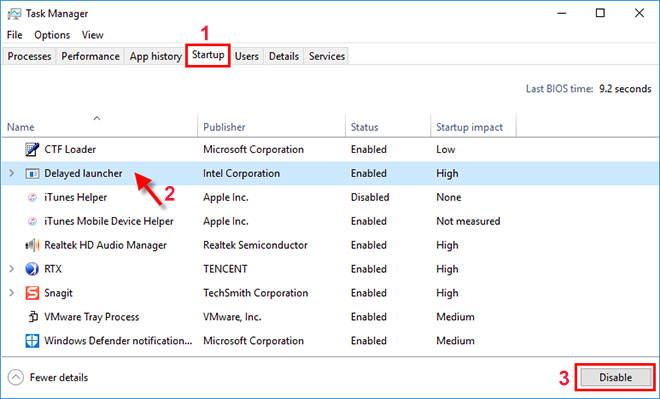
- Open Task Manager by pressing Ctrl+Shift+Esc.
- Click on the Startup tab.
- Select the program you want to disable and click Disable.
- Repeat this step for all unnecessary startup programs.
- Close Task Manager.
- Run disk cleanup utility:
- Open File Explorer by pressing Windows key + E.
- Select the C: drive or the drive you want to clean up.
- Right-click on the drive and choose Properties.
- In the General tab, click on Disk Cleanup.
- Click on Clean up system files.
- Select the files you want to delete and click OK.
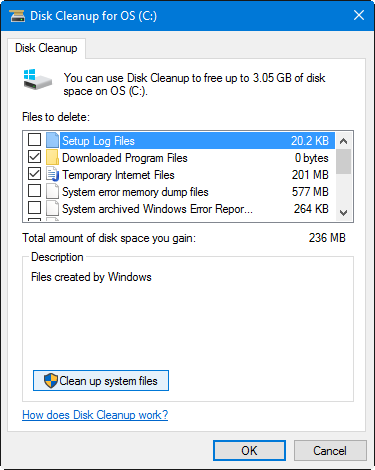
- Click Delete Files to confirm.
- Disable visual effects:
- Open Control Panel.
- Click on System.
- Click on Advanced system settings.
- In the Performance section, click on Settings.
- Select Adjust for best performance or manually choose the visual effects you want to disable.
- Click Apply and then OK.
- Check for and remove malware:
- Install and run a reliable antivirus/anti-malware software.
- Perform a full system scan to detect and remove any malware.
- Follow the software’s instructions to remove any identified threats.
Troubleshooting Techniques for Determining Windows 10 Compatibility
If you’re having trouble determining if your PC can run Windows 10, we’re here to help. Follow these steps to troubleshoot and find out if your device is compatible:
1. Check the system requirements: Visit the Windows 10 system requirements page on the Microsoft website to ensure your PC meets the necessary specifications.
2. Use the Windows 10 compatibility tool: Download and run the Windows 10 compatibility tool from Microsoft’s website. This tool will scan your device and provide a compatibility report.
3. Update your drivers: Ensure that all your drivers, especially graphics and network drivers, are up to date. Visit your device manufacturer’s website for the latest driver updates.
4. Disable incompatible software: Some applications may not be compatible with Windows 10. Check for any known compatibility issues with your installed software and temporarily disable or uninstall any incompatible programs.
5. Seek professional assistance: If you’re still experiencing compatibility issues, consider reaching out to our partners or professional technicians who can provide further support.
Optimizing BIOS Settings for Windows 10
If you’re having trouble determining if your PC can run Windows 10, optimizing your BIOS settings might help. Here are some steps to follow:
1. Restart your computer and enter the BIOS settings by pressing the indicated key during startup.
2. Look for the “Secure Boot” option and disable it to allow Windows 10 to run smoothly.
3. Check for the “Legacy Boot” option and enable it if you’re using an older system.
4. Ensure that the “AHCI” mode is enabled for better performance.
5. Save the changes and exit the BIOS settings.
By adjusting these settings, you can enhance compatibility and optimize your PC for Windows 10.
Changing Active Partition for Windows 10 Installation
| Step | Description |
|---|---|
| Step 1 | Restart your computer and enter the BIOS setup by pressing the specified key (usually Del, F2, or F10) during the boot process. |
| Step 2 | Navigate to the “Boot” or “Boot Order” section in the BIOS setup. |
| Step 3 | Identify the current active partition. It is usually indicated by an asterisk (*) or a similar symbol. |
| Step 4 | Select the partition that contains the Windows 10 installation files as the new active partition. |
| Step 5 | Save the changes and exit the BIOS setup. |
| Step 6 | Proceed with the Windows 10 installation process. |


