
Feeling frustrated with the RADS error in League of Legends on your Windows 10? Let’s dive into the solution.
Recently, Fortect has become increasingly popular as a reliable and efficient way to address a wide range of PC issues. It's particularly favored for its user-friendly approach to diagnosing and fixing problems that can hinder a computer's performance, from system errors and malware to registry issues.
- Download and Install: Download Fortect from its official website by clicking here, and install it on your PC.
- Run a Scan and Review Results: Launch Fortect, conduct a system scan to identify issues, and review the scan results which detail the problems affecting your PC's performance.
- Repair and Optimize: Use Fortect's repair feature to fix the identified issues. For comprehensive repair options, consider subscribing to a premium plan. After repairing, the tool also aids in optimizing your PC for improved performance.
Check your antivirus
1. Open your antivirus software and locate the settings or preferences section.
2. Look for any options related to game or application scanning, real-time protection, or firewall settings.
3. Temporarily disable these features or add an exception for League of Legends.
4. Save the changes and exit the antivirus settings.
5. Launch League of Legends and see if the RADS Error is resolved.
If the error persists, try uninstalling your antivirus software completely and then reinstalling it. Make sure to download the latest version from the official website.
Remember to re-enable your antivirus protection once you have finished troubleshooting the RADS Error. It’s important to keep your computer protected while playing online games.
By checking your antivirus settings, you can address any conflicts that may be causing the RADS Error in League of Legends on Windows 10.
Run the LoL Patcher as an administrator
To fix the RADS Error in League of Legends on Windows 10, try running the LoL Patcher as an administrator. This can help resolve any permission issues that may be causing the error.
To run the LoL Patcher as an administrator, follow these steps:
1. Right-click on the League of Legends shortcut or the .exe file.
2. From the context menu that appears, click on “Run as administrator.”
3. If prompted by User Account Control, click “Yes” to grant permission.
4. The LoL Patcher should now open with administrative privileges, which can help overcome any issues related to permissions.
By running the LoL Patcher as an administrator, you may be able to successfully launch the game without encountering the RADS Error. If the error persists, you can try other troubleshooting steps or seek further assistance from the League of Legends community or support team.
Add LoL to your exceptions list
1. Open the Windows Firewall settings by searching for “Firewall” in the Start menu.
2. Click on “Allow an app or feature through Windows Firewall” on the left-hand side.
3. Click on the “Change settings” button, then scroll down and click on the “Allow another app” button.
4. Click on the “Browse” button and navigate to the location where League of Legends is installed. Usually, it’s in the “C:\Riot Games\League of Legends” folder.
5. Select the “LeagueClient.exe” file and click on the “Open” button.
6. Make sure both the “Private” and “Public” checkboxes are ticked and click on the “Add” button.
7. Now, scroll down and find “lol.launcher.exe” in the app list. Tick both the “Private” and “Public” checkboxes for this file as well.
8. Click on the “OK” button to save the changes and close the Windows Firewall settings.
9. Restart your computer and try launching League of Legends again.
If you’re still experiencing the RADS Error, you may need to try other troubleshooting methods or seek further assistance.
Reinstall the game
To fix the RADS Error in League of Legends on Windows 10, reinstalling the game can often resolve the issue. Follow these steps:
1. First, uninstall the game from your computer. To do this, go to the Control Panel and select “Uninstall a program” (or “Add or remove programs” on older versions of Windows). Find League of Legends in the list of installed programs and choose to uninstall it.
2. Next, ensure that your internet connection is stable and reliable. A poor internet connection can sometimes cause the RADS Error. If you’re using Wi-Fi, try connecting via Ethernet cable for a more stable connection.
3. Once you’ve uninstalled the game, visit the official League of Legends website and download the latest version of the game client. Make sure to download the version specifically for Windows 10.
4. After the download is complete, locate the installer file and double-click on it to start the installation process. Follow the on-screen instructions to install the game.
5. Once the installation is complete, launch League of Legends and check if the RADS Error has been resolved. If not, you may need to try additional troubleshooting steps or seek further assistance.
Reinstalling the game can often fix the RADS Error in League of Legends on Windows 10. Make sure to follow these steps carefully and ensure a stable internet connection throughout the process.
Change your DNS
To fix the RADS Error in League of Legends on Windows 10, you can try changing your DNS settings. Here’s how:
1. Open the Control Panel on your Windows 10 computer.
2. Click on “Network and Internet” and then “Network and Sharing Center.”
3. On the left-hand side, click on “Change adapter settings.”
4. Right-click on your active network connection and select “Properties” from the context menu.
5. In the properties window, scroll down and double-click on “Internet Protocol Version 4 (TCP/IPv4).”
6. In the new window, select the option to “Use the following DNS server addresses.”
7. Enter the following DNS server addresses:
– Preferred DNS server: 8.8.8.8
– Alternate DNS server: 8.8.4.4
8. Click “OK” to save the changes.
9. Restart your computer and try launching League of Legends again.
Changing your DNS settings can help resolve connectivity issues and improve your gaming experience. Give it a try and see if it fixes the RADS Error.
Tweak file hosts
To fix the RADS Error in League of Legends on Windows 10, you can try tweaking the file hosts. Here’s how:
1. Open File Explorer and navigate to the following location: C:\Windows\System32\drivers\etc.
2. Look for a file named “hosts” and right-click on it. Select “Open with” and choose Notepad.
3. Scroll down to the bottom of the file and add the following lines:
0.0.0.0 l3cdn.riotgames.com
0.0.0.0 l3assets.riotgames.com
4. Save the file and exit Notepad.
5. Restart your computer and try launching League of Legends again. The RADS Error should be resolved.
Change system.cfg file

To fix the RADS Error in League of Legends on Windows 10, you can try changing the system.cfg file. This file contains important settings that can help resolve the issue.
First, locate the system.cfg file on your computer. It is usually found in the “C:\Riot Games\League of Legends\Config” directory.
Open the system.cfg file using a text editor such as Notepad. Look for the line that says “DownloadPath = “C:\Riot Games\League of Legends\downloads” and change it to “DownloadPath = “C:\Riot Games\League of Legends\temp”“.
Save the changes and exit the text editor.
Next, navigate to the “C:\Riot Games\League of Legends\RADS\system” directory and find the “user.cfg” file. Open it with a text editor and look for the line that says “leagueClientOptIn = yes“. Change it to “leagueClientOptIn = no“.
Save the changes and exit the text editor.
Restart your computer and try launching League of Legends again. This should help resolve the RADS Error on Windows 10.
Restart your modem
Here’s how you can restart your modem:
1. Locate your modem and unplug the power cable from the back of it.
2. Wait for about 10-15 seconds.
3. Plug the power cable back into the modem.
4. Wait for the modem to fully boot up and establish a connection with your internet service provider.
5. Once the modem is back online, try launching League of Legends again to see if the RADS Error has been resolved.
If restarting your modem doesn’t fix the issue, you may need to try other troubleshooting steps or reach out to League of Legends support for further assistance. Remember to always check if there are any relevant patches or updates available for the game, and make sure your firewall settings are not blocking League of Legends.
Stop all RADS processes
1. Press Ctrl + Shift + Esc to open the Task Manager.
2. In the Task Manager, go to the Processes tab.
3. Look for any processes related to RADS, such as LoLLauncher.exe or RiotClientServices.exe.
4. Right-click on each RADS process and select End Task.
5. After stopping all RADS processes, try launching League of Legends again to see if the RADS error is fixed.
If the RADS error persists, you may need to try other troubleshooting steps or seek further assistance from the League of Legends community or support channels.
What causes RADS Error on League of Legends?
The RADS Error on League of Legends can be caused by various factors. It could be due to a problem with the game files, an issue with the Riot Games server, or a conflict with your firewall settings. To fix this error on Windows 10, try the following steps:
1. Check your internet connection: Make sure you have a stable internet connection and that there are no network issues.
2. Disable your firewall: Temporarily disable any firewall or antivirus software that could be blocking League of Legends from connecting to the server.
3. Repair game files: Open the League of Legends launcher, click on the gear icon, and select “Repair” to repair any corrupted or missing game files.
4. Run as administrator: Right-click on the League of Legends shortcut and select “Run as administrator” to give the game administrative privileges.
5. Restart your computer: Sometimes a simple restart can resolve the RADS Error. Close the game and restart your computer before launching League of Legends again.
6. Reinstall the game: If none of the above steps work, you may need to uninstall and reinstall League of Legends. Use the official uninstaller or follow the instructions on the League of Legends website to remove the game completely.
Check internet connection
To fix RADS Error on League of Legends in Windows 10, first, check your internet connection. Make sure you have a stable and strong connection to the web server.
If you’re experiencing a crash or error message, it could be due to a temporary loss of internet access. To resolve this, try restarting your router or reconnecting to your network.
If you’re using a firewall or antivirus software, ensure that League of Legends is allowed through the firewall. You can do this by adding an exception or disabling the firewall temporarily.
If the issue persists, try clearing your browsing data and cookies. This can help resolve any conflicts or cached information causing the error.
Additionally, make sure your Windows 10 is up to date with the latest patches and updates. Outdated software can sometimes cause compatibility issues.
If none of these steps work, consider uninstalling and reinstalling League of Legends. This can help resolve any corrupt files or installation errors that may be causing the RADS Error.
Provide administrative rights
1. Right-click on the League of Legends shortcut or launcher and select “Run as administrator”.
2. If prompted, click “Yes” to allow the program to make changes to your computer. This will give the game administrative privileges.
3. Launch the game and check if the RADS Error is resolved.
If the error persists, you can try the following additional steps:
4. Close the game and navigate to the game installation folder. By default, it is located in “C:\Riot Games\League of Legends”.
5. Right-click on the “RADS” folder and select “Properties”.
6. In the Properties window, go to the “Security” tab.
7. Click on “Edit” to modify the permissions.
8. Select your user account from the list and check the box next to “Full control”. Then click “Apply” and “OK” to save the changes.
9. Launch the game again and see if the issue is resolved.
Providing administrative rights can help resolve the RADS Error in League of Legends on Windows 10. If you continue to experience the error, it may be necessary to seek further assistance from the game’s support or community forums.
Whitelist from Windows Firewall
To fix the RADS Error in League of Legends on Windows 10, you can whitelist the game from the Windows Firewall. This will allow the game to communicate without any interference from the firewall.
Here’s how you can do it:
1. Press the Windows key + R on your keyboard to open the Run dialog box.
2. Type “control” and hit Enter to open the Control Panel.
3. In the Control Panel, click on “System and Security” and then click on “Windows Defender Firewall”.
4. On the left side of the window, click on “Allow an app or feature through Windows Defender Firewall”.
5. Click on the “Change settings” button. You might need administrator privileges to make changes.
6. Scroll through the list of apps and features and look for “League of Legends” or “RADS User Kernel”.
7. Check both the boxes for “Private” and “Public” networks next to the League of Legends entry.
8. Click on the “OK” button to save the changes.
By whitelisting League of Legends from the Windows Firewall, you are giving the game unrestricted access to the internet, which should help fix the RADS Error. Remember to also check if any other security software or antivirus is blocking the game.
If you continue to experience the error, you can try other troubleshooting methods such as repairing the game installation, updating your drivers, or running the game as an administrator. There are various resources available online, such as Reddit communities and official support forums, where you can find more specific solutions for your scenario.
Flush the DNS cache
To fix the RADS Error in League of Legends on Windows 10, you can try flushing the DNS cache. This can help resolve any connectivity issues you might be experiencing.
Here’s how to flush the DNS cache:
1. Press the Windows key and type “Command Prompt” in the search bar.
2. Right-click on the Command Prompt app and select “Run as administrator.”
3. In the Command Prompt window, type the following command and press Enter: ipconfig /flushdns
4. You should see a message saying “Successfully flushed the DNS Resolver Cache.”
5. Close the Command Prompt window and restart your computer.
Flushing the DNS cache can clear any outdated or incorrect DNS information, which can sometimes cause connection problems. This method is quick and easy to try, and it often resolves RADS Errors in League of Legends.
If the issue persists, you can also try other troubleshooting steps such as disabling your firewall temporarily, checking your internet connection, or reinstalling the game.
Remember, it’s always a good idea to keep your operating system and game client up to date with the latest patches and updates. This can help prevent errors and improve performance.
If you need further assistance, you can also reach out to the League of Legends community on platforms like Reddit or consult the official support channels provided by Riot Games.
Keep in mind that RADS Errors can occur due to various factors, so it’s important to try different solutions until you find the one that works for your specific scenario.
Change the DNS server
1. Open the Control Panel on your computer.
2. Click on “Network and Internet” and then “Network and Sharing Center.”
3. In the left-hand menu, click on “Change adapter settings.”
4. Right-click on your active network connection and select “Properties.”
5. Scroll down and double-click on “Internet Protocol Version 4 (TCP/IPv4).”
6. Select the option to “Use the following DNS server addresses.”
7. Enter the following DNS server addresses:
– Preferred DNS server: 8.8.8.8
– Alternate DNS server: 8.8.4.4
8. Click “OK” to save the changes.
By changing the DNS server to Google’s public DNS, you may be able to resolve the RADS Error and connect to League of Legends successfully.
Update Network Driver
To update the network driver for League of Legends RADS error on Windows 10, follow these steps:
1. Press the Windows key + X and select Device Manager from the menu.
2. Expand the Network adapters category.
3. Right-click on your network adapter and select Update driver software.
4. Choose “Search automatically for updated driver software.”
5. Wait for Windows to search and install the latest driver for your network adapter.
6. Restart your computer and check if the RADS error is resolved.
If the automatic update doesn’t work, you can manually download and install the latest driver from the manufacturer’s website. Make sure to uninstall the previous driver before installing the new one.
Edit System.cfg File
To edit the System.cfg file and fix the RADS error in League of Legends on Windows 10, follow these steps:
1. Go to the installation folder of League of Legends on your computer.
2. Look for the “RADS” folder and open it.
3. Inside the “RADS” folder, locate the “system” folder and open it.
4. You should see a file named “system.cfg”. Right-click on it and select “Open with” followed by “Notepad” or any text editor of your choice.
5. Once the file is opened in the text editor, locate the line that says “UserSetResolution=0“.
6. Change the value from “0” to “1” to enable custom resolutions.
7. Save the changes you made to the file and close the text editor.
8. Launch League of Legends again and see if the RADS error is resolved.
If the RADS error persists, you can try other troubleshooting steps such as repairing the game installation or resetting the game settings.
Try the Hextech Repair Tool
If you’re experiencing the RADS Error in League of Legends on Windows 10, try using the Hextech Repair Tool. This tool is designed to fix common issues with the game and can help resolve the RADS Error.
To use the Hextech Repair Tool, follow these steps:
1. First, download the Hextech Repair Tool from the official League of Legends website or through the app store for your device.
2. Once downloaded, open the Hextech Repair Tool and follow the on-screen instructions to install it on your computer.
3. After installation, launch the Hextech Repair Tool and it will automatically scan your computer for any issues with League of Legends.
4. The tool will then provide you with a list of possible fixes for the RADS Error. Choose the option that best suits your situation and click on it to apply the fix.
5. Wait for the tool to complete the fixing process. It may take some time depending on the size of the game and the speed of your internet connection.
6. Once the fix is applied, restart your computer and launch League of Legends again to see if the RADS Error has been resolved.
Using the Hextech Repair Tool can be a quick and effective way to fix the RADS Error in League of Legends on Windows 10. Give it a try and get back to gaming without any interruptions.
How do I League of Legends error code 003?
If you’re encountering League of Legends error code 003 on Windows 10, there are a few steps you can take to fix it. First, try clearing your browser cache and cookies. This can help resolve any conflicts with the game’s web server. Additionally, disable any firewall or antivirus software that may be blocking the game’s connection.
If the issue persists, try reinstalling the game or using a different computer to see if the problem is specific to your setup. You can also check for any available game patches or updates that may address the error.
What causes ping spikes in League of Legends?
Ping spikes in League of Legends can be caused by various factors. One common culprit is a poor internet connection. If your internet speed is slow or unstable, it can result in ping spikes during gameplay. Another possible cause is network congestion, especially during peak hours when many players are online.
Firewall settings and antivirus software can also affect your ping. Make sure to check your firewall settings and ensure that League of Legends is allowed to access the internet. Additionally, disabling unnecessary background applications and processes can help reduce ping spikes.
Sometimes, outdated or faulty network drivers can cause ping issues. To fix this, you can update your network drivers or reinstall them. This can be done through Device Manager on your Windows 10 computer.
Lastly, it’s important to consider the server location you are connecting to. If the server is far from your location, it may result in higher ping. To improve your ping, you can try connecting to a different server that is closer to you.
Run League of Legends as Admin
To fix the RADS Error in League of Legends on Windows 10, one solution is to run the game as an administrator. This can help bypass any permission issues that may be causing the error.
To do this, right-click on the League of Legends shortcut or executable file and select “Run as administrator.” This will give the game the necessary permissions to run smoothly.
If you’re still experiencing the RADS Error after running the game as an administrator, there may be other underlying issues at play. It’s worth checking your internet connection, as a stable connection is crucial for online gaming. Additionally, make sure your firewall is not blocking the game’s access to the internet.
If the problem persists, you can try uninstalling and reinstalling League of Legends. This can help resolve any potential conflicts or corrupted files that may be causing the error.
Remember to always keep your game and operating system up to date by installing the latest patches and updates. This helps ensure compatibility and can fix any known issues.
If all else fails, it may be helpful to reach out to the League of Legends support team for further assistance. They can provide more specific troubleshooting steps and guidance tailored to your situation.
Flush DNS
To fix the RADS Error in League of Legends on Windows 10, you can try flushing your DNS. Flushing the DNS cache can help resolve connectivity issues and improve your gaming experience.
To flush DNS, follow these steps:
1. Press the Windows key + R to open the Run dialog box.
2. Type cmd and press Enter to open the Command Prompt.
3. In the Command Prompt, type ipconfig /flushdns and press Enter.
4. Wait for the process to complete. You should see a message saying “Successfully flushed the DNS Resolver Cache.”
After flushing DNS, try launching League of Legends again and see if the RADS Error is resolved. If not, you can try other troubleshooting steps or seek further assistance from the League of Legends support team.
Change DNS Server
To change the DNS server on Windows 10 and fix the RADS Error in League of Legends, follow these steps:
1. Press the Windows key + R on your keyboard to open the Run dialog box.
2. Type ncpa.cpl and press Enter to open the Network Connections window.
3. Right-click on your active network connection and select Properties.
4. Scroll down and double-click on Internet Protocol Version 4 (TCP/IPv4).
5. Select the option to Use the following DNS server addresses.
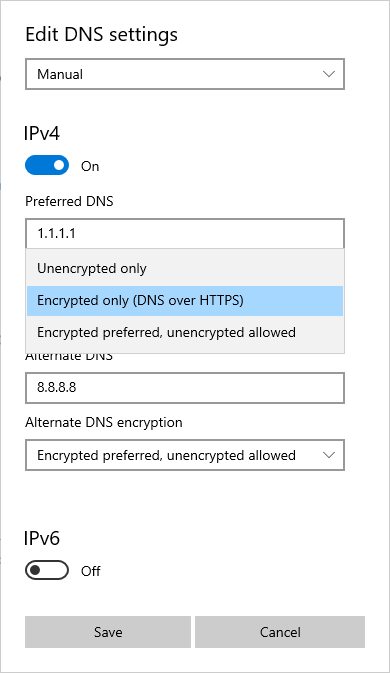
6. Enter the preferred DNS server and alternate DNS server addresses. You can use public DNS servers like Google DNS (preferred: 8.8.8.8, alternate: 8.8.4.4) or Cloudflare DNS (preferred: 1.1.1.1, alternate: 1.0.0.1).
7. Click OK to save the changes.
8. Restart your computer and try launching League of Legends again.
Changing the DNS server can help resolve connectivity issues and improve your gaming experience. By using reliable DNS servers, you ensure that your computer can properly communicate with the League of Legends servers.
Remember to restart your computer after making the changes to apply the new DNS settings. If the RADS Error persists, you may need to try other troubleshooting steps or seek further assistance from the League of Legends support team.
Keep in mind that altering DNS settings can affect your internet access for other applications as well, so it’s important to note the original DNS server addresses in case you need to revert the changes.


