If you’re struggling with choppy video and lag while using OBS, you’re not alone. This article will provide solutions to help you overcome these frustrating issues and get back to streaming smoothly.
Recently, Fortect has become increasingly popular as a reliable and efficient way to address a wide range of PC issues. It's particularly favored for its user-friendly approach to diagnosing and fixing problems that can hinder a computer's performance, from system errors and malware to registry issues.
- Download and Install: Download Fortect from its official website by clicking here, and install it on your PC.
- Run a Scan and Review Results: Launch Fortect, conduct a system scan to identify issues, and review the scan results which detail the problems affecting your PC's performance.
- Repair and Optimize: Use Fortect's repair feature to fix the identified issues. For comprehensive repair options, consider subscribing to a premium plan. After repairing, the tool also aids in optimizing your PC for improved performance.
Understanding OBS Video Stuttering
If you’re experiencing OBS video stuttering, there are a few ways to troubleshoot the issue. Start by checking your OBS video settings to ensure they match the output resolution and framerate of your system. Make sure your system meets the requirements for your recording quality and adjust your OBS settings accordingly. Another solution is to use the x264 encoding option instead of the default one. Additionally, try running a test recording to diagnose the issue. If everything looks fine, you can try using a tool like Stellar Repair to fix any corruption issues. Keep in mind that encoding lag and dropped frames can also cause stuttering, so consider adjusting your options or using a different software. Finally, be sure to check your audio settings and sound card.
How to Fix OBS Video Stuttering: Methods and Tools
- Open OBS
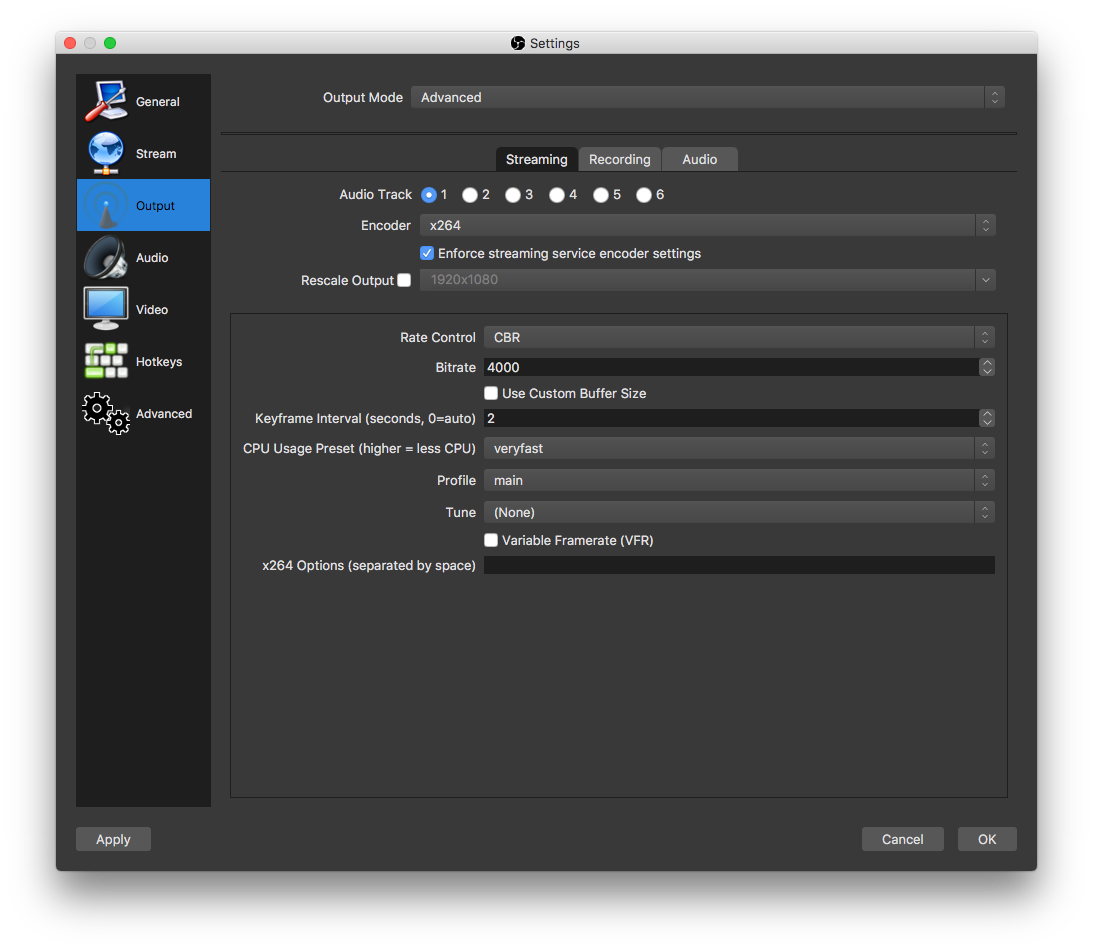
- Click on “Settings”
- Under “Output” tab, change “Output Mode” to Advanced
- Under “Output” tab, set “Encoder” to Software (x264)
- Under “Video” tab, set “Base (Canvas) Resolution” to your native resolution
- Under “Video” tab, set “Output (Scaled) Resolution” to your desired resolution

- Under “Video” tab, set “Downscale Filter” to Lanczos
- Under “Video” tab, set “FPS” to your desired FPS
- Click “Apply”
Method 2: Update Graphics Card Drivers
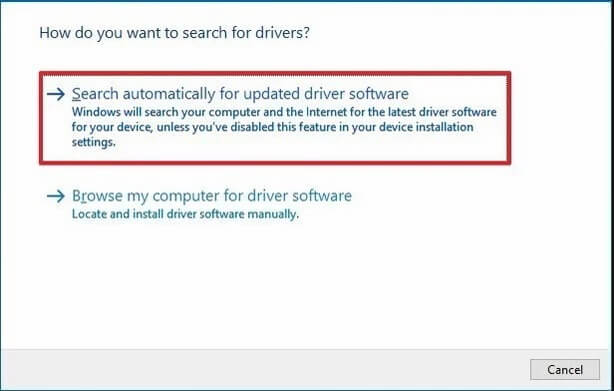
- Open “Device Manager”
- Expand “Display Adapters”

- Right-click on your graphics card
- Click “Update driver”
- Select “Search automatically for updated driver software”
- Wait for the update to complete
- Restart your computer
Method 3: Close Unnecessary Programs
- Open Task Manager by pressing Ctrl+Shift+Esc
- Click on “More details”
- Sort by “CPU”
- Close any programs using a high amount of CPU
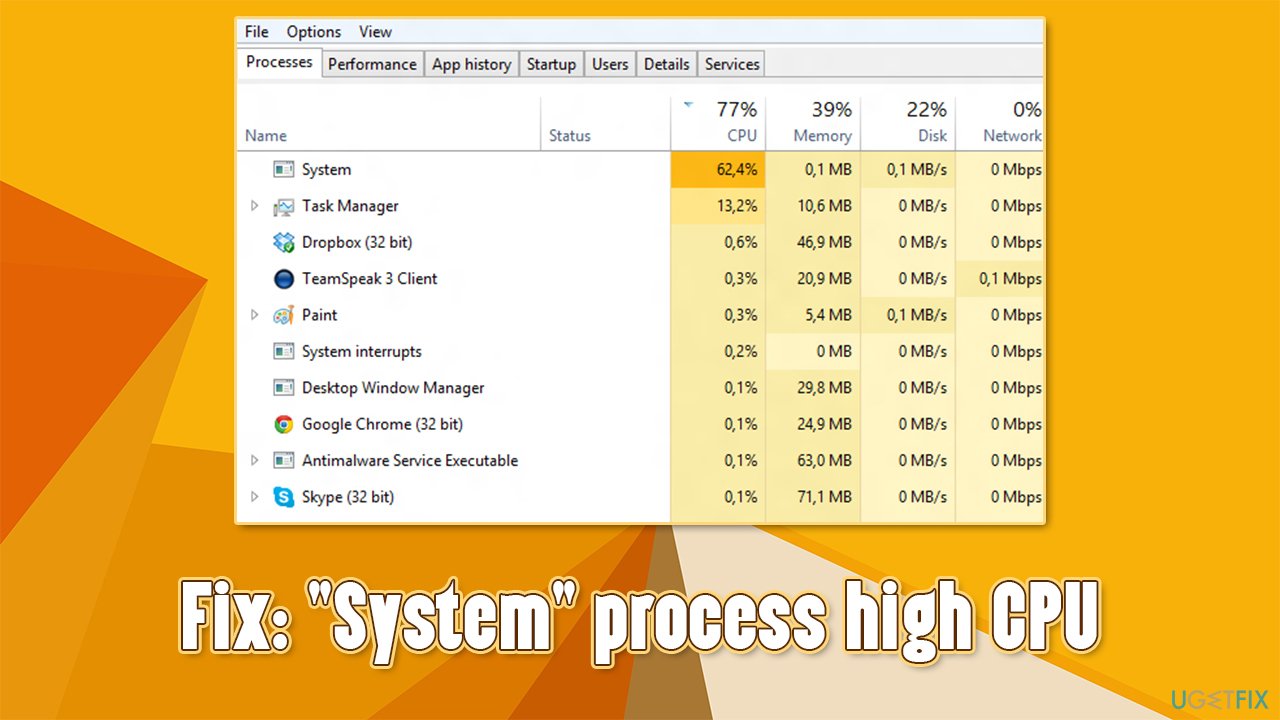
- Repeat for “Memory”
Method 4: Lower Game Settings
- Open the game causing the stuttering
- Lower the graphics settings
- Lower the resolution
- Disable any unnecessary effects or features
- Restart the game
Method 5: Use a Dedicated Streaming PC
- Set up a second PC dedicated to streaming
- Connect the two PCs using a capture card or NDI

- Stream from the dedicated streaming PC
Running OBS in Admin Mode
To fix lag and choppy video issues on OBS, try running it in admin mode. This will give OBS priority access to your system’s resources, allowing it to function more smoothly. To do this, right-click on the OBS icon and select “Run as Administrator.”
If this doesn’t solve the problem, there are other ways to optimize OBS performance. Adjust your recording quality, output resolution, and framerate to find the best OBS recording settings for your system. Check your audio settings and make sure everything is compatible. Try recording a test video and filter through the options to find the ones that work best for you.
If you’re still experiencing issues, consider using a repair tool like Stellar Repair or upgrading your hardware. Millions of people use OBS without problems, so don’t let a few technical difficulties get in the way of your content creation. Follow this guide and you’ll be on your way to producing high-quality videos with OBS.
import cv2
cap = cv2.VideoCapture(0)
while True:
ret, frame = cap.read()
if not ret:
break
# Apply some video processing techniques to improve the video quality
# For example, we can use a Gaussian filter to smooth out the video
frame = cv2.GaussianBlur(frame, (5, 5), 0)
cv2.imshow('frame', frame)
if cv2.waitKey(1) == ord('q'):
break
cap.release()
cv2.destroyAllWindows()
This sample code uses the OpenCV library to capture video from the camera and apply some video processing techniques to improve the quality of the video. The `GaussianBlur` function is used to smooth out the video, which can help reduce choppiness. However, this code is not specific to open broadcaster software and may not fully address the issue of choppy video in that platform.
Improving Frame Rate and Lowering GPU Settings
To improve frame rate and lower GPU settings, there are a few steps to follow. First, lower your encoding settings to reduce the load on your GPU. You can do this by adjusting the output resolution and bitrate in your OBS settings.
Next, try lowering your graphics settings in any game you’re recording to reduce the strain on your GPU. You can also try using HEVC encoding to reduce file size and improve overall performance.
If you’re still experiencing issues, try updating your drivers and checking for overheating issues on your GPU. Additionally, consider upgrading your hardware if you’re using an older system.
Finally, test your settings by recording a short video and reviewing the footage for any stuttering or lag issues. With these methods, you can improve the quality of your recordings and reduce any lag or encoding issues you may be experiencing.
Enabling In-game VSYNC and Changing Process Priority
If you’re still experiencing issues, try adjusting your OBS settings. Set your recording quality to “Indistinguishable Quality,” adjust your encoding bitrate, and use hardware encoding (if available). Also, make sure your computer meets the minimum requirements for OBS.
Additionally, it’s important to test your recordings and monitor for any stuttering or corruption issues. If you notice any problems, try adjusting your settings or consider upgrading your hardware. With millions of views on YouTube, even a small loss in quality can be a big problem. By following these steps, you can fix OBS choppy video & lag issues and create high-quality videos for your audience.
Using Video Repair Tools: Wondershare Repairit and Stellar Repair for Video
| Using Video Repair Tools: Wondershare Repairit and Stellar Repair for Video | |
|---|---|
| Article Title: | Solve OBS Choppy Video & Lag Issues |
| Tool | Description |
| Wondershare Repairit | A video repair software that can repair various video file formats such as MP4, MOV, WMV, MKV, AVI, and more. It also has a preview feature that allows you to preview repaired videos before saving them. |
| Stellar Repair for Video | A video repair software that can repair corrupt or damaged video files. It supports various video file formats such as MP4, MOV, AVI, MKV, and more. It also has a preview feature that allows you to preview repaired videos before saving them. |
Checking Hardware and Network Connections
Step 1: Check hardware and network connections. Make sure all cables are properly plugged in and your internet connection is stable. Test recording and look out for any recording stutter, dropped frames, or encoding lag. If you have a 64 GB G.Skill 3600 Mhz RAM, an RTX 3090, and a Ryzen 9 3950X, your hardware should be capable of high-quality recording.
Step 2: Check your OBS settings. Make sure your settings match the best OBS recording settings for your system. If you are experiencing lag issues, try lowering your screen recorder resolution and bitrate. HEVC encoding may help if you have a lot of movement in your recording.
Step 3: If you are still experiencing issues, try resetting your OBS settings to default. If that doesn’t work, try reinstalling OBS. Lastly, check if there is something on your computer that is running in the background and hogging resources.
By following these steps, you should be able to fix lag and recording stuttering to produce high-quality recordings or streams for platforms like YouTube. For more in-depth guidance, check out our guide or blog post on OBS settings.
Updating Network Adapter Driver and Reducing GPU Usage
Updating your network adapter driver can significantly improve your OBS stream quality and reduce lag issues. To do this, follow Step 1: check for updates on your device manager and download the latest driver. Another way to reduce lag is by decreasing your GPU usage. If you have an RTX 3090 or Ryzen 9 3950X, lowering the GPU usage can help with the recording stutter. Adjust your OBS stream settings to reduce GPU usage by lowering the FPS, the output resolution, and the bitrate. Additionally, clearing up your drive and closing unused programs can help reduce lag. Plus, consider using a screen recorder like Sound BlasterX AE-5 or OBS Studio instead of OBS to see if it solves the laggy and choppy video issues. By following these steps, you can improve your stream quality and ensure that your videos are indistinguishable from professional studio recordings.
Best Free No Lag Screen Recorder for Windows and Mac: EaseUS RecExperts
If you’re tired of dealing with laggy screen recording software, try EaseUS RecExperts. It’s a free screen recorder for Windows and Mac that won’t slow down your system. Plus, it’s easy to use and produces high-quality recordings. Here’s how to use it:
1. Download and install EaseUS RecExperts.
2. Open the program and select “Record Screen” from the main menu.
3. Choose the area of your screen you want to record.
4. Click the red “REC” button to start recording.
5. When you’re done, click the stop button and save your recording.
That’s it! With EaseUS RecExperts, you can record your screen without worrying about stuttering or lag issues. Give it a try and see how it compares to other screen recorders you’ve used in the past.