In this article, we will be discussing how to troubleshoot and update your Office 365 address book. Keeping your address book up-to-date and accurate is essential for efficient communication within your organization. We will provide you with step-by-step instructions to ensure your address book is functioning properly.
Recently, Fortect has become increasingly popular as a reliable and efficient way to address a wide range of PC issues. It's particularly favored for its user-friendly approach to diagnosing and fixing problems that can hinder a computer's performance, from system errors and malware to registry issues.
- Download and Install: Download Fortect from its official website by clicking here, and install it on your PC.
- Run a Scan and Review Results: Launch Fortect, conduct a system scan to identify issues, and review the scan results which detail the problems affecting your PC's performance.
- Repair and Optimize: Use Fortect's repair feature to fix the identified issues. For comprehensive repair options, consider subscribing to a premium plan. After repairing, the tool also aids in optimizing your PC for improved performance.
Troubleshooting Office 365 Address Book Updates
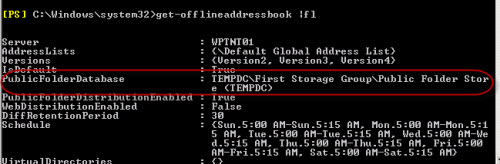
Troubleshooting Office 365 Address Book Updates can be frustrating, but there are several steps you can take to resolve the issue. First, check if the Offline Address Book is up to date by running the Get-OfflineAddressBook command in Powershell. If there are synchronization errors, try restarting the Microsoft Exchange File Distribution and Microsoft Exchange Offline Address Book services on the server side. If users are receiving a 0x8004010F or 0x80070057 error message, check if the Default Offline Address Book is set correctly in the user’s mailbox. You can also try deleting and recreating the Offline Address Book files in the ClientAccess\OAB location. Finally, check if the changes made in Azure Active Directory are reflected in the Address Book. By following these steps, you can resolve Address Book issues and ensure that your users have the most up-to-date information.
Manually Updating the Offline Address Book in Outlook
To manually update your Offline Address Book (OAB) in Outlook, follow these steps:
1. Close Outlook and go to the OAB default location on your computer: C:\Program Files\Microsoft\Exchange Server\V15\ClientAccess\OAB\*long number*.
2. Delete all files and folders in this location.
3. Open PowerShell as an administrator and run the command: Get-OfflineAddressBook | Update-OfflineAddressBook.
4. Open Outlook and go to the Send/Receive tab.
5. Click Send/Receive Groups and select Download Address Book.
6. Make sure the “Download changes since last Send/Receive” option is selected and click OK.
7. Wait for the download to complete.
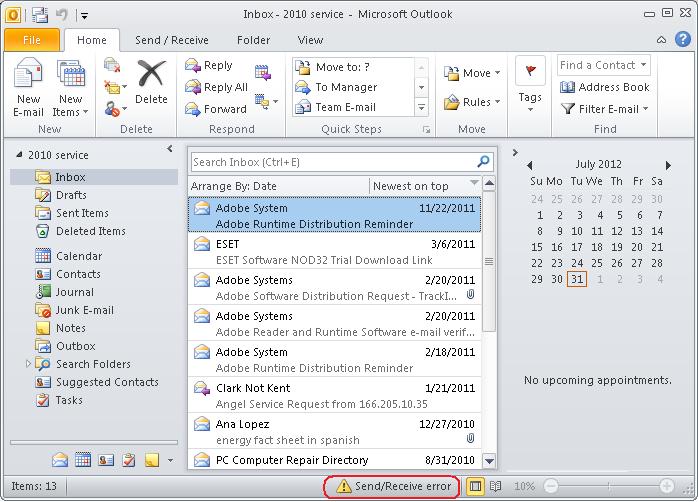
8. If you receive an error message such as “0x8004010F”, check your internet connection and try again. If you still have issues, check for synchronization errors in Outlook.
Manually updating the OAB can resolve Address Book issues and NDR messages in Outlook. Make sure to update the OAB on all users’ computers and Outlook clients.
Checking and Adjusting OAB Settings in Outlook
To check and adjust OAB settings in Outlook, follow these steps:
1. Open Outlook and go to the File tab.
2. Click on Account Settings and then choose Account Settings again.
3. Select the Email tab and then click on the account you want to modify.
4. Click on Change, then More Settings and then the Advanced tab.
5. Under Offline Folder File Settings, click on Compact Now to clear up space.
6. To change the OAB settings, go to the Send/Receive tab and click on Send/Receive Groups.
7. Choose the group you want to modify and click on Edit.
8. Under the Accounts tab, select the account you want to modify and choose Download offline address book.
9. Choose the Full Details option and click OK.
10. Click Close and then Send/Receive All Folders to update the OAB.
If you encounter error messages such as 0x80070057 or receive a non-delivery report (NDR), it may be due to incorrect OAB settings. In some cases, BITS may be the culprit, so check the BITS settings in your Windows OS. By adjusting the OAB settings, you can ensure that the address list is up-to-date for all users and clients, including shared mailboxes and calendars. This operation can be done on the server side as well in Exchange Global or Azure Active Directory. By following these steps, you can fix OAB issues and ensure that messages are delivered properly.
Installing Office and Microsoft 365 Desktop Updates
To install Office and Microsoft 365 Desktop updates, open Microsoft Outlook and click on “File.” Select “Office Account” and then “Update Options.” Choose “Update Now” to initiate the update process. If you encounter any issues, try restarting Outlook or restarting your computer. To troubleshoot address book issues, check the Default Offline Address Book in Exchange Global and make sure it’s properly configured. Check the ClientAccess\OAB directory to ensure the address book files are present. If you’re experiencing issues with offline address books, try rebuilding the address list by running the command “Get-OfflineAddressBook | Update-OfflineAddressBook.” This will update the Default Offline Address Book for all user mailboxes. If you’re still experiencing issues, check any distribution groups or Exchange Offline mode settings that may be affecting the operation.
Recreating Outlook Profile and Checking Autodiscover Service
To recreate your Outlook profile, first close Outlook and go to the Control Panel. From there, select Mail and then Profiles. Create a new profile and set it as the default. Restart Outlook and see if the issue is resolved.
If not, check the Autodiscover service by holding down the CTRL key and right-clicking the Outlook icon in the system tray. Select Test E-mail AutoConfiguration and uncheck the two options at the bottom. Enter your email address and password, then click Test.
If the test results show a successful Autodiscover result, try rebuilding the Offline Address Book. To do this, navigate to C:\Program Files\Microsoft\Exchange Server\ClientAccess\OAB and delete all files except for the OAB.xml file.
Finally, try updating the Default Offline Address List by going to the Exchange Management Console and selecting Organization Configuration, then Mailbox. Select the Offline Address Book tab and right-click the Default Offline Address List, then select Update.
Once you have completed these steps, restart Outlook and test to see if your issue has been resolved. If not, contact your IT department for further assistance.
Forcing OAB Update and Re-Distribution on Exchange
- Step 1: Open Exchange Management Shell
- Click on Start button
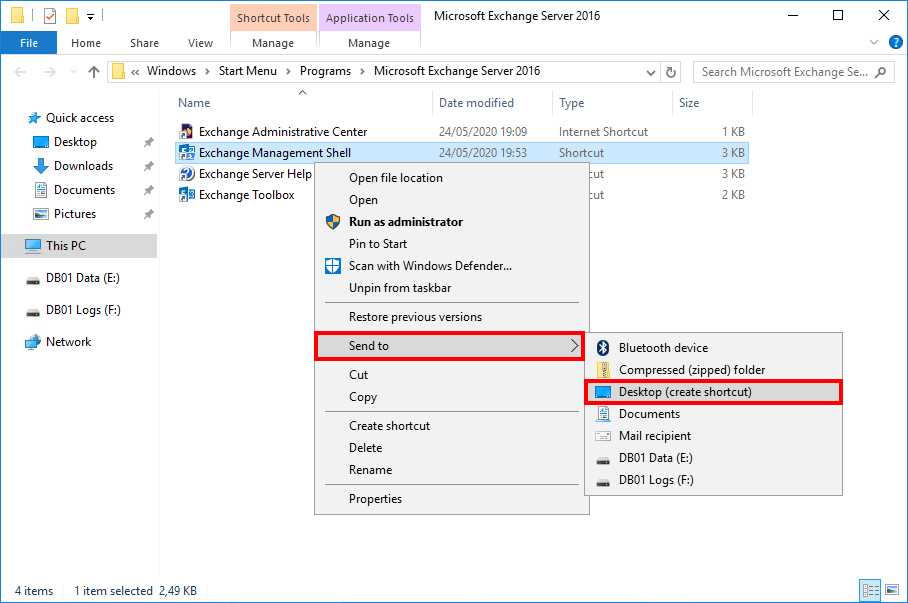
- Type Exchange Management Shell in the search box
- Right-click on Exchange Management Shell and select Run as Administrator
- Step 2: Check the Current OAB Generation Server
- Type Get-OfflineAddressBook | Format-List Name, Server, Version, Generation
- Press Enter
- Make a note of the name of the server that currently generates the OAB
- Step 3: Force the OAB Update
- Type Get-OfflineAddressBook | Update-OfflineAddressBook
- Press Enter
- Wait for the update to complete, this may take several minutes
- Step 4: Verify the OAB Update
- Type Get-OfflineAddressBook | Format-List Name, Server, Version, Generation
- Press Enter
- Verify that the Generation number has increased
- Step 5: Re-Distribute the OAB
- Type Get-ClientAccessServer | Update-FileDistributionService
- Press Enter
- Wait for the distribution to complete, this may take several minutes
- Step 6: Verify the OAB Distribution
- Open Outlook on a client machine
- Click on Send/Receive tab
- Click on Send/Receive Groups
- Click on Download Address Book
- Verify that the OAB has been updated


