Running into the error message “Not enough memory resources available to process” can be frustrating and hinder your productivity. In this article, I will provide effective solutions to resolve this issue and optimize your system’s memory usage.
Recently, Fortect has become increasingly popular as a reliable and efficient way to address a wide range of PC issues. It's particularly favored for its user-friendly approach to diagnosing and fixing problems that can hinder a computer's performance, from system errors and malware to registry issues.
- Download and Install: Download Fortect from its official website by clicking here, and install it on your PC.
- Run a Scan and Review Results: Launch Fortect, conduct a system scan to identify issues, and review the scan results which detail the problems affecting your PC's performance.
- Repair and Optimize: Use Fortect's repair feature to fix the identified issues. For comprehensive repair options, consider subscribing to a premium plan. After repairing, the tool also aids in optimizing your PC for improved performance.
Causes of “Not Enough Memory Resources” Error
When you encounter the “Not Enough Memory Resources” error, it means that your computer does not have sufficient memory to process the task at hand. This can happen due to a variety of reasons, such as running multiple memory-intensive programs simultaneously or having too many background processes running. To fix this issue, you can try the following steps:
1. Close unnecessary programs and processes: Close any programs or processes that are not essential to free up memory resources. This can be done by right-clicking on the program in the taskbar and selecting “Close” or using the Task Manager (press Ctrl+Shift+Esc) to end the processes.
2. Increase virtual memory: Adjust your virtual memory settings to allocate more memory to your computer. You can do this by right-clicking on “This PC” or “My Computer,” selecting “Properties,” going to the “Advanced system settings” tab, and clicking on the “Settings” button under the Performance section. In the Performance Options window, go to the Advanced tab and click on the “Change” button under the Virtual memory section. Then, uncheck the “Automatically manage paging file size for all drives” option and select “Custom size.” Enter a higher value for the Initial size and Maximum size, and click on the “Set” button before clicking “OK” to save the changes.
3. Clear temporary files: Delete temporary files and folders to free up disk space and memory. You can do this by opening File Explorer, right-clicking on the Windows drive (usually C:), selecting “Properties,” and then clicking on the “Disk Cleanup” button. Check the boxes for temporary files and other unnecessary files, and click on the “OK” button to start the cleanup process.
4. Check for malware: Scan your computer for malware that could be using up your memory resources. Use a reliable antivirus or antimalware program to perform a full system scan and remove any detected threats.
5. Upgrade your hardware: If the above steps do not resolve the issue, consider upgrading your computer’s hardware. Adding more RAM or upgrading to a faster hard drive can help improve memory performance.
Fixing Not Enough Memory Resources Are Available
If you are encountering the “Not Enough Memory Resources Are Available” error message on your Windows 10 PC, there are a few steps you can take to fix the issue.
First, check your computer’s available memory. Close any unnecessary programs and processes that are consuming a large amount of memory. You can also try increasing your virtual memory by adjusting the Windows page file size. To do this, right-click on “This PC” or “My Computer” and select “Properties”. Go to the “Advanced system settings” and click on the “Settings” button under the Performance section. In the new window, go to the “Advanced” tab and click on the “Change” button under the Virtual Memory section. Select the “Custom size” option and enter a larger value for the Initial and Maximum size. Click “OK” to save the changes.
If the issue persists, you can try running the CHKDSK utility to check for disk errors. Open a Command Prompt window with administrative privileges by pressing the Windows key + X and selecting “Command Prompt (Admin)”. In the Command Prompt, type “chkdsk /f /r” and press enter. This will scan and repair any file system errors on your hard drive.
Another solution is to clear temporary files and folders on your computer. Open File Explorer and navigate to the temporary folder, which is typically located at C:\Users\[Your Username]\AppData\Local\Temp. Delete all the files and folders in this directory.
If none of these steps resolve the issue, you may need to consider upgrading your computer’s hardware or reinstalling the operating system. It is also recommended to regularly backup your important files and data to prevent any data loss in case of system failures.
Run DISM Tool
To fix the issue of not enough memory resources available to process, you can try running the DISM Tool. This tool is built into Windows and can help resolve various system-related problems. Here’s how you can use it:
1. Press the Windows key and type “cmd” to open the Command Prompt.
2. Right-click on the Command Prompt icon and select “Run as administrator” from the context menu.
3. In the Command Prompt window, type “dism /online /cleanup-image /restorehealth” and press Enter.
4. The DISM Tool will now scan your system and attempt to repair any issues it finds.
5. Wait for the process to complete. It may take some time, so be patient.
6. Once the process is finished, restart your computer and check if the “not enough memory resources available to process” issue is resolved.
By running the DISM Tool, you can effectively fix memory-related problems and improve the performance of your Windows system.
python

import sys
def process_command():
try:
# Your command processing logic here
# This could be a memory-intensive operation
pass
except MemoryError:
print("Memory error occurred. Attempting to free up memory...")
# Free up memory by cleaning up resources or reducing memory usage
# Example actions: closing file handles, clearing large data structures, etc.
print("Memory freed. Retrying command...")
process_command()
except Exception as e:
# Handle other exceptions as needed
print(f"An error occurred: {str(e)}")
# Main program starts here
process_command()
In the above code, we define a `process_command()` function that attempts to execute the memory-intensive command. If a `MemoryError` is raised, we catch it, print a message, free up memory by cleaning up resources or reducing memory usage, and then retry the command. This approach allows for a potential workaround when faced with memory limitations.
Change IRPStackSize and SharedSection Values

To fix the “Not Enough Memory Resources Available to Process” issue, you can try changing the IRPStackSize and SharedSection values in your Windows Registry. These changes can help optimize memory usage and resolve memory-related errors.
1. Change IRPStackSize:
1. Press the Windows key + R to open the Run dialog box.
2. Type “regedit” and press Enter to open the Windows Registry Editor.
3. Navigate to the following location: HKEY_LOCAL_MACHINE\SYSTEM\CurrentControlSet\Services\LanmanServer\Parameters
4. Right-click on an empty space in the right pane and select New > DWORD (32-bit) Value.
5. Name the new value “IRPStackSize” (without quotes) and press Enter.
6. Double-click on the new IRPStackSize value and set the Base to Decimal.
7. Enter a value between 11 and 50 (recommended: 18) and click OK.
8. Restart your computer for the changes to take effect.
2. Change SharedSection values:
1. Press the Windows key + R to open the Run dialog box.
2. Type “sysdm.cpl” and press Enter to open the System Properties window.
3. Go to the Advanced tab and click on the Settings button under Performance.
4. In the Performance Options window, go to the Advanced tab.
5. Click on the Change button under Virtual memory.
6. Uncheck the box that says “Automatically manage paging file size for all drives.”
7. Select the drive where Windows is installed (usually C:) and choose the “Custom size” option.
8. Set the Initial size and Maximum size to the same value (recommended: 1.5 times your RAM size in megabytes).
9. Click Set, then OK to save the changes.
10. Restart your computer for the changes to take effect.
These adjustments can help resolve memory resource issues and improve system performance.
Delete Temporary Files
1. Open the “File Explorer” by pressing the Windows key + E on your keyboard.
2. Navigate to the temporary folder location. This is typically located at C:\Users\YourUsername\AppData\Local\Temp.
3. Once inside the temporary folder, you can select and delete all the files by pressing Ctrl + A to select all, and then pressing the Delete key.
4. If you encounter any files that cannot be deleted, it means they are currently in use by a running program. In this case, you may need to close the program or restart your computer to release the files.
5. Additionally, you can use the built-in Disk Cleanup utility in Windows to remove temporary files. To access it, simply type “Disk Cleanup” in the Windows search bar and select the matching result.
6. In the Disk Cleanup window, select the drive where your operating system is installed (usually C:) and click OK.
7. After analyzing the drive, the utility will display a list of files that can be safely deleted. Check the box next to “Temporary files” and any other file categories you want to remove, then click OK and confirm the deletion.
By regularly deleting temporary files, you can free up valuable disk space and improve the performance of your computer.
Perform chkdsk to Scan and Fix Potential Problems
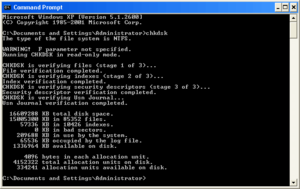
Performing a chkdsk scan can help identify and fix potential problems related to not enough memory resources available to process. To do this, follow these steps:
1. Open the Command Prompt by pressing the Windows key + R, typing “cmd”, and pressing Enter.
2. In the Command Prompt, type “chkdsk” followed by the drive letter of the disk you want to scan (e.g., C:).
3. Press Enter and wait for the scan to complete. This may take some time depending on the size and health of your disk.
4. Once the scan is finished, check the results for any errors or issues that need to be fixed.
5. If errors are found, type “chkdsk /f” followed by the drive letter to fix the errors. You may need to restart your computer for the changes to take effect.
6. After the restart, check if the “Not Enough Memory Resources Available to Process” issue has been resolved.
Performing a chkdsk scan can help identify and fix disk-related issues that may be causing memory resource problems. It is a useful tool for maintaining the health and performance of your computer’s storage.
Restore Windows Image using DISM Tool
To restore a Windows image using the DISM tool, follow these steps:
1. Open the Command Prompt by pressing the Windows key + R, typing “cmd,” and pressing Enter.
2. In the Command Prompt window, type “dism /online /cleanup-image /restorehealth” and press Enter. This command will scan the Windows image for any corruption and attempt to fix it.
3. Wait for the process to complete. It may take some time depending on the size of your Windows image and the resources available on your computer.
4. Once the process is finished, restart your computer to apply the changes.
By using the DISM tool, you can restore your Windows image and fix any issues related to not enough memory resources available to process.
Use a Windows 10 Installation Disk for Repair
1. Insert the Windows 10 installation disk into your computer’s CD/DVD drive.
2. Restart your computer and boot from the installation disk. You may need to adjust the boot order in your computer’s BIOS settings.
3. When the Windows Setup screen appears, select your language preferences and click “Next.”
4. Click on “Repair your computer” at the bottom left corner of the screen.
5. Select “Troubleshoot” and then choose “Advanced options.”
6. From the list of advanced options, select “Command Prompt.”
7. In the Command Prompt window, type sfc /scannow and press Enter. This will initiate the System File Checker tool to scan and repair any corrupted system files.
8. Wait for the scanning and repair process to complete. Once finished, restart your computer.
By using the Windows 10 installation disk for repair, you can resolve the issue of not enough memory resources available to process.