In the digital era, a reliable Wi-Fi connection is paramount for smooth browsing, online communication, and productive work. However, encountering laptop Wi-Fi connection issues can be frustrating and hinder our daily activities. Fear not! In this article, we will explore effective solutions to fix these pesky Wi-Fi problems, ensuring uninterrupted connectivity and a seamless online experience.
Recently, Fortect has become increasingly popular as a reliable and efficient way to address a wide range of PC issues. It's particularly favored for its user-friendly approach to diagnosing and fixing problems that can hinder a computer's performance, from system errors and malware to registry issues.
- Download and Install: Download Fortect from its official website by clicking here, and install it on your PC.
- Run a Scan and Review Results: Launch Fortect, conduct a system scan to identify issues, and review the scan results which detail the problems affecting your PC's performance.
- Repair and Optimize: Use Fortect's repair feature to fix the identified issues. For comprehensive repair options, consider subscribing to a premium plan. After repairing, the tool also aids in optimizing your PC for improved performance.
Troubleshooting Steps for Laptop Wi-Fi Connectivity
1. Check Wi-Fi Signal: Ensure your laptop is within range of the Wi-Fi network. Move closer to the router if needed.
2. Restart Your Device: Restart both your laptop and Wi-Fi router to refresh the connection.
3. Check Wi-Fi Settings: Open the Control Panel and navigate to Network & Security > Network and Sharing Center. Select “Manage Wireless Networks” and remove any old or conflicting networks.
4. Update Wi-Fi Drivers: Visit the manufacturer’s website and download the latest drivers for your Wi-Fi card.
5. Test Connection: Open a web browser and try accessing different websites to see if you have internet access.
6. Reset Router: If the issue persists, press and hold the reset button on your router for 10 seconds to restore it to factory settings.
7. Contact Support: If none of these steps resolve the issue, contact your internet service provider or the laptop manufacturer for further assistance.
Remember, these troubleshooting steps are general guidelines and may vary depending on your specific laptop model and operating system.
Checking Wi-Fi Settings and Hardware
1. Open the Control Panel on your computer.
2. Type “Network and Sharing” in the search bar and select the “Network and Sharing Center” option from the drop-down menu.
3. Click on “Manage Wireless Networks” in the left-hand menu.
4. Look for your Wi-Fi network name in the list of networks. If it’s not there, click on “Add” and select the option to manually connect to a wireless network.
5. Make sure your Wi-Fi card is properly installed and functioning. You can do this by checking the Device Manager in the Control Panel.
6. If you’re still having trouble, try resetting your modem and router. Unplug them from power for 30 seconds, then plug them back in.
7. Check if other devices in your house are able to connect to the Wi-Fi network. If not, there may be an issue with your internet service provider.
8. If all else fails, contact your tech support or the manufacturer of your laptop for further assistance.
Remember, it’s important to follow these steps in order and test your Wi-Fi connection after each step to see if the issue is resolved.
Restarting and Resetting Network Equipment
To restart your network equipment, follow these steps:
1. Close any open programs or browser windows on your computer.
2. Locate the power buttons on your modem and Wi-Fi box.
3. Press and hold the power button on your modem for 10 seconds, then release it.
4. Wait for the modem to fully restart, indicated by lights on the front panel.
5. Next, press and hold the power button on your Wi-Fi box for 10 seconds, then release it.
6. Wait for the Wi-Fi box to fully restart, indicated by lights on the front panel.
7. Once both devices have restarted, go to the network settings on your computer.
8. In Windows, click on the Wi-Fi icon in the bottom right corner of the screen.
9. Click on the “Network & Security” option in the drop-down menu.
10. Locate the network name (SSID) of your Wi-Fi network and click on it.
11. Click on the “Disconnect” button, then wait a few seconds.
12. Click on the network name again and click on the “Connect” button.
13. Enter your Wi-Fi password if prompted.
14. Test your internet connection by opening a web browser or streaming a movie.
15. If you’re still experiencing issues, try resetting your network settings or contacting your internet service provider for further assistance.
python

import subprocess
def check_wifi_connectivity():
try:
output = subprocess.check_output(["ping", "-c", "1", "www.google.com"])
if "1 packets transmitted, 1 received" in output.decode():
print("WiFi connection is working.")
else:
print("WiFi connection is not working.")
except subprocess.CalledProcessError:
print("WiFi connection is not working.")
check_wifi_connectivity()
In this code, we use the `subprocess` module to execute the `ping` command. It sends a single ICMP echo request packet to `www.google.com` and waits for a response. If a response is received, it indicates that the WiFi connection is working. Otherwise, it assumes that the connection is not working. Please note that this is a basic example and may not cover all potential issues or provide a comprehensive solution.
To further troubleshoot the issue, you might need to consider factors such as network configurations, drivers, firewalls, or other potential causes that could be affecting your laptop’s WiFi connectivity.
Reinstalling Network Drivers and Running Troubleshooter
To fix laptop Wi-Fi connection issues, you can try reinstalling network drivers and running the troubleshooter. Here’s how:
1. Reinstall Network Drivers:
– Press the Windows key + X and select Device Manager.
– Expand the Network adapters category.
– Right-click your Wi-Fi adapter and select Uninstall device.
– Check the box that says “Delete the driver software for this device” and click Uninstall.
– Restart your laptop.
– Windows will automatically reinstall the network drivers.
2. Run the Troubleshooter:
– Press the Windows key + I to open Settings.
– Click on Update & Security, then Troubleshoot.
– Select Internet Connections and click on Run the troubleshooter.
– Follow the on-screen instructions.
These steps can help resolve common Wi-Fi connection issues. If you’re still experiencing problems, consider contacting our experts or referring to our comprehensive guide for further assistance.
Dealing with Flight/Airplane Mode and Antivirus Software
To fix laptop Wi-Fi connection issues, it’s important to check two key factors: Flight/Airplane Mode and antivirus software.
First, make sure Flight/Airplane Mode is turned off. This mode disables Wi-Fi and other wireless connections to comply with regulations during flights. Click on the network icon in the taskbar to access the quick settings menu, then toggle off Flight/Airplane Mode.
Next, check your antivirus software. Some antivirus programs have built-in firewalls that could block your Wi-Fi connection. Temporarily disable your antivirus software and try connecting to Wi-Fi again. If the issue is resolved, adjust the settings in your antivirus software to allow Wi-Fi connections.
Remember, if you’re still experiencing issues, it’s always helpful to consult online guides, experts, or contact customer support. They can provide specific troubleshooting steps depending on your laptop model and software configuration.
Adjusting Power Adapter Settings and Network Settings
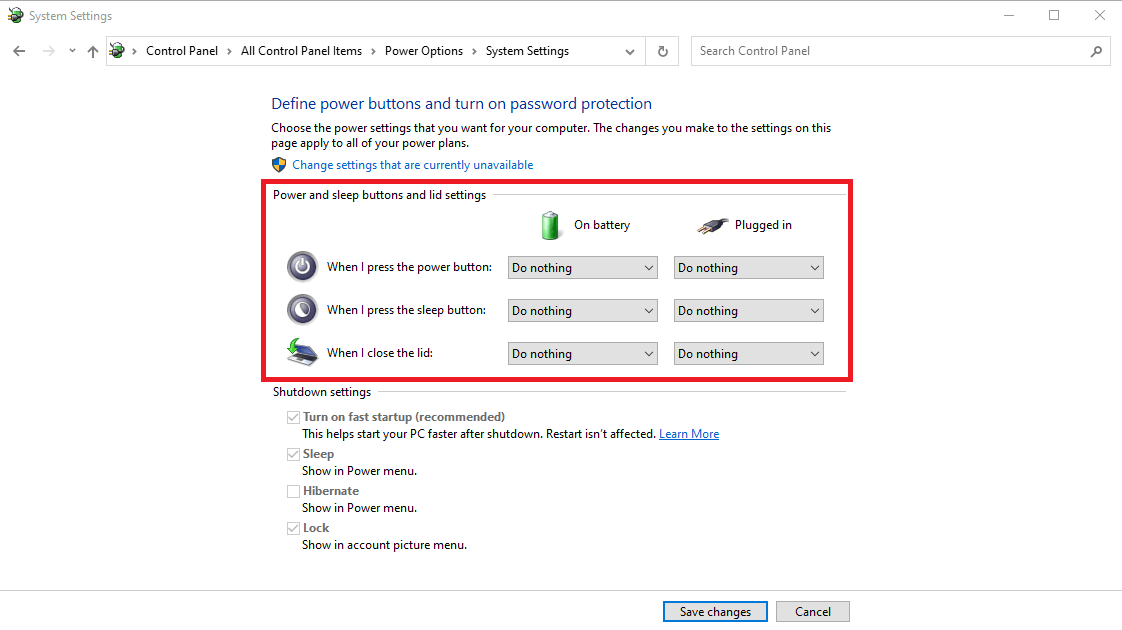
Adjusting Power Adapter Settings:
To ensure your laptop has a stable Wi-Fi connection, adjust the power adapter settings. First, connect your laptop to a power source using the power adapter. Then, follow these steps:
1. Open the Control Panel by clicking the Start button and selecting Control Panel.
2. Select “Power Options” and choose the power plan you want to modify.
3. Click on “Change plan settings” next to the selected power plan.
4. In the new window, click on “Change advanced power settings.”
5. Look for the “Wireless Adapter Settings” option and expand it.
6. Set both “On battery” and “Plugged in” options to “Maximum Performance.”
7. Click “Apply” and then “OK” to save the changes.
Adjusting Network Settings:
If you’re still experiencing Wi-Fi connection issues, adjusting the network settings might help. Follow these steps:
1. Press the Windows key + X, and select “Network Connections” from the menu.
2. Right-click on your Wi-Fi network and select “Properties.”
3. In the Properties window, click on the “Configure” button next to your Wi-Fi card.
4. Go to the “Advanced” tab and look for options such as “Power Saving Mode” or “Roaming Aggressiveness.”
5. Set these options to “Maximum Performance” or “Highest” for better connectivity.
6. Click “OK” to save the changes.
By adjusting both power adapter and network settings, you can optimize your laptop’s Wi-Fi connection for improved performance.
Common Issues with Wi-Fi Connectivity
-
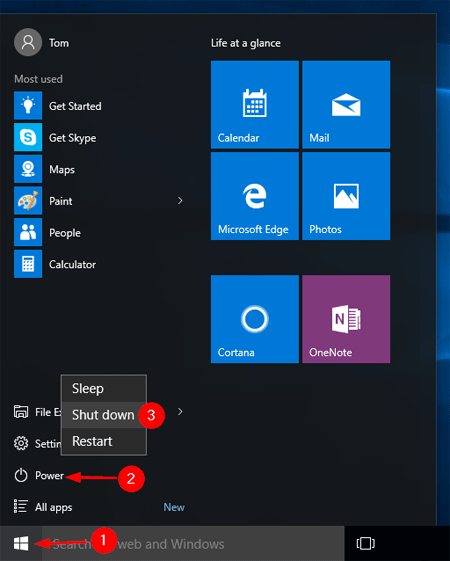
Restart the Device
- Power off the laptop by clicking on the Start menu, selecting “Power,” and choosing “Shutdown.”
- Wait for a few seconds, then press the power button to turn on the laptop.
-
Check Wi-Fi Adapter
- Click on the Start menu and type “Device Manager” in the search bar.
- Open Device Manager from the search results.
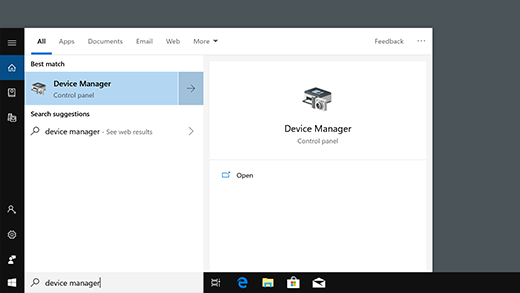
- Expand the category “Network Adapters.”
- Locate the Wi-Fi adapter, which might be named as “Wireless Network Adapter” or similar.
- If there is a yellow exclamation mark or a red cross on the adapter icon, right-click on it and select “Update driver” or “Enable” to fix any issues.
-
Reset Network Settings
- Open the Start menu and click on “Settings.”
- Select “Network & Internet.”

- Choose “Wi-Fi” from the left-hand menu.
- Scroll down and click on “Network reset.”
- Click on “Reset now” and follow the on-screen instructions to reset the network settings.
-
Check Wi-Fi Signal
- Move closer to the Wi-Fi router or access point to ensure a strong signal.
- If possible, connect to a different Wi-Fi network to check if the issue is specific to your network.
-
Disable Power Saving Mode
- Open the Start menu and click on “Settings.”
- Select “System” and then choose “Power & sleep” from the left-hand menu.
- Click on “Additional power settings” on the right-hand side.
- Choose “Change plan settings” next to your current power plan.
- Click on “Change advanced power settings.”
- Expand the “Wireless Adapter Settings” category and set both “On battery” and “Plugged in” options to “Maximum performance.”
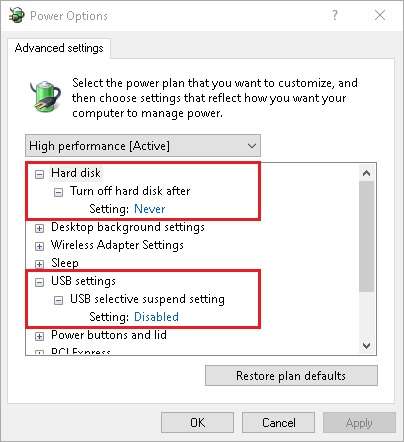
- Click “Apply” and then “OK” to save the changes.
Frequently Asked Questions about Laptop Wi-Fi Connection
| Question | Answer |
|---|---|
| 1. Why is my laptop not connecting to Wi-Fi? | There can be several reasons for this issue, including incorrect Wi-Fi settings, driver problems, or a problem with the router. Follow the troubleshooting steps mentioned in the article to identify and resolve the specific cause. |
| 2. How do I check if Wi-Fi is enabled on my laptop? | On most laptops, you can check Wi-Fi status by looking for a Wi-Fi icon in the system tray (bottom-right corner of the screen). Alternatively, you can go to the Network settings in the Control Panel or Settings app to check the Wi-Fi toggle. |
| 3. What should I do if my laptop is not detecting any Wi-Fi networks? | First, make sure Wi-Fi is enabled on your laptop. If it is and you still can’t detect any networks, try restarting your laptop and router. If the issue persists, check if other devices can connect to Wi-Fi or try updating your Wi-Fi drivers. |
| 4. How do I forget a Wi-Fi network on my laptop? | In Windows, go to the Network settings and click on “Manage known networks.” Select the Wi-Fi network you want to forget and click on “Forget.” On a Mac, open the Wi-Fi menu and select “Open Network Preferences.” Click on the advanced settings and remove the desired network from the list. |
| 5. What can I do if my laptop keeps disconnecting from Wi-Fi? | Start by checking if the Wi-Fi signal is strong and stable. If it is, try updating your Wi-Fi drivers, adjusting power management settings, or resetting your router. You can also try connecting to a different Wi-Fi network to see if the problem persists. |
| 6. How do I troubleshoot slow Wi-Fi on my laptop? | Ensure that your laptop is within a reasonable range of the router. Check for any physical obstructions or interference. If possible, connect to a 5GHz network for faster speeds. You can also try updating your Wi-Fi drivers or contacting your internet service provider for further assistance. |
| 7. Can a virus or malware affect my Wi-Fi connection? | While it’s rare, certain malware or viruses can cause issues with Wi-Fi connectivity. It’s recommended to regularly scan your laptop for malware using a reliable antivirus program and perform necessary actions to remove any threats. |
| 8. Why does my laptop’s Wi-Fi keep turning off automatically? | This can be due to power-saving settings or driver issues. Check your power management settings to ensure Wi-Fi is not set to turn off to save power. Additionally, updating your Wi-Fi drivers to the latest version may help resolve the issue. |


