Unlocking your iPhone when it is disabled and needs to connect to iTunes can be a frustrating situation. However, fear not! In this article, we will explore innovative methods to resolve this issue without having to restore your precious device. So, grab your iPhone and get ready to regain access to its functionality effortlessly.
Recently, Fortect has become increasingly popular as a reliable and efficient way to address a wide range of PC issues. It's particularly favored for its user-friendly approach to diagnosing and fixing problems that can hinder a computer's performance, from system errors and malware to registry issues.
- Download and Install: Download Fortect from its official website by clicking here, and install it on your PC.
- Run a Scan and Review Results: Launch Fortect, conduct a system scan to identify issues, and review the scan results which detail the problems affecting your PC's performance.
- Repair and Optimize: Use Fortect's repair feature to fix the identified issues. For comprehensive repair options, consider subscribing to a premium plan. After repairing, the tool also aids in optimizing your PC for improved performance.
Understanding the “iPhone is disabled” error
If you’ve encountered the “iPhone is disabled” error and want to fix it without restoring your device, follow these steps:
Step 1: Connect your iPhone to a computer with iTunes installed.
Step 2: Put your iPhone into recovery mode. Press and hold the Power button, then slide to power off. Connect your iPhone to the computer while holding the Home button until the recovery mode screen appears.
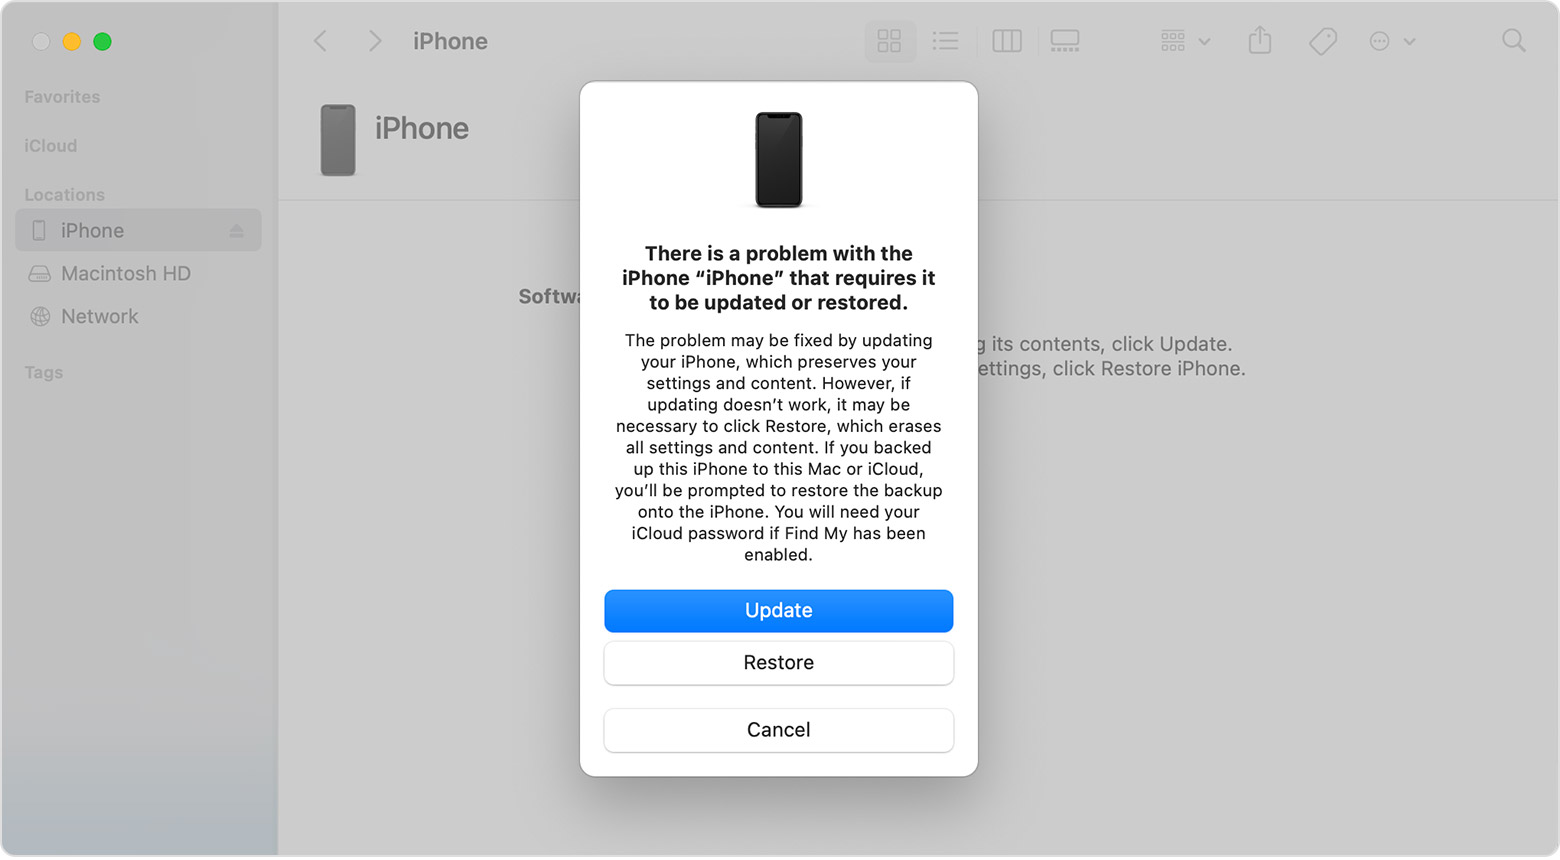
Step 3: In iTunes, you’ll see an option to restore or update your iPhone. Choose the “Update” option to fix the disabled error without losing your data.
By following these steps, you can unlock a disabled iPhone without losing any data. This method works for both iPhones and iPads. It’s important to note that if you forgot your iPhone passcode, this method won’t work and you’ll need to restore your device, resulting in data loss.
For a more detailed guide on fixing the “iPhone is disabled” error, check out our blog post.
Unlocking a disabled iPhone without restoring
If your iPhone is disabled and you want to unlock it without restoring, there are a few methods you can try. One way is to use Emergency service to make a call and then quickly press the Power button to cancel the call. Another method is to connect your iPhone to a trusted computer and open iTunes. Follow the on-screen instructions to fix your disabled iPhone without restoring. If these methods don’t work, you can try a hard reset by pressing and holding the Power button and Volume Down button simultaneously until you see the Apple logo. Keep in mind that attempting to unlock a disabled iPhone without restoring may not always work and there is a risk of data loss. It’s always a good idea to back up your iPhone regularly to prevent any accidental data loss.
Steps to fix a disabled iPhone with iTunes or Finder
- Connect your iPhone to your computer
- Use a USB cable to connect your iPhone to your computer.
- Open iTunes or Finder
- If you have a Mac running macOS Catalina or later, open Finder. Otherwise, open iTunes on your computer.
- Put your iPhone into Recovery Mode
- Depending on your iPhone model, the steps to enter Recovery Mode may vary. Refer to the Apple support website for specific instructions.
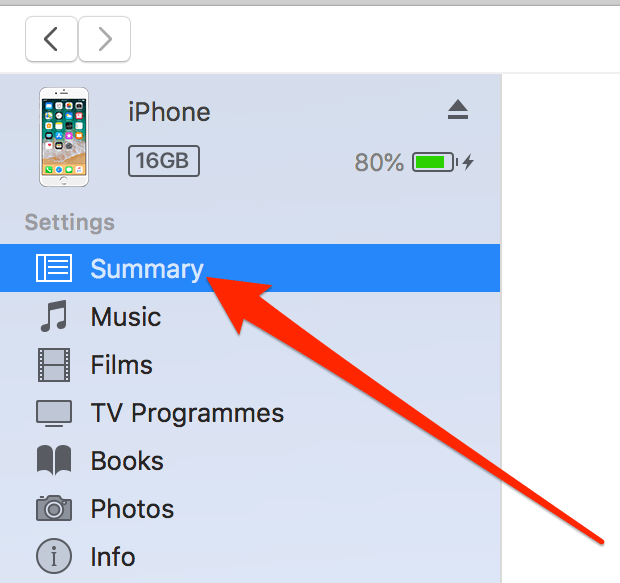
- Locate your iPhone in iTunes or Finder
- In iTunes, click on the iPhone icon that appears in the top left corner of the window.
- In Finder, your iPhone will appear in the sidebar under the “Locations” section.

- Click on the Restore button
- In iTunes, click on the “Restore iPhone” button located in the Summary tab.
- In Finder, click on the “Restore” button in the right-hand pane.
- Follow the on-screen instructions
- Read and confirm the warning message that appears, stating that your iPhone will be restored to its factory settings.
- Click on the “Restore and Update” button to proceed.
- Wait for the restore process to complete
- Be patient while iTunes or Finder downloads the necessary software and restores your iPhone.
- Do not disconnect your iPhone during this process.
- Set up your iPhone
- Once the restore process is finished, follow the on-screen instructions to set up your iPhone.
- You can choose to restore from a backup or set up your iPhone as new.
- Enter your passcode
- If your iPhone was disabled due to multiple incorrect passcode attempts, you will need to enter your passcode to unlock it.
Alternative methods to unlock a disabled iPhone without iTunes
If you find yourself locked out of your iPhone or iPad due to too many passcode attempts, there are alternative methods to unlock your device without using iTunes or restoring it. One method you can try is a hard reset.
Step 1: Press and hold the Volume Down button and the Power button simultaneously until the device screen goes black.
Step 2: Release both buttons and then quickly press and hold the Volume Down button again.
Step 3: Keep holding the Volume Down button until you see the lock screen. At this point, you should be able to enter your passcode and unlock your device without losing any data.
This method can be a helpful solution when you forgot your iPhone or iPad passcode or if your device is disabled. It is important to note that if you have enabled iCloud on your device, you may still need to enter your iCloud account password after unlocking your device.
Using BuhoUnlocker to fix the “iPhone is disabled” error
Using BuhoUnlocker is a helpful solution for fixing the “iPhone is disabled” error without having to restore your device through iTunes. By following these simple steps, you can regain access to your iPhone without losing any of your data.
1. Connect your disabled iPhone to your computer using a USB cable.
2. Download and open the BuhoUnlocker software on your PC.
3. Follow the on-screen instructions to put your iPhone into recovery mode.
4. Once your iPhone is in recovery mode, click the “Start” button in BuhoUnlocker.
5. BuhoUnlocker will now begin removing the lock screen passcode from your iPhone.
6. After the process is complete, your iPhone will restart and be unlocked.
7. You can now access your iPhone without the “iPhone is disabled” error.
Using BuhoUnlocker is a quick and effective way to fix the “iPhone is disabled” error without restoring your device and losing any of your valuable data.
Fixing a disabled iPhone with iCloud or Find My App
If your iPhone is disabled and you don’t want to restore it using iTunes, you can try using iCloud or the Find My app.
First, make sure your iPhone is connected to the internet. Then, go to iCloud.com or open the Find My app on another device and sign in using your Apple ID.
Once you’re logged in, locate the disabled iPhone in the list of devices and select it. From there, you’ll have a few options. You can choose to erase the device, which will remove all data and settings, including the passcode. If you have a recent backup, you can also choose to restore the device using that backup.
If you choose to erase the device, you can then set it up as new or restore it from a backup during the setup process. Keep in mind that erasing the device will remove all data, so make sure you have a backup if you want to keep anything.
Remember to always keep your passcode in a safe place and avoid situations that may cause your iPhone to become disabled.
Tips to prevent iPhone from being disabled
- Set a strong passcode: Use a unique and complex passcode to protect your iPhone from unauthorized access.
- Enable Find My iPhone: This feature allows you to locate, lock, and erase your iPhone remotely in case it gets lost or stolen.

- Regularly backup your iPhone: Use iCloud or iTunes to create backups of your device’s data to ensure that you don’t lose important information.
- Be cautious of third-party apps: Download apps only from trusted sources to minimize the risk of installing malicious software.
- Keep your iPhone updated: Install the latest iOS updates to benefit from enhanced security features and bug fixes.
- Use Touch ID or Face ID: Enable biometric authentication to add an extra layer of security to your iPhone.
- Avoid using simple or predictable passcodes: Stay away from common passcodes like “1234” or patterns that can be easily guessed.
- Enable Erase Data: Activate the option that erases all data on your iPhone after ten failed passcode attempts to protect your personal information.
- Disable Siri on the lock screen: Prevent unauthorized access to your iPhone by disabling Siri when your device is locked.
- Enable Two-Factor Authentication: Add an extra level of security by requiring a verification code in addition to your passcode to access your Apple ID and iCloud.

Troubleshooting if iPhone won’t connect to iTunes
If your iPhone won’t connect to iTunes and is showing the “iPhone is Disabled Connect to iTunes” message, there are a few troubleshooting steps you can try before resorting to restoring your device.
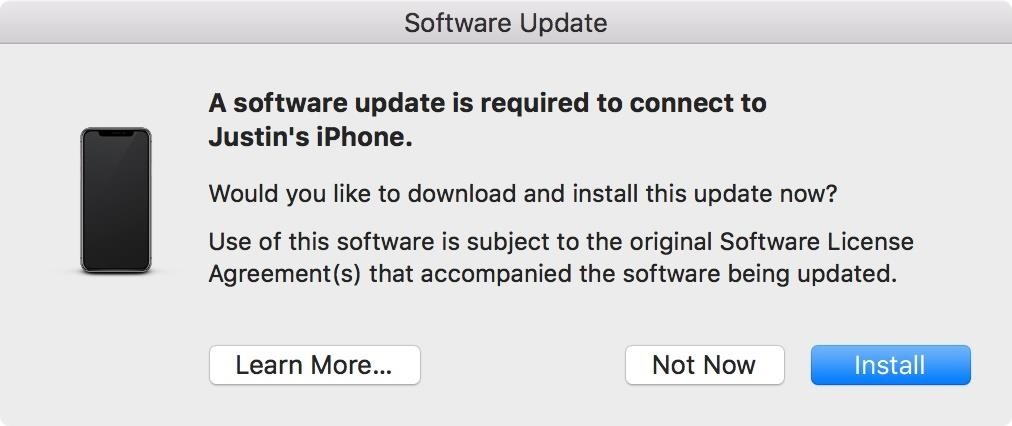
First, make sure you have the latest version of iTunes installed on your computer. Updating the software can often resolve connection issues.
Next, check your iPhone’s settings to ensure there are no conflicts. Go to “Settings” > “General” > “Restrictions” and make sure the iTunes Store and App Store are allowed.
If the problem persists, try force restarting your iPhone by holding down the power and home buttons until you see the Apple logo.
If none of these steps work, try connecting your iPhone to a different computer or using a different USB cable. Sometimes the issue can be with the computer or cable rather than the iPhone itself.
If you still can’t connect to iTunes, it may be necessary to restore your device. However, this will erase all the data on your iPhone, so be sure to have a recent backup before proceeding.
For a more detailed guide on fixing a disabled iPhone without restoring, check out our blog post titled “How to Fix iPhone is Disabled Connect to iTunes Without Restoring.”