I will guide you through troubleshooting network connectivity issues in Hyper-V VM.
Recently, Fortect has become increasingly popular as a reliable and efficient way to address a wide range of PC issues. It's particularly favored for its user-friendly approach to diagnosing and fixing problems that can hinder a computer's performance, from system errors and malware to registry issues.
- Download and Install: Download Fortect from its official website by clicking here, and install it on your PC.
- Run a Scan and Review Results: Launch Fortect, conduct a system scan to identify issues, and review the scan results which detail the problems affecting your PC's performance.
- Repair and Optimize: Use Fortect's repair feature to fix the identified issues. For comprehensive repair options, consider subscribing to a premium plan. After repairing, the tool also aids in optimizing your PC for improved performance.
Troubleshooting Hyper-V VM Network Connectivity Issues
1. Check the network configuration of the virtual machine (VM). Ensure that the VM is connected to the correct virtual switch and that the virtual switch is connected to the correct physical network adapter.
2. Verify that the network adapter of the VM is enabled. Right-click on the VM in Hyper-V Manager, go to Settings, and check that the network adapter is enabled.
3. Ensure that the operating system running on the VM has the necessary network settings configured. This includes checking the IP address settings, subnet mask, default gateway, and DNS settings.
4. Check the network connectivity between the VM and other devices on the network. Ping the IP addresses of other devices to verify connectivity.
5. If the VM is not obtaining an IP address automatically, check the DHCP settings. Make sure that DHCP is enabled on the network and that the VM is configured to obtain an IP address automatically.
6. If the VM is unable to access the internet, check the network firewall settings. Ensure that the necessary ports and protocols are allowed for internet access.
7. If the VM is unable to communicate with other VMs or devices on the same network, check the network switch settings. Verify that the VM is connected to the correct virtual switch and that the switch has the necessary connectivity options configured.
8. If all else fails, try restarting the VM and the host server. Sometimes a simple restart can resolve network connectivity issues.
Steps to Fix Hyper-V VM No Internet Problem
- Check VM Network Settings
- Open Hyper-V Manager.
- Select the VM experiencing the no internet problem.
- Go to the Settings of the VM.
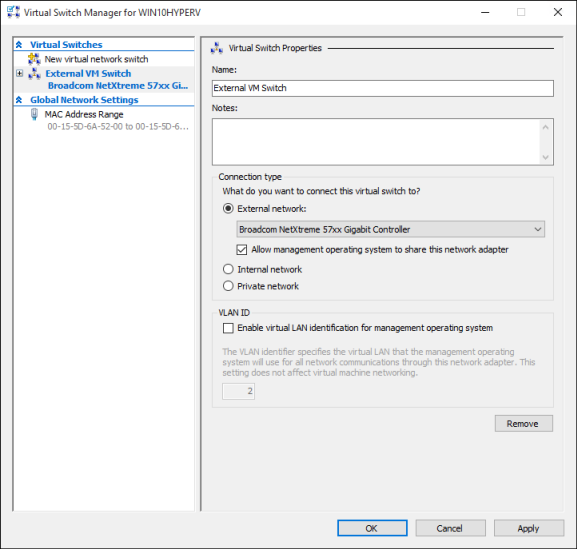
- Verify that the Virtual Switch is properly configured.
- Restart Virtual Switch
- Open Hyper-V Manager.
- Right-click on the Virtual Switch that the VM is using.
- Select Properties.
- Click on OK to restart the Virtual Switch.
- Check Firewall Settings
- Open Control Panel.
- Click on Windows Firewall.
- Ensure that the Hyper-V Virtual Ethernet Adapter is allowed through the firewall.
- Reset TCP/IP Stack
- Open Command Prompt as an administrator.
- Type the command netsh int ip reset and press Enter.
- Restart the VM and check if the internet is working.
- Check Physical Network Adapter
- Open Device Manager.
- Expand the Network Adapters section.
- Verify that the Physical Network Adapter is functioning correctly.
- Update the driver if necessary.
- Disable and Enable Network Adapter
- Open Control Panel.
- Click on Network and Sharing Center.
- Click on Change adapter settings.
- Right-click on the Network Adapter and select Disable.
- Wait for a few seconds, then right-click on the Network Adapter again and select Enable.
Resolving Virtual Network Adapter Mismatch in Hyper-V
If you are experiencing network connectivity issues with your Hyper-V VM, it could be due to a virtual network adapter mismatch. Here’s how you can resolve it:
1. Open Hyper-V Manager and select the affected virtual machine.
2. Go to the Settings of the virtual machine.
3. Under the Hardware tab, select Network Adapter.
4. Ensure that the virtual network adapter matches the correct network configuration.
5. If the adapter is mismatched, select the correct one from the drop-down menu.
6. Click Apply and then OK to save the changes.
By ensuring that the virtual network adapter matches the correct configuration, you should be able to resolve any network connectivity issues with your Hyper-V VM.
powershell

# PowerShell script to diagnose network connectivity issues in a Hyper-V VM

$vmName = "YourVMName"
# Get the VM object
$vm = Get-VM -Name $vmName
# Check if the VM is running
if ($vm.State -eq "Running") {
# Get the VM network adapter
$networkAdapter = Get-VMNetworkAdapter -VMName $vmName
# Check if the network adapter is connected
if ($networkAdapter.ConnectionStatus -eq "Connected") {
# Check IP configuration inside the VM
$vmNetworkConfig = $networkAdapter | Get-VMNetworkAdapterPacketDirect
# Check if IP configuration is obtained
if ($vmNetworkConfig.IPAddresses) {
Write-Host "Network connectivity is working in the VM."
} else {
Write-Host "Network connectivity issue: IP configuration not obtained in the VM."
}
} else {
Write-Host "Network connectivity issue: Network adapter not connected."
}
} else {
Write-Host "Network connectivity issue: VM is not running."
}
Please note that this sample code assumes you are using PowerShell and have the Hyper-V PowerShell module installed. Additionally, it only checks basic connectivity and IP configuration within the VM and may not cover all possible network connectivity issues.
For more complex or specific scenarios, it is recommended to consult official documentation, forums, or seek assistance from experienced professionals who can thoroughly analyze your environment and provide tailored solutions.
Protecting Your Hyper-V Virtual Machine and Ensuring Network Connectivity
To troubleshoot network connectivity issues with your Hyper-V virtual machine, follow these steps:
1. Verify that the network adapter is enabled and properly configured. Go to the Hyper-V Manager, select the virtual machine, and check the settings for the network adapter.
2. Check the network switch settings. Ensure that the virtual machine is connected to the correct switch and that the switch is properly configured.
3. Verify that the physical network connection is working. Test the network cable and make sure the network interface controller is functioning correctly.
4. Check the firewall settings. Disable the firewall temporarily to see if it’s causing any connectivity issues.
5. Ensure that the operating system network settings are correct. Check the IP address, subnet mask, default gateway, and DNS settings.
6. Restart the virtual machine and the host server. Sometimes a simple restart can resolve network connectivity issues.
If these steps don’t resolve the problem, consult the Hyper-V documentation or contact Microsoft support for further assistance.
Remember to always keep your virtual machine and network protected by using the latest security updates and following best practices for network security.
For more information on troubleshooting Hyper-V VM network connectivity issues, refer to the Microsoft website or consult the Hyper-V documentation.


