If you’re experiencing mouse stutter on your Windows 10 computer, there’s no need to panic. With a few simple steps, you can easily fix the issue and get back to smooth and effortless scrolling.
Recently, Fortect has become increasingly popular as a reliable and efficient way to address a wide range of PC issues. It's particularly favored for its user-friendly approach to diagnosing and fixing problems that can hinder a computer's performance, from system errors and malware to registry issues.
- Download and Install: Download Fortect from its official website by clicking here, and install it on your PC.
- Run a Scan and Review Results: Launch Fortect, conduct a system scan to identify issues, and review the scan results which detail the problems affecting your PC's performance.
- Repair and Optimize: Use Fortect's repair feature to fix the identified issues. For comprehensive repair options, consider subscribing to a premium plan. After repairing, the tool also aids in optimizing your PC for improved performance.
Understanding Mouse Stutter on Windows 10
Mouse stuttering can be a frustrating issue for Windows 10 users. If your mouse pointer freezes or lags, there are a few things you can do to fix it. One method is to update your mouse driver or graphics card driver. Another solution is to scan for faults in the Device Manager. You can also try disabling Bluetooth if you’re using a wireless mouse, as this can cause delay. If your mouse is slow or laggy, try adjusting the mousepad or using a different pointing device. Additionally, make sure your computer is running smoothly and free from any other performance issues. By following these options and keyboard shortcuts, you can easily fix mouse stutter on your Windows 10 computer.
Checking Your Mouse for Issues
- Check the surface your mouse is on
- Ensure your mouse is on a smooth surface

- Ensure the surface is clean and free of debris
- Check your mouse cable
- Ensure your mouse cable is plugged in securely
- Check for any visible damage or fraying on the cable

- Check your mouse settings
- Open Settings
- Click on Devices
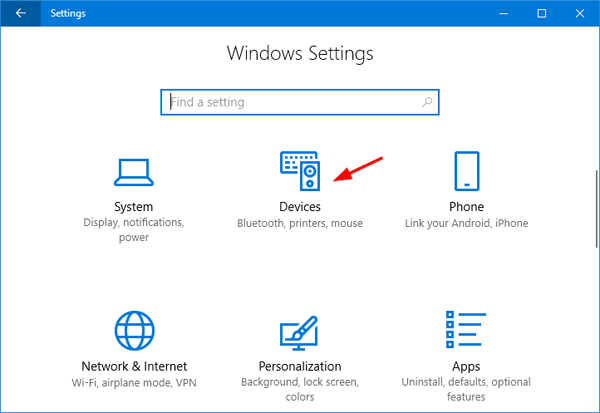
- Click on Mouse
- Ensure your mouse settings are correct for your usage
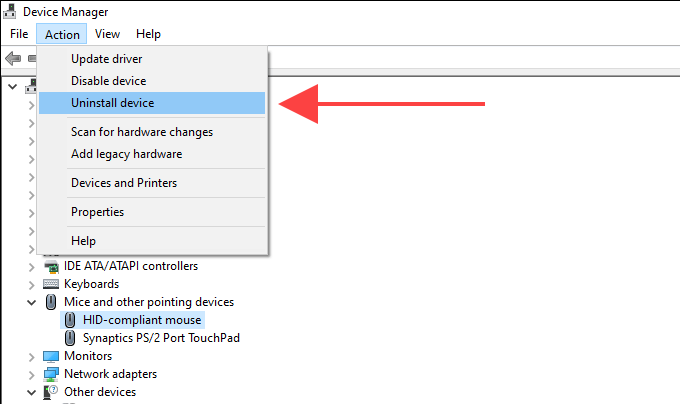
- Check for driver updates
- Open Device Manager
- Click on Mice and other pointing devices
- Right-click on your mouse
- Select Update driver
Updating Mouse Drivers to Fix Stutter
Updating your mouse drivers is one of the most effective ways to fix mouse stuttering on Windows 10. First, identify the brand and name of your mouse. Then, go to the manufacturer’s website and find the latest driver for your specific model. Download and install the driver, and restart your computer.
If you’re using a wireless or Bluetooth mouse, make sure it’s connected properly and that the batteries are fresh. If you’re still experiencing mouse stuttering, try adjusting the pointer speed or disabling any unnecessary mouse options.
Another solution is to check for any graphics card driver updates, which can also affect mouse performance. Troubleshoot any other possible issues, such as a slow computer or faulty mousepad, and make sure your inputs are registering properly. By following these simple steps, you can eliminate mouse lag and enjoy a smoother experience.
1. Open the Device Manager by pressing the Windows key + X and selecting Device Manager from the menu.
2. Expand the section for Mice and other pointing devices.
3. Right-click on your mouse and select Properties.
4. Click on the Driver tab and select Update Driver.
5. Choose Browse my computer for driver software.
6. Select Let me pick from a list of available drivers on my computer.
7. Choose the driver that is recommended for your device and click Next.
8. Restart your computer after the driver has been installed.
9. If the problem persists, try updating the driver for your graphics card as well.
10. You can also try disabling any third-party software that may be interfering with your mouse or graphics card drivers.
Note that this is just an example and may not work for all cases of mouse stutter on Windows 10. It is always recommended to seek professional help or consult with the manufacturer of your device for specific instructions on how to fix any technical issues.
Enabling/Disabling Scroll Inactive Windows
To fix mouse stutter on Windows 10, users can enable or disable scroll inactive windows. This option allows users to scroll through an inactive window without clicking on it first. To enable this feature, press the Windows logo key + I to open Settings, click on Devices, select Mouse, and highlight Mouse pointer. From there, scroll down and locate the option to “Scroll inactive windows when I hover over them” and toggle it on. This should help reduce mouse lag and freezes. To disable this feature, follow the same steps and toggle the option off. This method works for all mouse brands, including Logitech, wireless, gaming, and Bluetooth mice. Other solutions include checking for driver updates, scanning for faults, and using keyboard shortcuts to navigate.
Terminating Realtek Audio Process
Terminate Realtek Audio Process to Fix Mouse Stutter on Windows 10. Press Ctrl + Shift + Esc to open Task Manager. Click on the “Processes” tab. Look for “RtkAudioService64.exe” or “RtkAudioService.exe” process. Right-click the process and select “End task.” Confirm the action by clicking “End process” in the pop-up window. This should fix the mouse stuttering issue caused by the Realtek Audio process. If the problem persists, try updating your mouse drivers or scanning for any malware or viruses. Check if your mouse is connected properly or try using a different USB port. For more solutions to common mouse issues, check out our guide or visit our YouTube channel.
Setting Touchpad to No Delay
To fix mouse stutter on Windows 10, you can set your touchpad to no delay. This will help eliminate any lag or delay in your mouse inputs. Here’s how:
1. Press the logo key + I to open Settings.
2. Click on Devices and then select Touchpad.
3. Scroll down and click on Additional settings.
4. In the Mouse Properties window, click on the Pointer Options tab.
5. Under Motion, slide the bar to select No delay (always).
6. Click Apply and then OK to save the changes.
This should help improve your mouse movements and eliminate any stutter or delay. If you’re still experiencing issues, you may need to scan for any faults or consider upgrading to a better mouse brand.
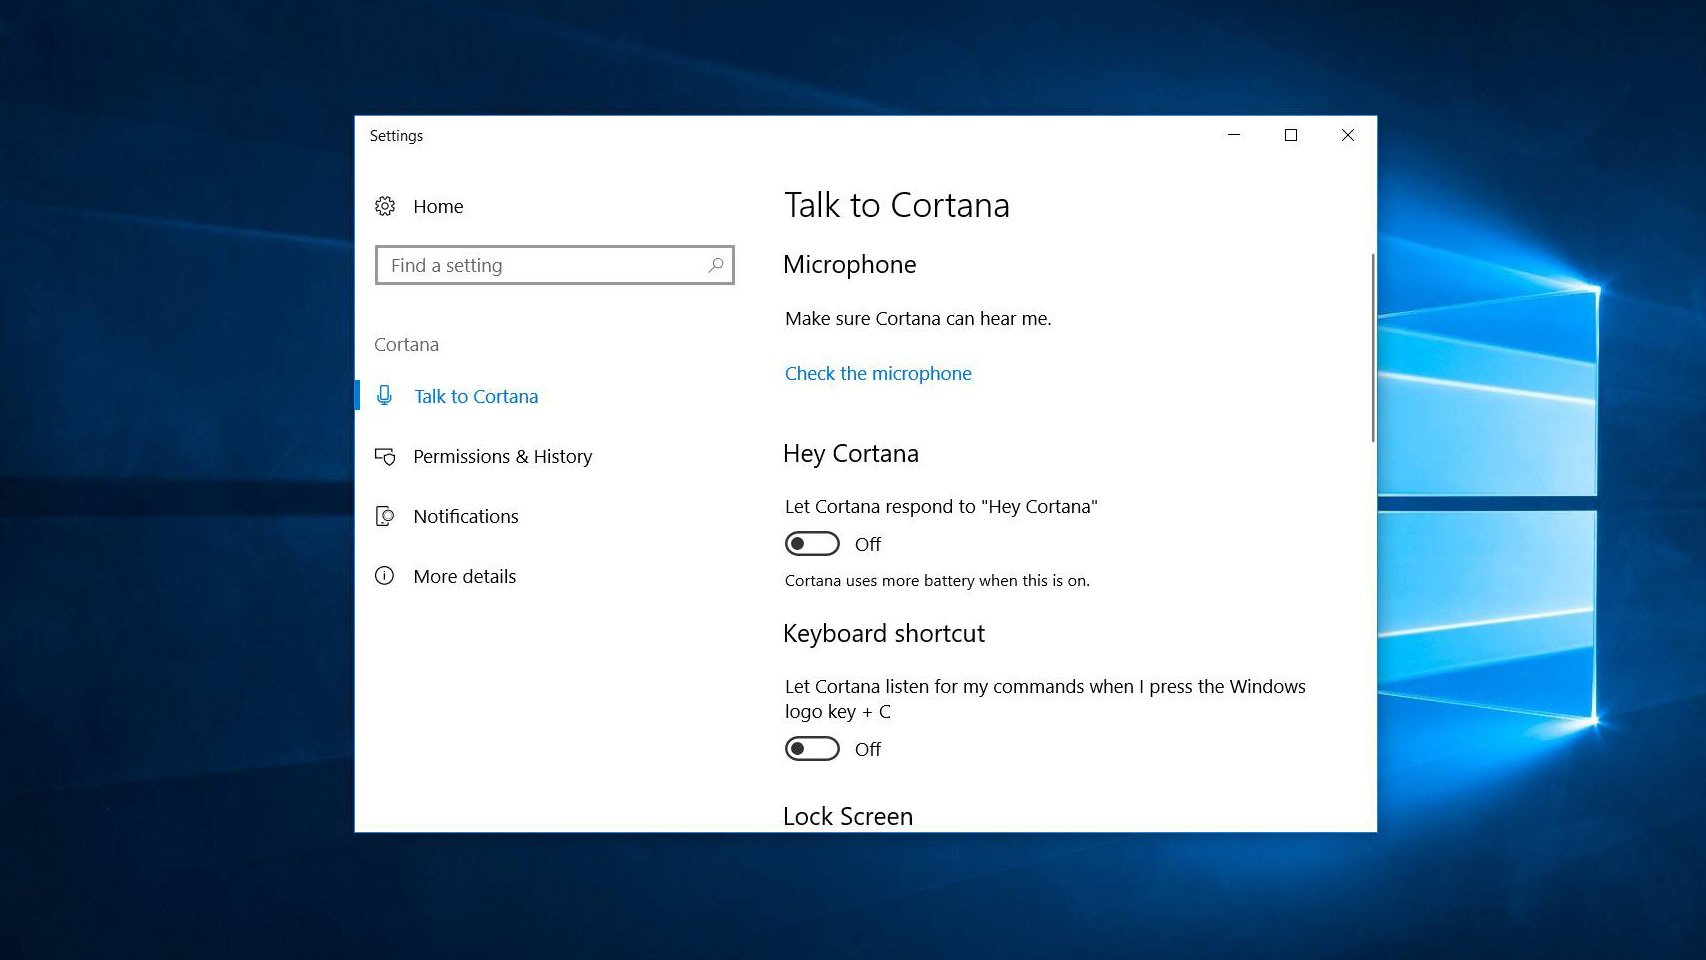
Turning off Cortana and Wallpaper Slideshow
To fix mouse stutter on Windows 10, you can turn off Cortana and Wallpaper Slideshow. These features can cause delays in mouse input and lead to laggy performance. To turn off Cortana, simply click on the search icon in the taskbar, select the settings icon, and toggle off “Cortana can give you suggestions, ideas, reminders, alerts and more.” To turn off Wallpaper Slideshow, right-click on the desktop, select “Personalize,” and under the “Background” section, choose a single image instead of a slideshow. If you have a Logitech or other wireless mouse, try plugging in a corded mouse to see if the stuttering goes away. If you’re still experiencing issues, try adjusting your mouse settings or updating your drivers. Follow these instructions for a quick and easy way to fix mouse stutter on Windows 10.
Dealing with GPU and High System Usage Issues
If you’re experiencing mouse stutter or lag on Windows 10, it could be due to high GPU or system usage. To fix this issue, try these steps:
1. Open Task Manager by pressing Ctrl + Shift + Esc and check the GPU and CPU usage. If they’re high, close any unnecessary programs running in the background.
2. Update your graphics card drivers to the latest version. Go to the manufacturer’s website and download the appropriate driver.
3. Disable hardware acceleration in your browser. Open your browser, click on the three dots in the upper right corner, select Settings, scroll down to System, and turn off hardware acceleration.
4. Check for any Windows updates and install them if available.
5. If you’re using a Bluetooth mouse, it could be causing delay or input lag. Try using a wired mouse instead.
6. If you’re using a gaming mouse, try adjusting the DPI settings or using a different mouse pad.
By following these steps, you should be able to fix the mouse stutter issue on your Windows 10 computer.
Using USB Extender and Connecting to USB 2.0 Port
To fix mouse stutter on Windows 10, consider using a USB extender to connect to a USB 2.0 port. This is particularly helpful if you’re experiencing mouse lags or freezes. Connect your mouse to the USB extender and plug it into a USB 2.0 port on your computer. You can also try pressing the Tab key to highlight Mouse in the Settings app, and then use the arrow keys to navigate to Additional mouse options. From there, select the mouse name and click on Properties. Check the box next to “Disable internal pointing device when external USB pointing device is attached” and click Enter. This should fix the mouse stutter issue. This method works for all mouse brands including Logitech and gaming mice. Avoid Bluetooth mice as they may have delay or input lag.
Additional Options to Fix Mouse Stutter on Windows 10
- Disable Cortana – Cortana can sometimes cause mouse stuttering issues on Windows 10. To disable it, go to the Start menu, click on the gear icon to open Settings, select Cortana, and toggle off the switch.
- Update your computer’s drivers – Outdated or corrupted drivers can cause mouse stuttering. You can update your drivers manually or use a driver updater software for a quicker and easier process.
- Disable unnecessary startup programs – Too many programs running at startup can slow down your computer and cause mouse stuttering. To disable unnecessary startup programs, go to Task Manager, click on the Startup tab, and disable any programs that you don’t need to run at startup.
- Disable unnecessary visual effects – Visual effects like animations and transparency can be resource-intensive and cause mouse stuttering. To disable them, go to the Start menu, click on Settings, select System, click on Advanced system settings, select the Advanced tab, and click on Settings under Performance. Then, select Adjust for best performance or Custom, and uncheck any unnecessary visual effects.
- Disable USB selective suspend – USB selective suspend can cause USB devices to disconnect or stop working, which can lead to mouse stuttering. To disable it, go to the Start menu, click on Control Panel, select Power Options, click on Change plan settings, click on Change advanced power settings, expand USB settings, and select Disabled under USB selective suspend setting.


