Unveiling the Solution: Resolving the Enigma of Computer Not Detecting External Hard Disk
Recently, Fortect has become increasingly popular as a reliable and efficient way to address a wide range of PC issues. It's particularly favored for its user-friendly approach to diagnosing and fixing problems that can hinder a computer's performance, from system errors and malware to registry issues.
- Download and Install: Download Fortect from its official website by clicking here, and install it on your PC.
- Run a Scan and Review Results: Launch Fortect, conduct a system scan to identify issues, and review the scan results which detail the problems affecting your PC's performance.
- Repair and Optimize: Use Fortect's repair feature to fix the identified issues. For comprehensive repair options, consider subscribing to a premium plan. After repairing, the tool also aids in optimizing your PC for improved performance.
Ensure Proper Connection and Power Supply
1. Check the USB cable: Make sure the USB cable connecting the external hard disk to your computer is securely plugged in on both ends. Try using a different USB cable if the issue persists.
2. Verify power supply: Ensure that the external hard disk has a stable power supply. If it’s a portable drive, connect it directly to your computer’s USB port instead of using a USB hub. In case of a desktop external hard drive, check if the AC adapter is properly connected and functioning.
3. Restart your computer: Sometimes, a simple restart can resolve connectivity issues. Restart your computer and check if the external hard disk is detected.
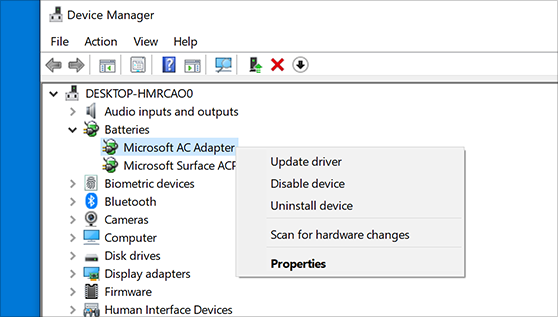
4. Update device drivers: Outdated or incompatible device drivers can cause problems. Open the Device Manager, locate the external hard disk, right-click on it, and select “Update driver.”
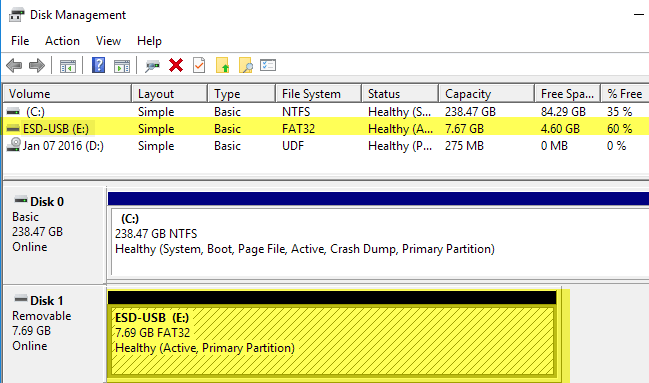
5. Check Disk Management (Windows): Open Disk Management by right-clicking on the Start menu and selecting “Disk Management.” Look for the external hard disk in the list. If it appears, assign a drive letter to it by right-clicking on the disk and selecting “Change Drive Letter and Paths.”
Try Different Cables, Ports, or Computers
Try different cables, ports, or computers to fix the issue of your computer not detecting an external hard disk. Sometimes the problem can be due to a faulty cable or a malfunctioning port. Switching to different cables or trying different USB ports can help determine if this is the cause. Additionally, connecting the external hard disk to another computer can help identify if the problem lies with your computer or the hard disk itself. By troubleshooting these hardware components, you can quickly resolve the issue and regain access to your data.
Update, Uninstall, or Roll Back Drivers
If your computer is not detecting an external hard disk, you may need to update, uninstall, or roll back your drivers.
To update your drivers, follow these steps:
1. Press the Windows key + X and select Device Manager.
2. Expand the Disk drives section.
3. Right-click on your external hard disk and select Update driver.
4. Choose Search automatically for updated driver software.
To uninstall your drivers, follow these steps:
1. Press the Windows key + X and select Device Manager.
2. Expand the Disk drives section.
3. Right-click on your external hard disk and select Uninstall device.
4. Restart your computer and the drivers will be reinstalled automatically.
To roll back your drivers, follow these steps:
1. Press the Windows key + X and select Device Manager.
2. Expand the Disk drives section.
3. Right-click on your external hard disk and select Properties.
4. Go to the Driver tab and select Roll Back Driver.
If none of these solutions work, you may need to consider data recovery options or check if the external hard disk is properly connected.
Enable and Format the Drive in Disk Management
To enable and format the drive in Disk Management, follow these steps:
1. Press the Windows key and type “Disk Management” in the search bar. Open the Disk Management tool from the search results.
2. Locate the external hard disk in the list of drives. It may appear as “Unknown” or “Not Initialized.”
3. Right-click on the drive and select “Initialize Disk.”
4. Choose the appropriate disk initialization option (MBR or GPT) and click OK.
5. Right-click on the unallocated space of the drive and select “New Simple Volume.”
6. Follow the on-screen prompts to assign a drive letter and format the drive with the desired file system.
7. Once the process is complete, the external hard disk should be recognized by your computer.
Note: If the drive does not appear in Disk Management, try connecting it to a different USB port, checking the cables, or using a different power source.
Clean the Disk and Start Fresh
To fix a computer not detecting an external hard disk, try cleaning the disk and starting fresh. First, make sure the disk is properly connected and powered on. If it still doesn’t show up, follow these steps:
1. Open File Explorer and right-click on the “This PC” or “My Computer” icon in the sidebar.
2. Select “Manage” from the context menu to open the Computer Management window.
3. Click on “Disk Management” under the “Storage” section.
4. Look for your external hard disk in the list of drives. It may be labeled as “Unknown” or without a drive letter.
5. Right-click on the disk and select “Initialize Disk” from the menu.
6. When prompted, choose the appropriate disk partition style (usually GUID Partition Table for Mac or Master Boot Record for Windows).
7. Right-click on the unallocated space and select “New Simple Volume” to create a new partition.
8. Follow the on-screen instructions to assign a drive letter, format the partition, and complete the process.
By cleaning the disk and starting fresh, you may resolve any issues with drive letter assignment or file system corruption. If the problem persists, consider checking the AC adapter or trying a different USB port or USB cable.
Remove and Test the Bare Drive
- Power off your computer and unplug the external hard disk from the USB port.
- Prepare a suitable workspace with enough light and a clean, static-free surface to work on.
- Obtain a SATA-to-USB adapter or a compatible hard drive enclosure to connect the bare drive externally to the computer.
- Remove the casing of the external hard disk by unscrewing any screws or clips that hold it together.
- Take caution when handling the bare drive and avoid touching any exposed circuitry or the read/write head.
- Connect the bare drive to the SATA-to-USB adapter or hard drive enclosure by aligning the SATA connectors and firmly plugging them together.

- Connect the adapter or enclosure to an available USB port on your computer.
- Power on your computer and wait for it to fully boot up.
- Check if the drive is detected by opening the “Disk Management” utility on Windows or using the “Disk Utility” tool on macOS.
- Look for the external hard disk in the list of drives and verify if it appears as connected and recognized.
- Perform a diagnostic test on the bare drive by using specialized software or built-in tools to check for any hardware or logical issues.
- Make note of any error messages or abnormal behavior observed during the test, as it can help diagnose the problem.
- If the drive is detected and functions properly, the issue may lie with the original external enclosure or the USB cable.
- If the drive is not detected or exhibits further issues, it may indicate a faulty bare drive that requires professional data recovery services.
Try Alternate External Hard Drives
If your computer is not detecting an external hard disk, try these alternate solutions:
1. Check the drive letter assignment: Open File Explorer, right-click on This PC, select Manage, go to Disk Management, and assign a drive letter to the external hard disk.
2. Troubleshoot using Device Manager: Press Windows key + X, select Device Manager, expand the Disk drives category, right-click on the external hard disk, and choose Update driver.
3. Restart your computer: Sometimes a simple reboot can resolve the issue.
4. Try using a different USB port or USB hub: Connect the external hard disk directly to a USB port on your PC instead of using a USB hub.
5. Check for compatibility issues: Ensure that the external hard disk is compatible with your operating system, especially if you’re using a Mac.
6. Install the latest device driver: Visit the manufacturer’s website (e.g., Seagate or Western Digital) and download the latest driver for your external hard disk.
Remember to save your important data before attempting any troubleshooting steps to avoid data loss.
If the external hard disk still doesn’t show up, it may indicate a hardware issue. Consider contacting the manufacturer’s support or seeking professional help for further assistance.
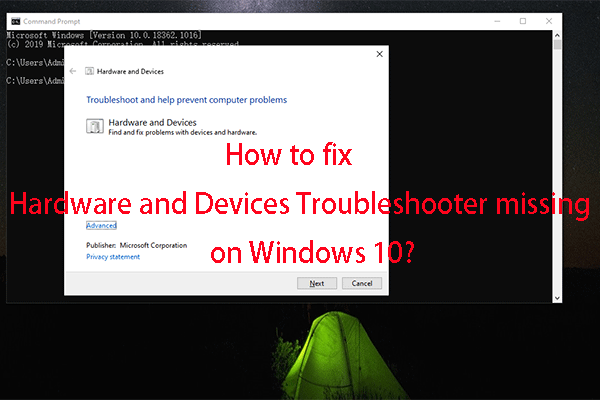
Run Hardware and Devices Troubleshooter
To troubleshoot a computer not detecting an external hard disk, you can run the Hardware and Devices Troubleshooter. Here’s how:
1. Open the Start menu and search for “Troubleshoot settings.”
2. Click on “Troubleshoot settings” from the search results.
3. Scroll down and click on “Hardware and Devices” under the “Find and fix other problems” section.
4. Click on “Run the troubleshooter” and follow the on-screen instructions to complete the troubleshooting process.
5. Restart your computer and check if the external hard disk is now detected.
If the issue persists, you may need to check for updated device drivers or try connecting the hard disk to a different USB port.
Recover Data from Unrecognized External Hard Drives
- Check the connections: Ensure that the external hard drive is properly connected to your computer. Try using a different USB port or cable to rule out any connectivity issues.
- Update drivers: Update the drivers for your external hard drive by visiting the manufacturer’s website or using the Device Manager in Windows. This can resolve compatibility issues and help your computer recognize the device.
- Restart your computer: Sometimes a simple restart can fix the issue. Restart your computer and check if the external hard drive is recognized.
- Use Disk Management: Open Disk Management in Windows to see if the external hard drive appears there. If it does, assign a drive letter to the device and it should show up in File Explorer.
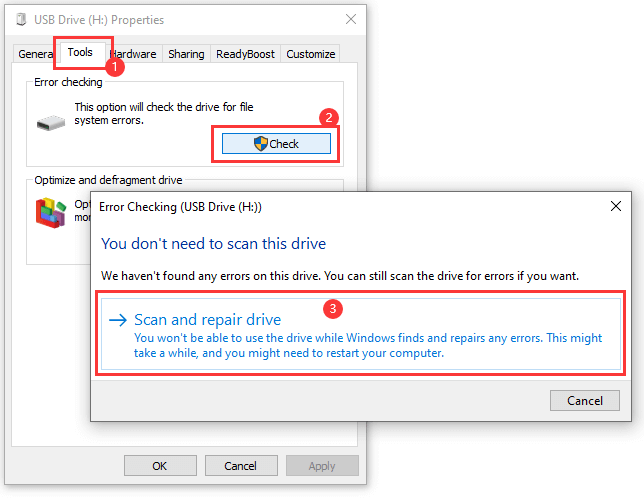
- Check for disk errors: Run the built-in Windows Error Checking tool to scan and fix any errors on the external hard drive. This might help in resolving recognition problems.
- Try on a different computer: Connect the external hard drive to a different computer to see if it gets recognized. If it does, the issue might be specific to your computer.
- Update your operating system: Ensure that your operating system is up to date. Installing the latest updates can fix compatibility issues and improve device recognition.
- Use data recovery software: If all else fails, you can try using data recovery software to recover data from the unrecognized external hard drive. There are several reliable options available online.
- Contact customer support: If none of the above solutions work, reach out to the customer support of the external hard drive manufacturer for further assistance and guidance.
Fix Unrecognized External Hard Drives on Windows 10/11
- Check the connection:
- Ensure that the external hard drive is properly connected to the computer.
- Try using a different USB port or cable to rule out any potential connection issues.
- Update the USB drivers:
- Open the Device Manager by pressing Win + X and selecting “Device Manager.”
- Expand the “Universal Serial Bus controllers” category.
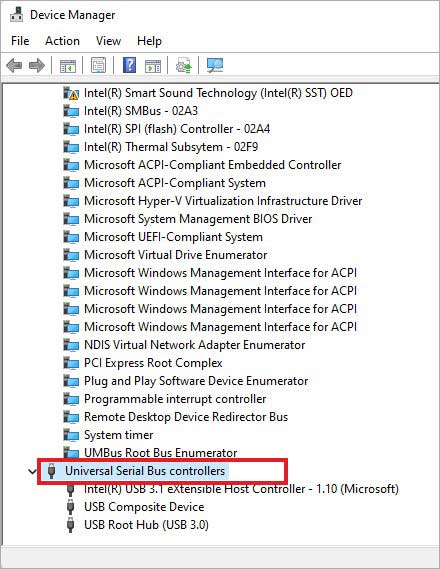
- Right-click on each USB device and select “Update driver.”
- Follow the on-screen instructions to update the drivers.
- Assign a new drive letter:
- Open the Disk Management utility by pressing Win + X and selecting “Disk Management.”
- Locate the external hard drive in the list of disks.

- Right-click on the external hard drive and select “Change Drive Letter and Paths.”
- Click on “Change” and choose a new drive letter.
- Click “OK” to save the changes.
- Check for driver conflicts:
- Open the Device Manager by pressing Win + X and selecting “Device Manager.”
- Look for any devices with a yellow exclamation mark or question mark.
- Right-click on the problematic device and select “Update driver.”
- Follow the on-screen instructions to update the driver or resolve any conflicts.
- Run the Hardware and Devices troubleshooter:
- Open the Settings app by pressing Win + I.
- Go to “Update & Security” and select “Troubleshoot” from the left menu.
- Click on “Additional troubleshooters.”
- Scroll down and click on “Hardware and Devices.”
- Click “Run the troubleshooter” and follow the instructions provided.
- Reinstall the drivers:
- Open the Device Manager by pressing Win + X and selecting “Device Manager.”
- Expand the “Universal Serial Bus controllers” category.
- Right-click on each USB device and select “Uninstall device.”
- Restart the computer.
- Windows will automatically reinstall the drivers upon restart.
Monitor External Hard Drive Health
How to Fix Computer Not Detecting External Hard Disk
Monitor External Hard Drive Health
It’s important to keep an eye on the health of your external hard drive to avoid any potential issues. Here’s a table that can help you monitor its health:
| Health Parameter | Status | Description |
|---|---|---|
| SMART Status | Good | The overall health of the hard drive as reported by the SMART (Self-Monitoring, Analysis, and Reporting Technology) system. |
| Temperature | Normal | The current temperature of the hard drive. High temperatures can indicate potential issues. |
| Bad Sectors | 0 | The number of bad sectors found on the hard drive. Higher values may indicate a failing drive. |
| Read/Write Errors | None | The number of read or write errors encountered during data transfers. Any errors should be investigated. |
| Power-On Hours | 2500 | The total number of hours the hard drive has been powered on. Higher values may indicate increased risk of failure. |
Regularly monitoring these parameters can help you identify potential issues with your external hard drive and take appropriate actions to prevent data loss or drive failure.


