Are you having trouble with your Windows 10/11 taskbar and unable to right click? Check out these simple solutions to get it working again.
Recently, Fortect has become increasingly popular as a reliable and efficient way to address a wide range of PC issues. It's particularly favored for its user-friendly approach to diagnosing and fixing problems that can hinder a computer's performance, from system errors and malware to registry issues.
- Download and Install: Download Fortect from its official website by clicking here, and install it on your PC.
- Run a Scan and Review Results: Launch Fortect, conduct a system scan to identify issues, and review the scan results which detail the problems affecting your PC's performance.
- Repair and Optimize: Use Fortect's repair feature to fix the identified issues. For comprehensive repair options, consider subscribing to a premium plan. After repairing, the tool also aids in optimizing your PC for improved performance.
Methods to Fix Right-Click Context Menu on Taskbar in Windows 10
To fix the right-click context menu on the taskbar in Windows 10/11, there are a few methods you can try. One way to fix the problem is to restart the Windows Explorer process. To do this, press Ctrl + Shift + Esc to open the Task Manager. Then, select the Windows Explorer process and click Restart. Another method is to use PowerShell to re-register all Windows apps. Open PowerShell as an admin, then enter Get-AppXPackage -AllUsers | Foreach {Add-AppxPackage -DisableDevelopmentMode -Register “$($_.InstallLocation)\AppXManifest.xml”} and hit Enter. This will re-register Windows apps and fix the context menu issue. If these methods don’t work, try updating Windows or running the Windows Update troubleshooter. By following these methods, you can restore the full functionality of your right-click context menu on the taskbar.
Applying Latest Updates and Removing Malware
updating
Can’t right click on Taskbar? Try applying the latest Windows updates and removing malware to fix the issue. To update Windows, go to Settings > Update & Security > Windows Update and check for any available updates. For malware removal, use Windows Security by typing “Windows Security” in the search bar and running a Full Scan. If the issue persists, try resetting the Taskbar with the following steps:
1. Press Ctrl + Shift + Esc to open Task Manager.
2. Go to the “Processes” tab and end the “Windows Explorer” process.
3. Click “File” in the top-left corner and select “Run new task.”
4. Type “explorer.exe” and check the box for “Create this task with administrative privileges.”
5. Click “OK” to restart Windows Explorer.
If that doesn’t work, try creating a new user admin account, updating device drivers, or running a System File Checker (SFC) scan. These solutions should restore Taskbar functionality and allow you to right-click on Taskbar icons, move the Taskbar to the bottom of the screen, and hide the Taskbar.
Restarting Explorer, Tile Data Model Server, and Services Screen
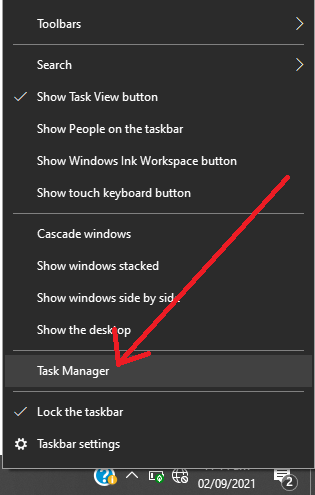
- Step 1: Open Task Manager by pressing Ctrl + Shift + Esc or right-click on the taskbar and select “Task Manager”.
- Step 2: Click on the “More details” button at the bottom of the Task Manager window.
- Step 3: Locate “Windows Explorer” in the list of processes and right-click on it.
- Step 4: Select “Restart” from the context menu.
- Step 5: Open the Run dialog by pressing Win + R.
- Step 6: Type services.msc and press Enter.

- Step 7: Locate “Tile Data model server” in the list of services and right-click on it.
- Step 8: Select “Restart” from the context menu.
- Step 9: Repeat step 7 and 8 for “Application Identity” and “Network Connection Broker” services.
Fixing Right-Click Context Menu on Start Menu and Taskbar through Registry Editor and PowerShell
If you’re having trouble right-clicking on the start menu or taskbar in Windows 10/11, you can fix this issue in two ways: through the Registry Editor or PowerShell.
To use the Registry Editor, press the Windows key + R to open the Run dialog box. Type regedit and press Enter. Navigate to HKEY_CURRENT_USER\Software\Microsoft\Windows\CurrentVersion\Explorer\Advanced and create a new DWORD value named EnableXamlStartMenu with a value of 0. Restart the computer for the changes to take effect.
Alternatively, you can use PowerShell. Open PowerShell as an administrator and run the command Get-AppXPackage -AllUsers | Foreach {Add-AppxPackage -DisableDevelopmentMode -Register “$($_.InstallLocation)\AppXManifest.xml”}. This will reinstall all the default apps and fix the right-click context menu issue.
Keep in mind that these methods are for Windows 10/11 and may not work for Windows 7 or Windows 8. If nothing seems to be working, try creating a new user admin account or installing the latest update like KB4034674 for Windows 10 build 15063.540 (version 1703) or 20H2.
By following these steps, you should be able to fix the right-click context menu issue on your taskbar or start menu.