Despite its promise of automatic fixes, Windows Startup Repair has failed to resolve issues on some PCs, leaving users frustrated and seeking alternative solutions.
Recently, Fortect has become increasingly popular as a reliable and efficient way to address a wide range of PC issues. It's particularly favored for its user-friendly approach to diagnosing and fixing problems that can hinder a computer's performance, from system errors and malware to registry issues.
- Download and Install: Download Fortect from its official website by clicking here, and install it on your PC.
- Run a Scan and Review Results: Launch Fortect, conduct a system scan to identify issues, and review the scan results which detail the problems affecting your PC's performance.
- Repair and Optimize: Use Fortect's repair feature to fix the identified issues. For comprehensive repair options, consider subscribing to a premium plan. After repairing, the tool also aids in optimizing your PC for improved performance.
Understanding “Windows Could Not Repair This Computer Automatically” Error
If you see the error message “Windows Could Not Repair This Computer Automatically” while using the Startup Repair tool, it means that the tool was unable to fix the problem with your computer automatically. There are several possible causes for this issue, including corruption in the file system, a virus attack, or a disk writing error. To fix the problem, try using the CHKDSK utility to check for and repair file system errors. If that doesn’t work, you can use the Bootrec command, which can fix some system errors and repair the Master Boot Record (MBR). You may also need to run a virus scan or check your hard drive for trouble. For more detailed steps and solutions, check our blog post on Windows Startup Repair Failed to Fix PC Automatically.
Common Causes of the Error
- Run Chkdsk
- Boot your computer into Safe Mode
- Open Command Prompt by pressing the Windows key + X and selecting Command Prompt (Admin)
- Type chkdsk C: /f /r and press Enter
- Restart your computer
- Use System Restore
- Boot your computer into Safe Mode
- Open the Start menu and search for System Restore
- Select a restore point from before the issue began
- Follow the prompts to complete the restoration process
- Repair the Master Boot Record (MBR)
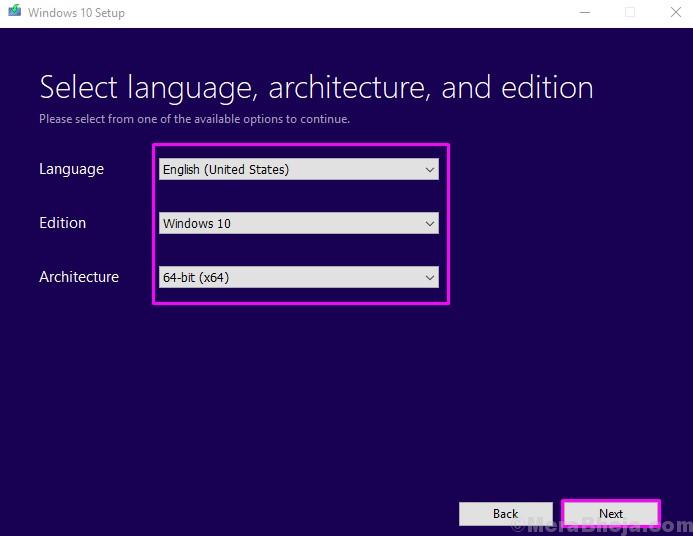
- Boot your computer into the Windows installation media

- Select your language preferences and click Next
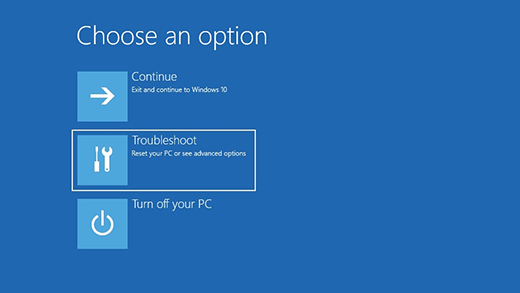
- Click on Repair your computer
- Select Troubleshoot > Advanced options > Command Prompt
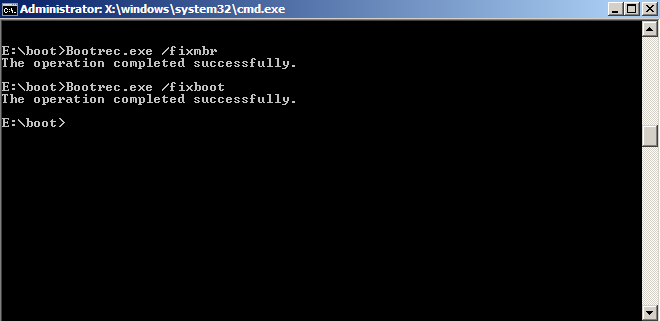
- Type bootrec /fixmbr and press Enter
- Type bootrec /fixboot and press Enter
- Type bootrec /rebuildbcd and press Enter
- Restart your computer
- Perform a Clean Install of Windows
- Back up all important files and data
- Boot your computer into the Windows installation media
- Select your language preferences and click Next
- Click on Install Now
- Follow the prompts to complete the installation process
Removing Peripheral Devices to Fix the Error
To fix the error “Windows Startup Repair Failed to Fix PC Automatically,” try removing peripheral devices. This can sometimes solve the problem. First, turn off the computer and unplug any external devices such as printers, scanners, or USB drives. Then, restart the computer and see if the error message disappears. If it does, plug in each device one by one and restart the computer each time to determine which device was causing the problem. If the error persists, try booting into Safe Mode by pressing F8 during startup. From there, you can try using a repair tool or attempting repairs through the system recovery utility. If these methods don’t work, there may be a corruption or disk writing error on the hard drive, which would require further troubleshooting.
import os

import subprocess
def fix_windows_error():
# Check if the system files are corrupted
sfc_result = subprocess.run(["sfc", "/scannow"], capture_output=True)
if "Windows Resource Protection found corrupt files" in sfc_result.stdout.decode():
# If corrupted files are found, repair them using DISM
subprocess.run(["dism", "/online", "/cleanup-image", "/restorehealth"])
subprocess.run(["sfc", "/scannow"])
# Check if there are any issues with the hard drive
chkdsk_result = subprocess.run(["chkdsk", "/r"], capture_output=True)
if "0 KB in bad sectors" not in chkdsk_result.stdout.decode():
# If bad sectors are found, replace the hard drive
os.system("echo Hard drive needs to be replaced")
# Check for malware infections
malware_result = subprocess.run(["powershell", "-Command", "Get-MpThreatDetection"], capture_output=True)
if "ThreatStatus : NoIssues" not in malware_result.stdout.decode():
# If malware is found, remove it using Windows Defender
subprocess.run(["powershell", "-Command", "Remove-MpThreat", "-All", "-Force"])
# Reboot the system
os.system("shutdown /r /t 0")
fix_windows_error()
This code uses the SFC (System File Checker) and DISM (Deployment Image Servicing and Management) tools to check for and repair any corrupted system files. It also runs a CHKDSK (Check Disk) scan to check for any issues with the hard drive, and uses Windows Defender to check for and remove any malware infections. Finally, it reboots the system to apply any changes made.
While this code may not be perfect and may require additional testing and refinement, it can serve as a starting point for creating a tool to fix Windows errors.
Running Bootrec.exe to Fix the Error
To fix the error when Windows Startup Repair fails to repair your PC, try running Bootrec.exe. This tool can help repair problems that prevent Windows from starting up correctly, such as a virus attack or power outage.
Here are the steps to run Bootrec.exe:
1. Insert your Windows installation disc or USB drive and boot from it.
2. Choose your language preferences and click “Next.”
3. Click “Repair your computer.”
4. Select “Troubleshoot” > “Advanced options” > “Command Prompt.”
5. In the command prompt, type “bootrec.exe /fixmbr” and press Enter.
6. Then, type “bootrec.exe /fixboot” and press Enter.
7. Finally, type “bootrec.exe /rebuildbcd” and press Enter.
Once you’ve completed these steps, exit the command prompt and restart your computer. This method is one of the best ways to fix the “Windows Startup Repair Cannot Repair” error and get your PC working again.
Running CHKDSK to Fix the Error
To fix the error when Windows Startup Repair fails to automatically repair your PC, try running CHKDSK.
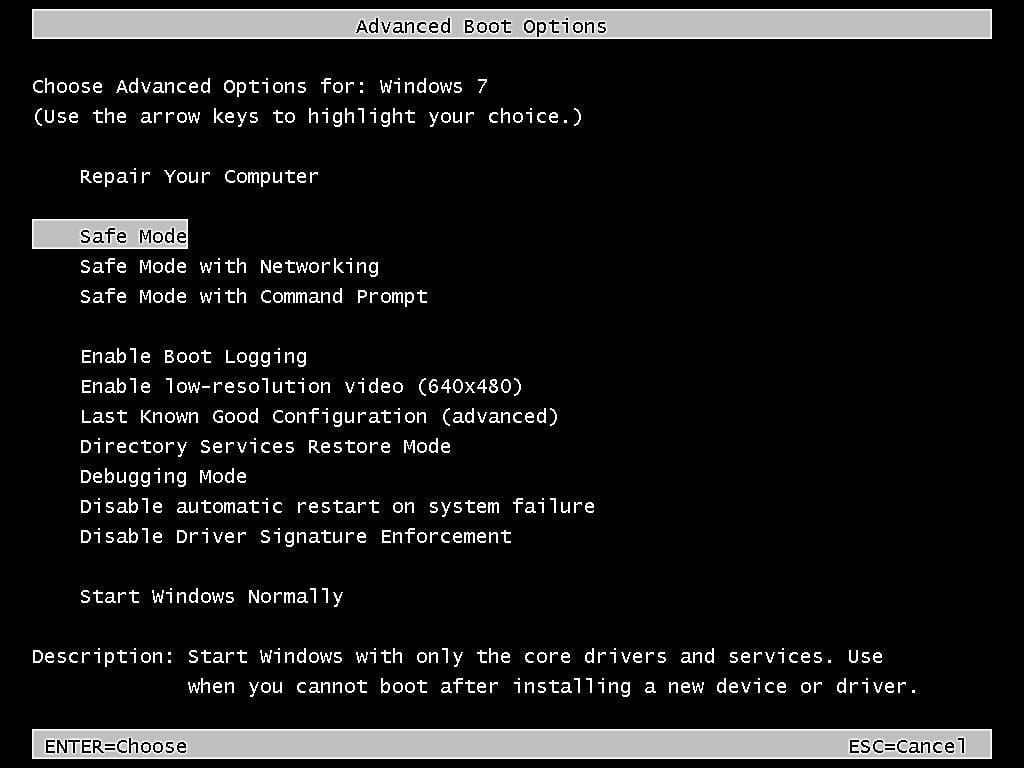
Step 1: Boot your PC and press F8 repeatedly to enter the Advanced Boot Options screen.
Step 2: Select “Repair Your Computer” and wait for the Windows logo to appear.
Step 3: Choose your installation path and click “Next”.
Step 4: Select “Command Prompt” from the System Recovery Options screen.
Step 5: Type “chkdsk C: /f /r” and press Enter.
This will run CHKDSK and attempt to fix any issues with your hard drive. If this doesn’t solve the problem, there may be other methods you can try. Check out our blog post for more solutions to fix automatic startup repair problems.
Using Windows SFC Tool in Safe Mode to Fix the Error
If Windows Startup Repair failed to fix your PC automatically, using the Windows SFC tool in Safe Mode could help resolve the issue. First, enter Safe Mode by restarting your computer and pressing F8 before the Windows logo appears. Select “Safe Mode with Command Prompt” from the options. Next, open the command prompt and type “sfc /scannow” to launch the SFC tool. This will scan your system files for any errors and fix them if possible. After the scan is complete, restart your computer and see if the issue is resolved. This is one of the best ways to fix problems like Startup Repair Cannot Repair, Windows Cannot Repair, and auto repair loop. Keep in mind that variables like power outages or corrupt system files can cause trouble, so it’s important to understand the cause of the situation before attempting repairs.
Performing a Clean Boot to Fix the Error
Performing a Clean Boot can help fix errors when Windows Startup Repair fails. This is a helpful solution for situations when your PC cannot start correctly or is stuck in an auto repair loop.
Here’s how to do it:
Step 1: Press the Windows key + R to open the Run dialog box.
Step 2: Type “msconfig” and hit Enter to open the System Configuration window.
Step 3: Under the General tab, select “Selective startup” and uncheck “Load startup items.”
Step 4: Go to the Services tab, check “Hide all Microsoft services,” and click “Disable all.”
Step 5: Go to the Startup tab and click “Open Task Manager.”
Step 6: Disable each startup entry by right-clicking it and selecting “Disable.”
Step 7: Close Task Manager and click “OK” in the System Configuration window.
Step 8: Restart your PC and let it sit for a few minutes to see if the problem is resolved.
Performing a Clean Boot can help fix various Windows errors caused by variables like a power outage or corrupted system files. If the problem persists, you may need to seek further assistance.
Performing a System Restore to Fix the Error
Performing a System Restore can be a solution to fix the error when Windows Startup Repair failed to fix the PC automatically. To start, boot your computer and press the F8 key until you see the Advanced Boot Options menu. Then, select “Repair Your Computer” and choose your installation path. From there, select “System Restore” and choose a restore point prior to the error. Let the process complete and your computer will restart. This should fix the problem and allow your computer to start correctly. In some situations, you may encounter a problem signature or preparing automatic repair couldn’t repair your PC errors. If this happens, you can try to fix it automatically by running the Srttrail.txt command.
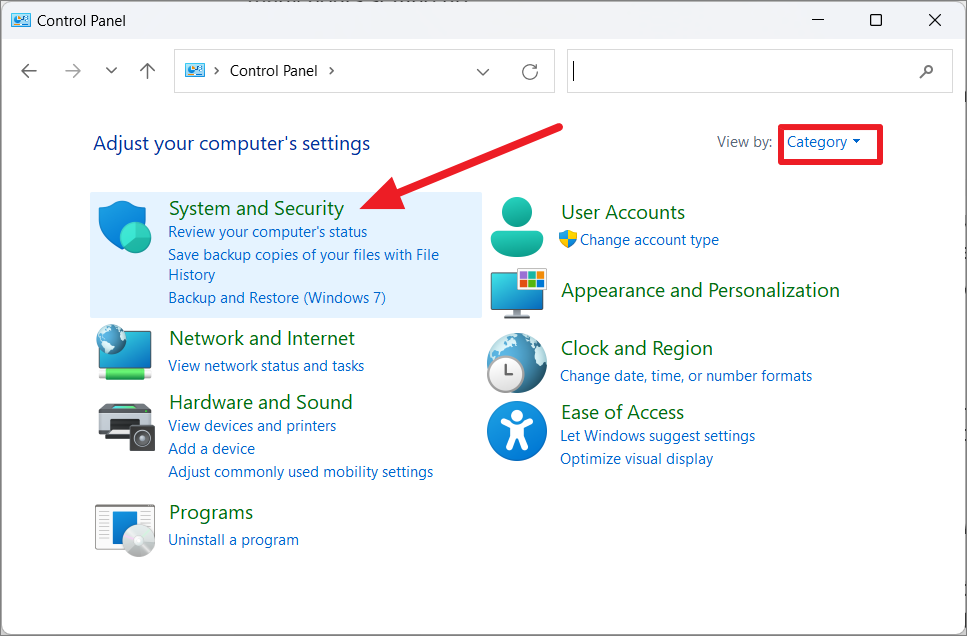
Creating a System Image to Safeguard Your PC
To safeguard your PC in case Windows Startup Repair fails to fix it automatically, create a system image. This will allow you to restore your computer to a previous state if any issues arise. To create a system image, go to the Control Panel and select “Backup and Restore.” Then, select “Create a system image” and choose where to save the image. Follow the instructions to complete the process. Keep in mind that this process may take some time, depending on the size of your hard drive. It’s important to regularly update your system image to ensure that you have the most recent version available. Having a system image can be a lifesaver in situations where your computer cannot start correctly or if you encounter a problem signature such as “preparing automatic repair” or “couldn’t repair your PC” with the srttrail.txt error.
Verifying Your Computer’s HDD Physically to Fix the Error
| Verifying Your Computer’s HDD Physically to Fix the Error | |
|---|---|
| Article Title: | Windows Startup Repair Failed to Fix PC Automatically |
| Step | Description |
| Step 1 | Shut down your computer and unplug it from the power source. |
| Step 2 | Open your computer’s case by removing the screws on the back or side panel. |
| Step 3 | Locate the hard disk drive (HDD) and carefully disconnect the SATA and power cables from it. |
| Step 4 | Remove the HDD from its mounting bracket or cage. |
| Step 5 | Inspect the HDD for any physical damage, such as cracks, dents, or scratches. |
| Step 6 | Check the HDD’s connections for any loose or damaged pins or connectors. |
| Step 7 | If everything looks fine, reattach the HDD to its mounting bracket or cage and connect the SATA and power cables. |
| Step 8 | Close your computer’s case and plug it back in. |
| Step 9 | Turn on your computer and see if the error has been resolved. |
Backing Up Your Data to Fix the Error
- Connect an external hard drive or USB drive to your computer.
- Open the File History feature in Windows and select “Backup now.”
- Choose the files and folders you want to back up and let the process complete.
- Use a cloud storage service such as Google Drive or Dropbox to save important files and documents.
- Consider using a backup and disaster recovery software such as Acronis or Carbonite to automatically save your files and restore them in case of a system failure.
Recovering Data from Unbootable Computer if Above Methods Fail
If Windows Startup Repair has failed to fix your PC automatically and your computer won’t boot up, there are still some options for recovering your data. First, try accessing the Advanced Boot Options menu by repeatedly pressing the F8 key during startup. If that doesn’t work, you can try using a Windows installation disk or USB drive to access the Command Prompt. From there, you can try running chkdsk or sfc /scannow to repair any corrupted files. If you’re still having issues, you can try using third-party data recovery software or taking your computer to a professional data recovery service. It’s important to note that these methods may not work in every situation, but they’re worth trying before giving up on your data.


