In a perplexing turn of events, Windows 10 users have found themselves facing a puzzling predicament: the disappearance of their WiFi settings. This unexpected occurrence has left users searching for solutions, eager to regain their wireless connectivity. Fear not, as we delve into the depths of this issue, providing you with the ultimate guide to solving this mysterious vanishing act.
Recently, Fortect has become increasingly popular as a reliable and efficient way to address a wide range of PC issues. It's particularly favored for its user-friendly approach to diagnosing and fixing problems that can hinder a computer's performance, from system errors and malware to registry issues.
- Download and Install: Download Fortect from its official website by clicking here, and install it on your PC.
- Run a Scan and Review Results: Launch Fortect, conduct a system scan to identify issues, and review the scan results which detail the problems affecting your PC's performance.
- Repair and Optimize: Use Fortect's repair feature to fix the identified issues. For comprehensive repair options, consider subscribing to a premium plan. After repairing, the tool also aids in optimizing your PC for improved performance.
Wi-Fi network detection issue on Windows 10
If you’re experiencing Wi-Fi network detection issues on Windows 10, here’s how you can solve them:
1. First, check if your Wi-Fi is turned on. Look for the Wi-Fi icon in the taskbar and ensure it’s not turned off.
2. If the Wi-Fi symbol is missing, go to the device manager. Double-click on the network adapter and select “Enable” if it’s disabled.
3. If the network adapter is missing, go to the device manager and select “Scan for hardware changes” to reinstall the adapter.
4. For Microsoft Surface Pro or HP laptop users, try updating the Wi-Fi driver through Windows Update or the manufacturer’s website.
Troubleshooting steps for missing Wi-Fi settings in Windows 10
- Restart your computer: Sometimes, a simple restart can fix issues with missing Wi-Fi settings in Windows 10. Restart your computer and check if the Wi-Fi settings have reappeared.
- Check airplane mode: Make sure that airplane mode is turned off. When airplane mode is on, it disables all wireless communication, including Wi-Fi. Go to the Action Center and ensure that airplane mode is not enabled.

- Update Wi-Fi driver: Outdated or incompatible Wi-Fi drivers can cause the Wi-Fi settings to disappear. Visit the manufacturer’s website or use Windows Update to download and install the latest driver for your Wi-Fi adapter.
- Run the Network troubleshooter: Windows 10 has a built-in Network troubleshooter that can help identify and resolve issues with Wi-Fi connectivity. Open the Settings app, go to “Update & Security,” select “Troubleshoot,” and then run the Network troubleshooter.
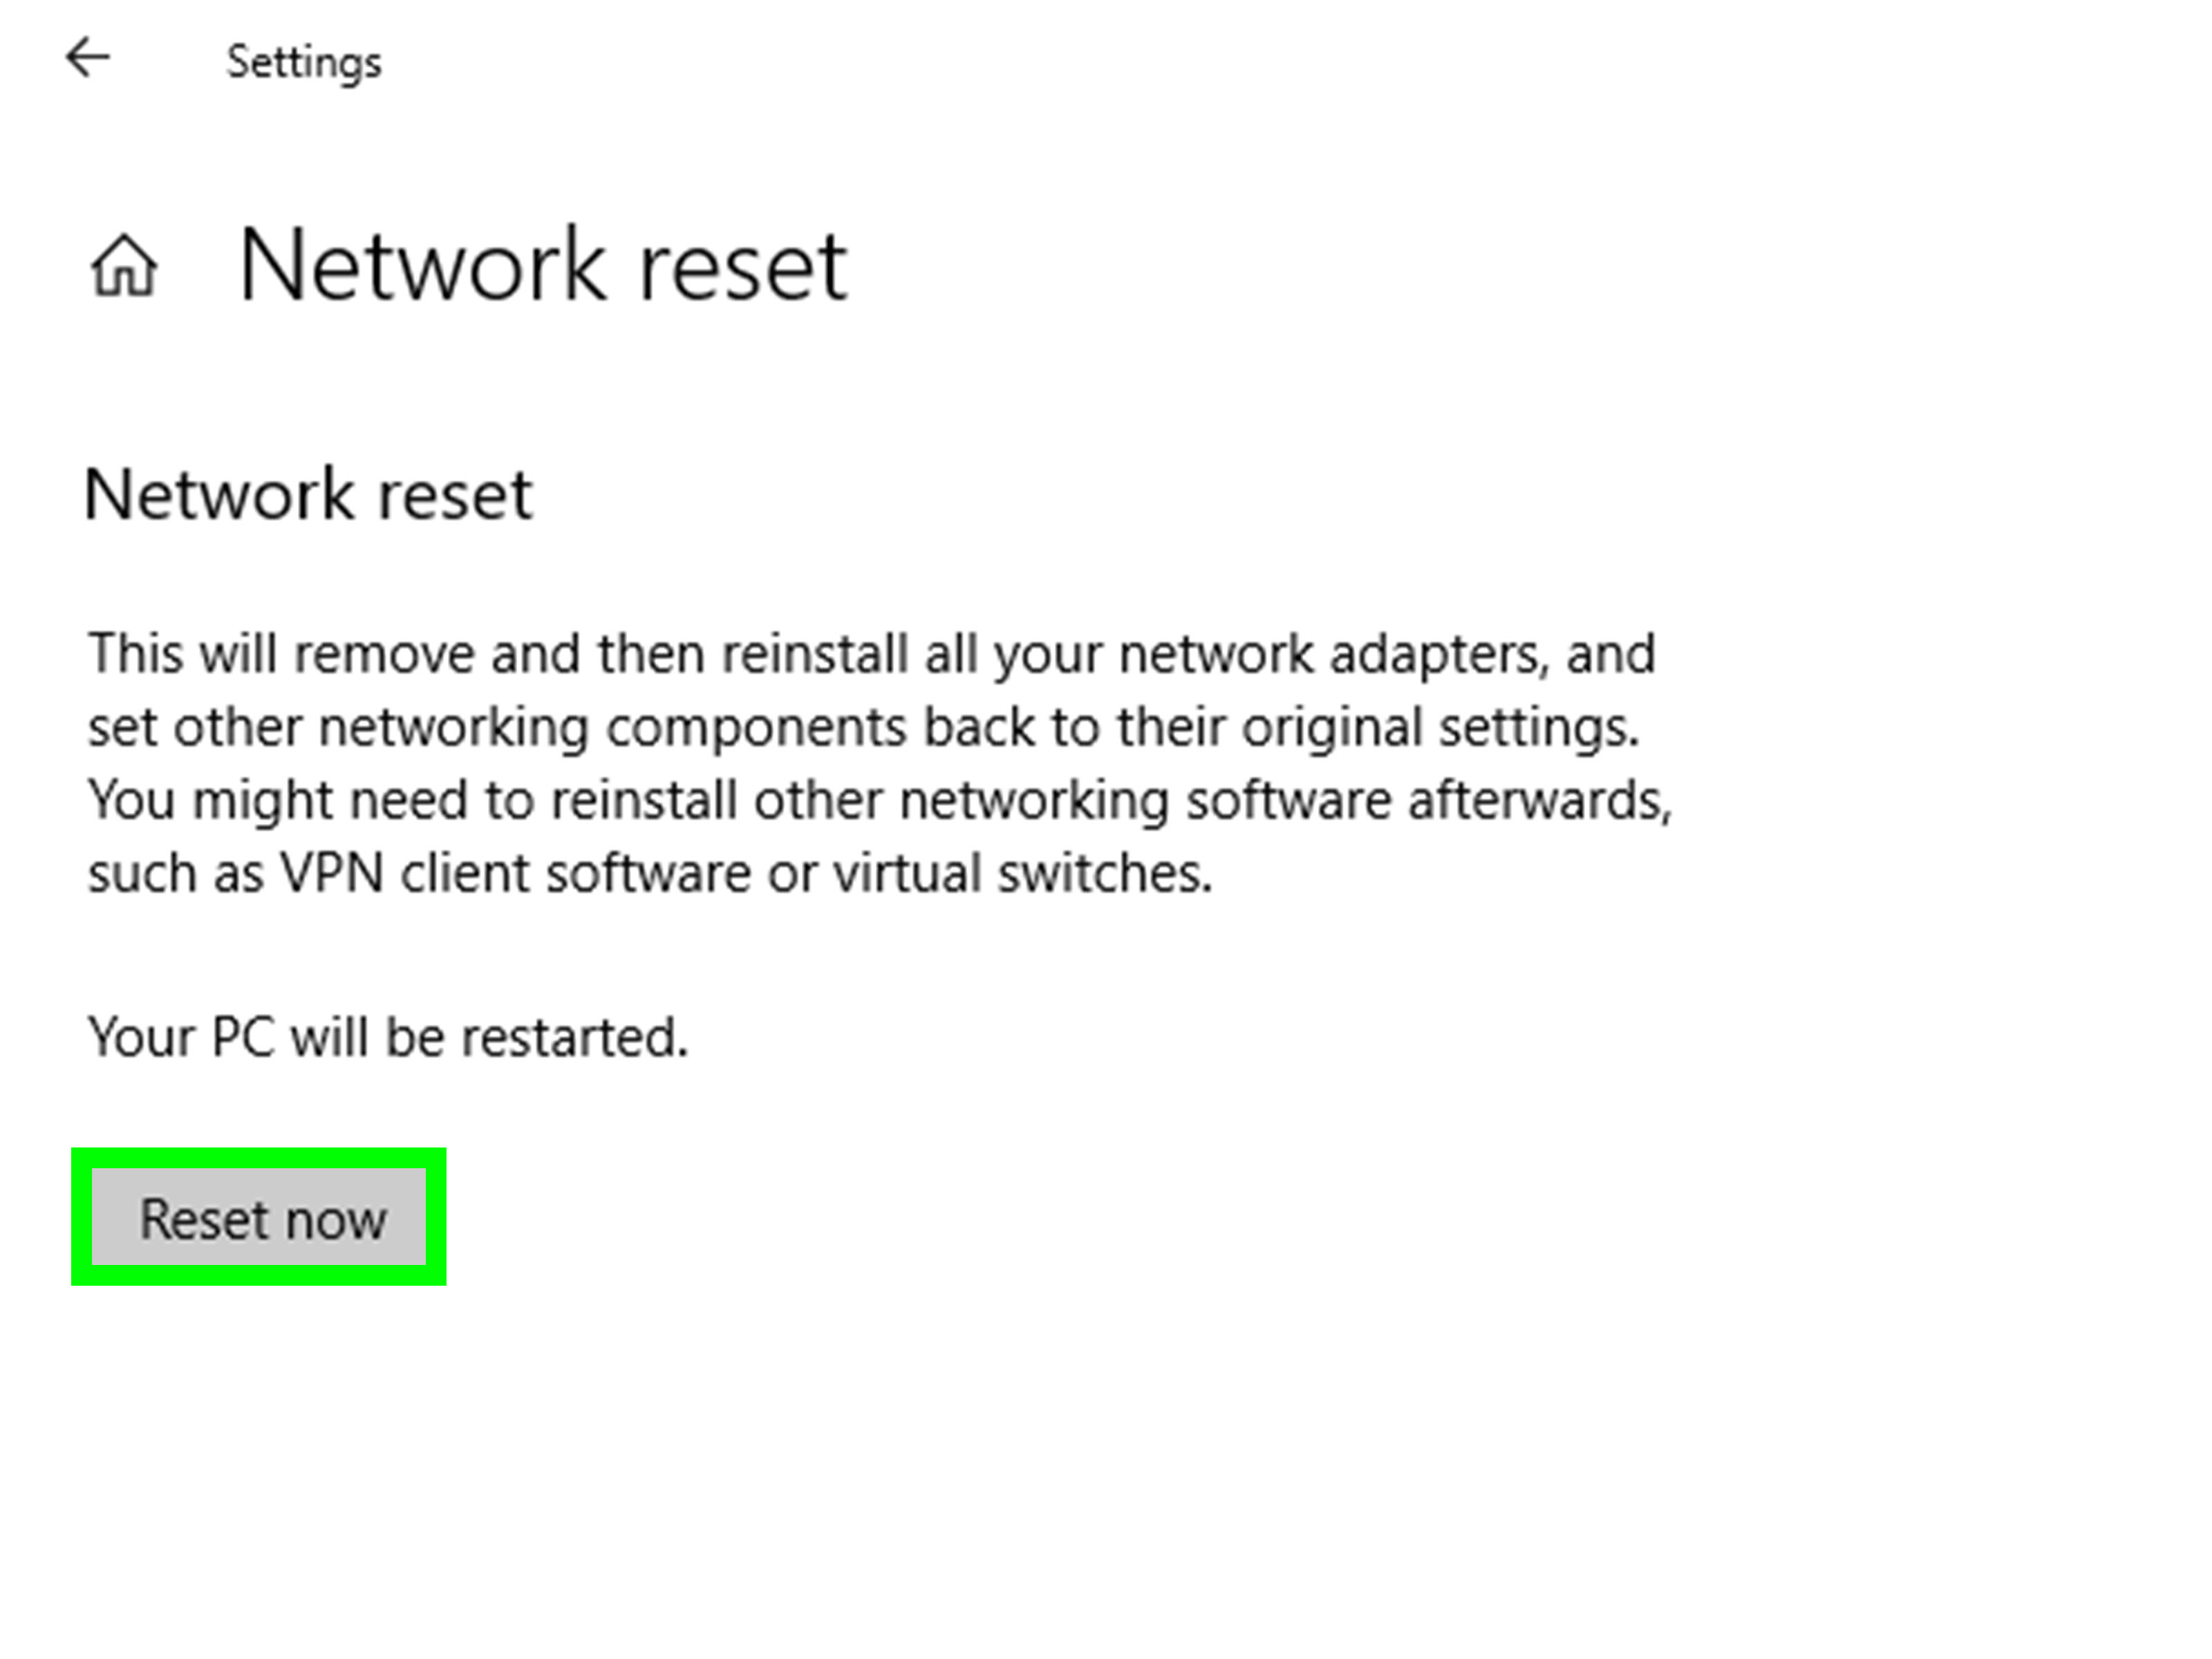
- Reset network settings: Resetting your network settings can help fix any configuration issues that may be causing the missing Wi-Fi settings. Open the Settings app, go to “Network & Internet,” select “Status,” and then click on “Network reset.” Follow the on-screen instructions to reset your network settings.
- Check for hidden Wi-Fi networks: Some Wi-Fi networks may be hidden from the list of available networks. To check if this is the case, open the Settings app, go to “Network & Internet,” select “Wi-Fi,” and then click on “Manage known networks.” If there are any hidden networks, remove them and try reconnecting to your desired Wi-Fi network.

- Perform a system restore: If the Wi-Fi settings suddenly disappeared after a recent software installation or update, performing a system restore to a previous point in time may help resolve the issue. Open the Control Panel, search for “Recovery,” and select “System Restore.” Follow the on-screen instructions to restore your system to a previous state.
- Check for hardware issues: Ensure that your Wi-Fi adapter is properly connected and functioning. If you are using a USB Wi-Fi adapter, try connecting it to a different USB port. If possible, test the adapter on another computer to rule out any hardware problems.
Restarting and updating Windows 10 to fix Wi-Fi issues
To fix Wi-Fi issues on Windows 10, you can try restarting and updating your system. First, restart your computer by clicking on the Start menu, selecting the Power icon, and choosing Restart. After the restart, update your Windows 10 by following these steps:
1. Click on the Start menu, then select Settings.
2. In the Settings window, click on Update & Security.
3. Click on Windows Update and then select Check for updates.
4. If there are any available updates, click on Download and install.
Updating your system can help resolve Wi-Fi issues by ensuring that you have the latest drivers and software.
python

import wifi
def get_available_networks():
wifi_list = wifi.Cell.all('wlan0') # Replace 'wlan0' with the appropriate interface name
networks = []
for cell in wifi_list:
networks.append({
'ssid': cell.ssid,
'signal': cell.signal,
'encrypted': cell.encrypted,
'channel': cell.channel,
})
return networks
# Usage example
available_networks = get_available_networks()
for network in available_networks:
print(network)
Resolving Wi-Fi disappearance in Windows Settings with device and driver checks
Windows 10 WiFi Disappeared & Missing Setting [SOLVED]
| Device Check | Driver Check |
|---|---|
| 1. Check if the Wi-Fi adapter is enabled | 1. Update the Wi-Fi driver |
| 2. Make sure the Wi-Fi adapter is not disabled in Device Manager | 2. Reinstall the Wi-Fi driver |
| 3. Verify if the Wi-Fi adapter is properly connected to the motherboard | 3. Roll back the Wi-Fi driver to a previous version |
| 4. Check for any physical damage to the Wi-Fi adapter | 4. Uninstall any conflicting software or security programs |
| 5. Test the Wi-Fi adapter on another device or test a different Wi-Fi adapter on your computer | 5. Perform a system restore to a point when Wi-Fi was working |
Solutions for checking Wi-Fi card, enabling required service, updating driver, and reinstalling
- Open Device Manager by right-clicking on the Start button and selecting it from the menu.
- Expand the Network adapters category.

- Look for any entries related to the Wi-Fi card, such as Wireless adapter or Wi-Fi card.
- If there are any yellow exclamation marks or red X symbols next to the Wi-Fi card entry, it indicates a problem.
Solutions for enabling required service:
- Press Windows key + R to open the Run dialog box.
- Type services.msc and press Enter to open the Services window.
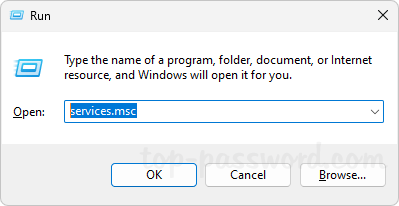
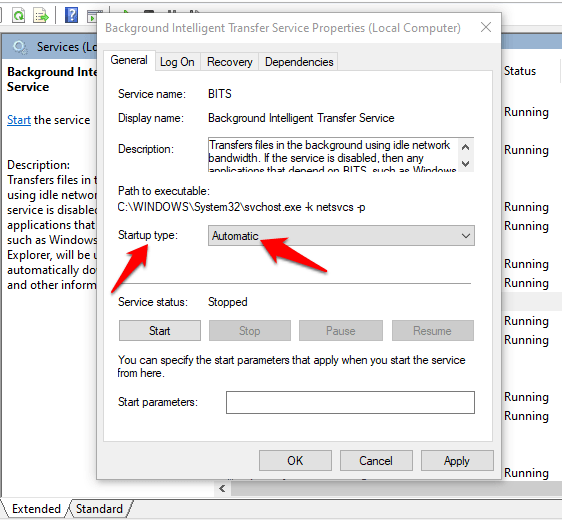
- Scroll down and locate the WLAN AutoConfig service.
- Right-click on it and select Properties.
- Make sure the Startup type is set to Automatic.
- If the service is not currently running, click on the Start button to start it.
Solutions for updating driver:
- Open Device Manager by right-clicking on the Start button and selecting it from the menu.
- Expand the Network adapters category.
- Right-click on the Wi-Fi card entry and select Update driver.
- Choose the option to Search automatically for updated driver software.
- Follow the on-screen instructions to complete the driver update process.
Solutions for reinstalling:
- Open Device Manager by right-clicking on the Start button and selecting it from the menu.
- Expand the Network adapters category.
- Right-click on the Wi-Fi card entry and select Uninstall device.
- Confirm the uninstallation if prompted.
- Restart your computer.
- Windows will automatically reinstall the Wi-Fi card driver.
Managing power settings to resolve Wi-Fi connectivity problems
To manage power settings and resolve Wi-Fi connectivity issues on Windows 10, follow these steps:
1. Open the Start Menu and type “Power & Sleep settings” in the search bar.
2. Click on “Power & Sleep settings” in the search results to open the Power & Sleep settings page.
3. Scroll down and click on “Additional power settings” to open the Power Options menu.
4. In the Power Options menu, click on “Change plan settings” next to your selected power plan.
5. Click on “Change advanced power settings” to open the advanced settings menu.
6. Look for the “Wireless Adapter Settings” option and expand it.
7. Expand “Power Saving Mode” and set it to “Maximum Performance” for both “On battery” and “Plugged in” options.
8. Click “OK” to save the changes.
9. Restart your computer and check if the Wi-Fi icon reappears and the connectivity problem is resolved.
This method can help address issues related to the Wi-Fi icon missing and Wi-Fi connectivity problems on devices like Microsoft Surface Pro and HP laptops running Windows 10.


