In this article, I will discuss the TrustedInstaller in Windows 10, including its permissions, file deletion abilities, and location.
Recently, Fortect has become increasingly popular as a reliable and efficient way to address a wide range of PC issues. It's particularly favored for its user-friendly approach to diagnosing and fixing problems that can hinder a computer's performance, from system errors and malware to registry issues.
- Download and Install: Download Fortect from its official website by clicking here, and install it on your PC.
- Run a Scan and Review Results: Launch Fortect, conduct a system scan to identify issues, and review the scan results which detail the problems affecting your PC's performance.
- Repair and Optimize: Use Fortect's repair feature to fix the identified issues. For comprehensive repair options, consider subscribing to a premium plan. After repairing, the tool also aids in optimizing your PC for improved performance.
Understanding the ‘TrustedInstaller’ Error
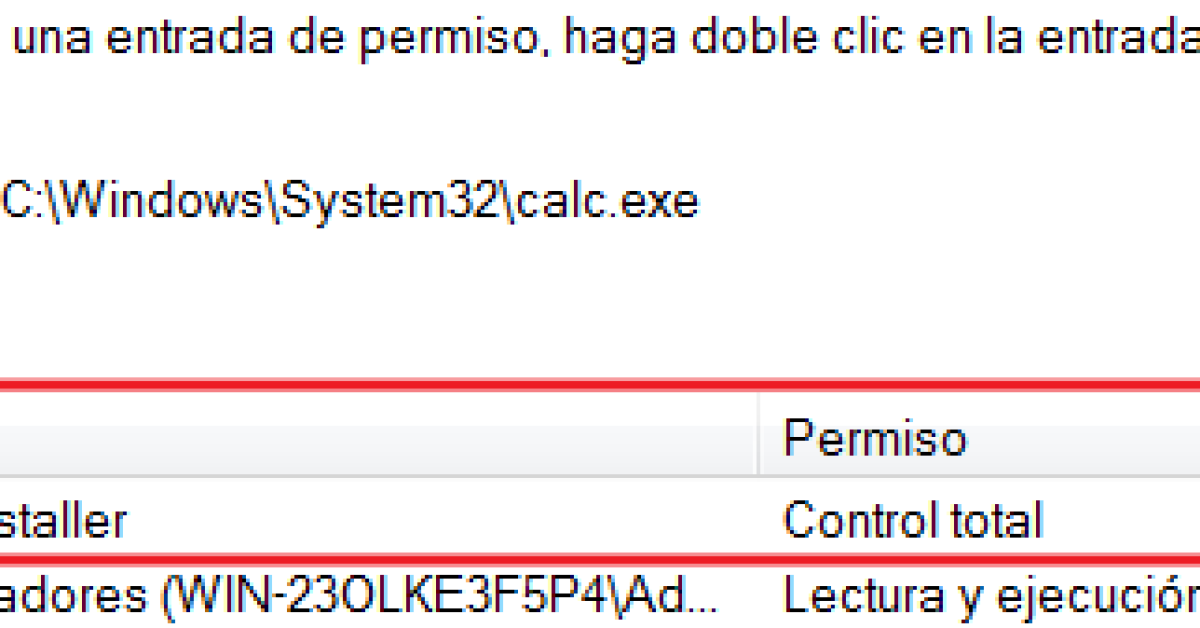
TrustedInstaller is a built-in Windows user account that has full control over system files and registry keys. When you encounter a ‘TrustedInstaller’ error, it usually means you don’t have the necessary permissions to perform a certain action on a file or folder.
To resolve this issue, you can take ownership of the file or folder in question. Right-click on the file, go to Properties, then the Security tab, and click on Advanced. From there, you can change the owner to your user account.
Once you have ownership, you can delete files or folders that were previously inaccessible. Just be cautious when modifying system files, as it can potentially harm your operating system.
Understanding the ‘TrustedInstaller’ error in Windows 10 can help you troubleshoot permission issues more effectively and take control of your system files when needed.
Fixing the Error Using Command Prompt and File Explorer
To fix the error using Command Prompt and File Explorer on Windows 10, you can take the following steps:
1. Open Command Prompt as an administrator by searching for it in the Start menu, right-clicking on it, and selecting “Run as administrator.”
2. Type the command “takeown /f C:\Path\to\file” in Command Prompt to take ownership of the file you are trying to delete.
3. Next, type “icacls C:\Path\to\file /grant administrators:F” to grant full control permissions to administrators.
4. Now, navigate to File Explorer and locate the file you want to delete. Right-click on it, select “Properties,” go to the “Security” tab, and click on “Advanced.”
5. In the Advanced Security Settings window, click on “Change” next to the owner’s name. Enter your username and click “Check Names” to validate it.
6. Check the box that says “Replace owner on subcontainers and objects” and click “Apply” to save the changes.
Getting Permission to Modify Protected Files
- Understand the importance of modifying protected files before attempting to do so
- Identify the specific file or directory you need to modify
- Locate the file or directory in your Windows 10 system
- Go to the file or directory’s Properties to view its current permissions
- Click on the Security tab within the Properties window
- Click on the Advanced button to access more detailed permission settings
- Click on the Change link next to the owner’s name to modify ownership permissions
- Grant yourself Full Control permissions over the file or directory
- Apply the changes and confirm any UAC prompts that appear
Checking and Repairing TrustedInstaller.exe Issues
If you suspect that TrustedInstaller.exe is the issue, you can repair it by running the System File Checker tool. This tool will scan your system for any corrupt files and replace them with the correct versions. To do this, open the Command Prompt as an administrator and type “sfc /scannow” to start the scan.
If the System File Checker tool does not resolve the issue, you may need to manually delete the TrustedInstaller.exe file and then reinstall it. This process should only be done if you are comfortable working with system files and have a backup of your data.
FAQ
What is TrustedInstaller in Windows?
TrustedInstaller in Windows is a built-in service account with the highest permissions that manages system files, installs and uninstalls applications, and performs critical system updates.
How to disable TrustedInstaller Windows 10?
To disable TrustedInstaller on Windows 10, you can use the Services panel. Simply open the Services panel, double-click on the Windows Modules Installer setting, choose the Disabled option from the Startup type drop-down list, and click OK.
Is it safe to remove TrustedInstaller?
It is not safe to remove TrustedInstaller as doing so can put your system at risk and cause it to not function properly.
How do I get permission from TrustedInstaller in Windows 10?
To get permission from TrustedInstaller in Windows 10, you can do so by opening File Explorer, right-clicking on the folder or file you want to take ownership of, selecting Properties, going to the Security tab, clicking on Advanced, and then selecting Change Permissions.


