Discover the ultimate solution to resolve memory management issues on your Windows device with this comprehensive guide. Upgrade your understanding and put an end to frustrating stop code errors once and for all.
Recently, Fortect has become increasingly popular as a reliable and efficient way to address a wide range of PC issues. It's particularly favored for its user-friendly approach to diagnosing and fixing problems that can hinder a computer's performance, from system errors and malware to registry issues.
- Download and Install: Download Fortect from its official website by clicking here, and install it on your PC.
- Run a Scan and Review Results: Launch Fortect, conduct a system scan to identify issues, and review the scan results which detail the problems affecting your PC's performance.
- Repair and Optimize: Use Fortect's repair feature to fix the identified issues. For comprehensive repair options, consider subscribing to a premium plan. After repairing, the tool also aids in optimizing your PC for improved performance.
Understanding Memory Management in Windows 10
1. Press the Windows key + R to open the Run dialog box.
2. Type “mdsched.exe” and press Enter.
3. Choose the option to restart the computer and check for problems.
4. Windows will run a memory diagnostic to identify any memory-related issues.
5. If errors are detected, it’s likely that there’s a problem with your RAM.
6. Try reseating or replacing the faulty RAM modules.
7. If the issue persists, consider running a system file check using the “sfc /scannow” command in the Command Prompt.
8. Additionally, ensure that your Windows 10 version is up to date and that all device drivers are properly installed.
Causes of the Stop Code Memory Management BSoD Error
1. Faulty RAM: If your computer’s RAM is defective or incompatible with your system, it can trigger the Stop Code Memory Management error.
2. Outdated or Corrupt Device Drivers: When your device drivers are outdated or corrupted, it can lead to memory management issues and result in the BSoD error.
3. Malware Infections: Malicious software can interfere with your system’s memory, causing the Memory Management stop code error.
4. System File Corruption: Corrupted system files can disrupt the memory management process and lead to the BSoD error.
5. Overclocking: Overclocking your PC’s components, such as the CPU or RAM, beyond their recommended limits can cause instability and trigger the Memory Management error.
6. Hardware Issues: Faulty hardware components, such as a damaged hard drive or malfunctioning motherboard, can also result in this error.
To fix the Stop Code Memory Management error:
1. Check and replace faulty RAM sticks.
2. Update or reinstall device drivers.
3. Run a malware scan and remove any infections.
4. Use the System File Checker tool to repair corrupted system files.
5. Avoid overclocking and reset your components to their default settings.
6. Test your hardware for any issues and replace faulty components if necessary.
Scan for Virus or Malware Infection
To ensure your PC is free from viruses or malware that may be causing the Memory Management stop code BSOD, it’s essential to perform a thorough scan. Follow these steps to scan for infections:
1. Open your preferred antivirus software or use Windows Defender.
2. Select the scan option to start a full system scan.
3. Wait for the scan to complete, as it may take some time depending on the size of your system memory.
4. If any viruses or malware are detected, follow the instructions provided by the antivirus software to remove them.
5. Restart your computer after the scan and removal process is complete.
By regularly scanning for viruses or malware, you can prevent these issues from occurring and ensure your system is running smoothly. It’s recommended to keep your antivirus software up to date for optimal protection.
python

import random
# Define a class to represent a memory block
class MemoryBlock:
def __init__(self, start_address, size):
self.start_address = start_address
self.size = size
self.is_allocated = False
def allocate(self):
self.is_allocated = True
def deallocate(self):
self.is_allocated = False
# Function to simulate memory allocation
def allocate_memory(memory, size):
for block in memory:
if not block.is_allocated and block.size >= size:
block.allocate()
return block.start_address
return None
# Function to simulate memory deallocation
def deallocate_memory(memory, address):
for block in memory:
if block.start_address == address:
block.deallocate()
return True
return False
# Main program
if __name__ == "__main__":
# Create a list of memory blocks
memory = []
for i in range(10):
memory.append(MemoryBlock(i * 100, random.randint(50, 200)))
# Allocate memory
allocated_address = allocate_memory(memory, 100)
if allocated_address:
print(f"Memory allocated at address {allocated_address}")
else:
print("Failed to allocate memory")
# Deallocate memory
if deallocate_memory(memory, allocated_address):
print("Memory deallocated")
else:
print("Failed to deallocate memory")
In this sample code, we define a `MemoryBlock` class to represent individual blocks of memory. The `allocate_memory` function is responsible for finding an available memory block of sufficient size and marking it as allocated. The `deallocate_memory` function frees the memory block associated with a given address. The main program demonstrates the usage of these functions by creating a list of memory blocks and allocating/deallocating memory.
Note that this is a simplified example for demonstration purposes, and real-world memory management systems can be much more complex depending on the programming language and environment being used.
Run Windows Memory Diagnostic Tool
To fix the “Stop Code Memory Management” issue on Windows, you can use the Windows Memory Diagnostic Tool. This tool helps identify any problems with your system memory that may be causing the blue screen errors.
To run the Windows Memory Diagnostic Tool:
1. Press the Windows key + R to open the Run dialog box.
2. Type “mdsched.exe” and press Enter.
3. Select the option to restart your computer and check for problems.
During the diagnostic process, your computer will restart and the tool will test your memory for any issues. Once the test is complete, your computer will start up normally.
By running the Windows Memory Diagnostic Tool, you can resolve memory-related problems that may be causing the “Stop Code Memory Management” error. This tool is available on various Windows versions, including Windows 11, Windows Server, and even on virtual machines like VMware Workstation.
Fix the memory management issue and prevent further blue screen occurrences by using this simple and effective diagnostic tool.
Update Drivers
To update drivers and fix the Stop Code Memory Management issue on Windows, follow these steps:
1. Press the Windows key + X and select Device Manager.
2. Expand the categories and look for any devices with a yellow exclamation mark.
3. Right-click on the device and select Update driver.
4. Choose “Search automatically for updated driver software” and let Windows find the latest driver for you.
5. If Windows doesn’t find an update, visit the manufacturer’s website and download the latest driver manually.
6. Install the driver by following the on-screen instructions.
7. Restart your computer for the changes to take effect.
Updating drivers can help resolve MEMORY_MANAGEMENT errors and prevent system crashes. It’s important to keep your drivers up to date to ensure optimal performance and stability.
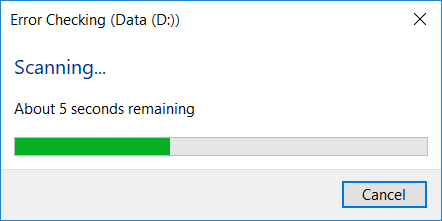
Check for Disk Errors and Repair
| Check for Disk Errors and Repair | |
|---|---|
| Issue | Stop Code Memory Management Fix for Windows |
| Description | One of the potential causes for the “Stop Code Memory Management” error in Windows is disk errors. Checking for disk errors and repairing them can help resolve the issue. |
| Steps to Check and Repair Disk Errors |
|
| Note | Depending on the size of the drive and the number of errors found, the scanning and repair process may take some time. It is recommended to save your work and close all open applications before initiating the scan. |
Clear Temporary Files and Folders
To clear temporary files and folders for a stop code memory management fix on Windows, follow these steps:
1. Press the Windows key + R to open the Run dialog box.
2. Type “temp” (without quotes) and press Enter. This will open the temporary files folder.
3. Press Ctrl + A to select all files and folders in the folder.
4. Press Shift + Delete to permanently delete the selected files and folders.
5. If prompted, click “Yes” to confirm the deletion.
6. Repeat steps 2-5, but this time type “%temp%” (without quotes) in the Run dialog box. This will open another temporary files folder.
7. Restart your computer.
Clearing temporary files and folders can help resolve memory management-related BSOD errors. By removing unnecessary files, you can free up space in your computer’s memory, potentially improving performance and stability.
Note: These instructions apply to all versions of Windows, including Windows 11, Windows Server, and VMWare Workstation.
Check Newly Installed Applications
To check newly installed applications on Windows and resolve the Stop Code Memory Management issue, follow these steps:
1. Press the Windows key + R to open the Run dialog box.
2. Type “appwiz.cpl” and press Enter to open the Programs and Features window.
3. Here, you will find a list of all installed applications on your computer.
4. Look for any recently installed applications that may be causing the issue.
5. Right-click on the application and select “Uninstall” to remove it from your system.
6. Restart your computer to apply the changes.
7. If the issue persists, try updating your device drivers by visiting the manufacturer’s website or using Windows Update.
8. Additionally, make sure your computer’s memory is properly seated and functioning correctly.
9. If you continue to experience the MEMORY_MANAGEMENT BSOD errors, consider running a memory diagnostic test.
Install Pending Windows Updates
To fix the Stop Code Memory Management issue in Windows, it is important to ensure that all pending Windows updates are installed. Here’s how to do it:
1. Press the Windows key and type “Windows Update” in the search bar.
2. Select “Windows Update settings” from the search results.
3. In the Windows Update settings window, click on “Check for updates” to scan for any pending updates.
4. If there are any updates available, click on “Install now” to start the installation process.
5. Follow the on-screen instructions to complete the installation of the updates.
6. Once the updates are installed, restart your computer to apply the changes.
By installing pending Windows updates, you can address potential software conflicts and ensure that your system is up to date with the latest bug fixes and security patches. This can help resolve the Stop Code Memory Management issue and prevent further occurrences of the Blue Screen of Death (BSOD).
Reset Windows 10
To reset Windows 10 and fix the Stop Code Memory Management issue, follow these steps:
1. Restart your computer: Press the Windows key, select Power, and choose Restart. This can resolve temporary memory issues.
2. Check for Windows updates: Press the Windows key, select Settings, go to Update & Security, and click Check for updates. Install any available updates.
3. Run the Windows Memory Diagnostic tool: Press the Windows key, type “Windows Memory Diagnostic,” and select the tool. Follow the on-screen instructions to scan and fix any memory-related problems.
4. Update your device drivers: Press the Windows key, type “Device Manager,” and select the tool. Expand the categories, right-click on a device, and choose Update driver.
5. Perform a system restore: Press the Windows key, type “System Restore,” and select the tool. Follow the prompts to restore your computer to a previous point in time.
Remember to save your work before proceeding with any of these steps. These instructions should help resolve the Stop Code Memory Management issue and prevent further occurrences of the Blue Screen of Death (BSOD).


