
Having trouble with the Print Spooler Service on your Windows 10? Look no further. In this article, we will guide you through troubleshooting and fixing the issue efficiently.
Recently, Fortect has become increasingly popular as a reliable and efficient way to address a wide range of PC issues. It's particularly favored for its user-friendly approach to diagnosing and fixing problems that can hinder a computer's performance, from system errors and malware to registry issues.
- Download and Install: Download Fortect from its official website by clicking here, and install it on your PC.
- Run a Scan and Review Results: Launch Fortect, conduct a system scan to identify issues, and review the scan results which detail the problems affecting your PC's performance.
- Repair and Optimize: Use Fortect's repair feature to fix the identified issues. For comprehensive repair options, consider subscribing to a premium plan. After repairing, the tool also aids in optimizing your PC for improved performance.
Understanding the Print Spooler in Windows 10
The Print Spooler in Windows 10 is responsible for managing print jobs and sending them to the printer. If you encounter the issue of the Print Spooler service not running, there are a few troubleshooting steps you can take to fix it.
First, open File Explorer and navigate to the following directory: %SystemRoot%\System32\spool\PRINTERS. This is the folder where print jobs are stored. Delete all the files in this folder to clear any stuck print jobs.
Next, check if the printer driver is installed correctly. Go to the Start menu and search for “Device Manager.” Open Device Manager and expand the “Print queues” category. If you see any exclamation marks or question marks next to the printer, it indicates a driver issue. Right-click on the printer and select “Update driver” to install the latest driver.
If the issue persists, you can try restarting the Print Spooler service. Open the Start menu, search for “Services,” and open the Services app. Scroll down to find the “Print Spooler” service, right-click on it, and select “Restart.”
If none of these steps work, you can try resetting the Print Spooler service using the Windows Registry. Open the Start menu, search for “Registry Editor,” and open it. Navigate to the following path: HKEY_LOCAL_MACHINE\SYSTEM\CurrentControlSet\Services\Spooler. Right-click on “Spooler” and select “Export” to create a backup. Then, delete all the keys and values under the “Spooler” folder.
Lastly, if the issue still persists, you can try using the Windows Troubleshooter to automatically fix any problems. Open the Start menu, search for “Troubleshoot settings,” and open it. Scroll down to find the “Printer” troubleshooter and run it to diagnose and fix any issues with the Print Spooler.
Troubleshooting Steps for Print Spooler Issues
- Open the Services window by pressing Win+R and typing services.msc into the Run dialog box, then hit Enter.
- Scroll down and locate the Print Spooler service.
- Right-click on the Print Spooler service and select Restart.
- If the service is not running, right-click on it and select Start.
- Close the Services window and try printing again.
Method 2: Clear Print Spooler Files
- Open File Explorer by pressing Win+E.
- Navigate to the following folder: C:\Windows\System32\spool\PRINTERS.
- Delete all the files in the PRINTERS folder.
- Open the Services window by following the steps in Method 1.
- Restart the Print Spooler service.
- Try printing again.
Method 3: Use the Printer Troubleshooter
- Open the Settings app by pressing Win+I.
- Click on Update & Security.
- Select Troubleshoot from the left-hand menu.
- Click on Additional troubleshooters.
- Scroll down and click on Printer.
- Click on Run the troubleshooter and follow the on-screen instructions.
Running Printer Troubleshooter
To troubleshoot and fix the “Print Spooler Service Not Running” issue on Windows 10, you can try running the built-in Printer Troubleshooter. This tool can help identify and resolve common printer-related problems.
Here’s how to run the Printer Troubleshooter:
1. Press the Windows key + R to open the Run dialog box.
2. Type “control” and press Enter to open the Control Panel.
3. In the Control Panel, select “Troubleshooting” (you can use the search bar to find it quickly).
4. Under the “Hardware and Sound” section, click on “Use a printer”.
5. The Printer Troubleshooter will now open. Click on “Advanced” and make sure the option “Apply repairs automatically” is checked.
6. Click on “Next” to start the troubleshooting process.
7. The troubleshooter will scan your system for any printer-related issues and attempt to fix them automatically.
8. Follow the on-screen instructions, if any, to complete the troubleshooting process.
If the Printer Troubleshooter does not resolve the issue, you may need to try other troubleshooting steps or seek further assistance. Remember to check for updated printer drivers, ensure that the Print Spooler service is running, and check for any software conflicts that may be causing the issue.
Keep in mind that these steps are specific to the Windows 10 operating system and may not be applicable to other versions of Windows.
Remember to save any unsaved work and close any open applications before running the troubleshooter.
If you encounter any error messages or have specific printer-related software installed (such as Adobe Acrobat, Google Chrome, QuickBooks, etc.), you may need to consult their respective support documentation for troubleshooting steps.
It’s always a good idea to keep your operating system and printer drivers up to date to minimize the chances of encountering issues. Regularly check for updates from the manufacturer’s website or use Windows Update to ensure you have the latest software patches and bug fixes.
If all else fails, consider seeking professional assistance or contacting the printer manufacturer’s support for further guidance.
Checking Print Spooler Configuration
To check the print spooler configuration on Windows 10, follow these steps:
1. Press the Windows key + R to open the Run dialog box.
2. Type “services.msc” and press Enter to open the Services window.
3. Scroll down and locate the “Print Spooler” service.
4. Right-click on the “Print Spooler” service and select “Properties” from the context menu.
5. In the Properties window, make sure the “Startup type” is set to “Automatic”.
6. If the service is not running, click on the “Start” button to start it.
7. Click “Apply” and then “OK” to save the changes.
By checking the print spooler configuration, you can ensure that the service is set to start automatically and is running properly. This can help resolve issues with the print spooler service not running on Windows 10.
Deleting Print Spooler Files and Cache
To troubleshoot and fix the issue of Print Spooler Service not running on Windows 10, you may need to delete print spooler files and cache. Here’s how you can do it:
1. Open the Run dialog box by pressing the Windows key + R.
2. Type %windir%\System32\spool\PRINTERS and press Enter. This will open the print spooler folder.
3. Delete all the files in the PRINTERS folder. These files are temporary print job data that may be causing the issue.
4. After deleting the files, open the Run dialog box again.
5. Type services.msc and press Enter. This will open the Services window.
6. Scroll down and locate the Print Spooler service.
7. Right-click on the Print Spooler service and select Restart. This will restart the print spooler service.
8. Close the Services window and try printing again.
Deleting the print spooler files and cache can help resolve issues with the Print Spooler Service not running on Windows 10.
Reinstalling and Updating Printer Drivers
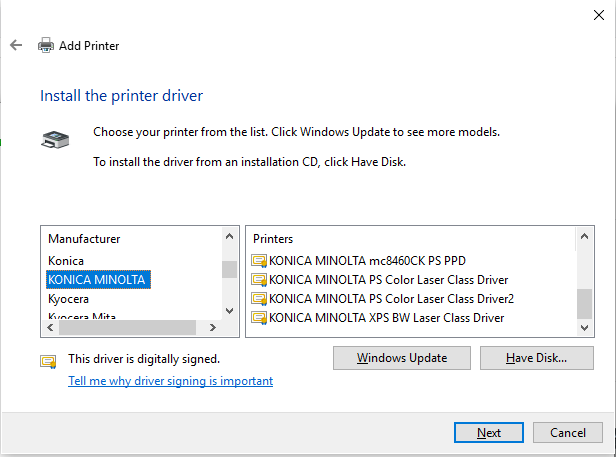
To reinstall and update printer drivers on Windows 10, follow these steps:
1. Press the Windows key and type “Device Manager” to open the Device Manager.
2. In the Device Manager window, expand the “Printers” category.
3. Right-click on your printer and select “Uninstall device” from the context menu. Confirm the uninstallation if prompted.
4. Once the printer is uninstalled, disconnect it from your computer.
5. To update the printer driver, go to the manufacturer’s website and download the latest driver for your printer model. Make sure to choose the driver that is compatible with Windows 10.
6. After downloading the driver, double-click on the downloaded file to run the installer.
7. Follow the on-screen instructions to install the updated driver. Make sure to connect your printer to your computer when prompted.
8. Once the driver installation is complete, restart your computer.
9. After the restart, your printer should be recognized by Windows 10 with the updated driver.
Resolving Access Issues and Error Messages
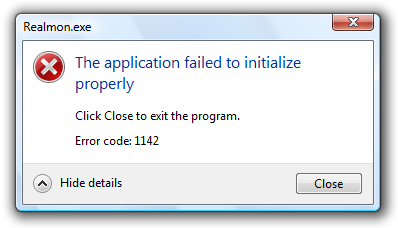
If you’re experiencing access issues or error messages while trying to print on Windows 10, there are a few troubleshooting steps you can take to resolve the problem.
First, make sure the Print Spooler service is running. To do this:
1. Press the Windows key + R to open the Run dialog box.
2. Type “services.msc” and press Enter to open the Services window.
3. Scroll down and locate the “Print Spooler” service.
4. Right-click on it and select “Properties”.
5. In the General tab, make sure the “Startup type” is set to “Automatic”.
6. If the service is stopped, click the “Start” button to start it.
If the Print Spooler service is already running, but you’re still encountering errors, you may need to clear the print queue. Here’s how:
1. Press the Windows key + R to open the Run dialog box.
2. Type “services.msc” and press Enter to open the Services window.
3. Scroll down and locate the “Print Spooler” service.
4. Right-click on it and select “Stop”.
5. Open File Explorer and navigate to the following directory: %systemroot%\System32\spool\PRINTERS.
6. Delete all the files in this folder.
7. Go back to the Services window, right-click on the “Print Spooler” service, and select “Start” to restart it.
If you’re still experiencing issues, you may need to reset the Print Spooler service. Here’s how:
1. Press the Windows key + R to open the Run dialog box.
2. Type “services.msc” and press Enter to open the Services window.
3. Scroll down and locate the “Print Spooler” service.
4. Right-click on it and select “Properties”.
5. In the General tab, click the “Stop” button to stop the service.
6. Open File Explorer and navigate to the following directory: %systemroot%\System32\spool\PRINTERS.
7. Delete all the files in this folder.
8. Go back to the Services window, right-click on the “Print Spooler” service, and select “Start” to restart it.
If none of these steps resolve the issue, you may need to check for any software conflicts or malware on your computer. Additionally, updating your printer drivers and checking for any available Windows updates may also help.


