Unveiling the Troubleshooting Secrets for Google Chrome’s Unresponsive Behavior on Windows 10
Recently, Fortect has become increasingly popular as a reliable and efficient way to address a wide range of PC issues. It's particularly favored for its user-friendly approach to diagnosing and fixing problems that can hinder a computer's performance, from system errors and malware to registry issues.
- Download and Install: Download Fortect from its official website by clicking here, and install it on your PC.
- Run a Scan and Review Results: Launch Fortect, conduct a system scan to identify issues, and review the scan results which detail the problems affecting your PC's performance.
- Repair and Optimize: Use Fortect's repair feature to fix the identified issues. For comprehensive repair options, consider subscribing to a premium plan. After repairing, the tool also aids in optimizing your PC for improved performance.
Fix Chrome Not Opening
If Google Chrome is not opening or responding on your Windows 10 computer, try these solutions:
1. Clear browsing data: Open Chrome, click on the three dots menu in the top-right corner, go to “More tools,” and select “Clear browsing data.” Select “All time” and check “Cookies and other site data” and “Cached images and files.” Click “Clear data” to proceed.
2. Update Chrome: Click on the three dots menu, go to “Help,” and select “About Google Chrome.” Chrome will check for updates and install them if available.
3. Reset Chrome settings: Type “chrome://settings/reset” in the address bar and press Enter. Click “Reset settings” to revert Chrome to its default settings.
4. Disable Proxy Settings: Press Win + X, select “Settings,” and go to “Network & Internet.” In the left panel, click “Proxy.” Disable any proxy settings if enabled.
5. Check for malware: Run a full scan with Windows Defender Firewall or any reliable antivirus software.
Try these solutions one by one to fix the issue with Chrome not opening or responding on your Windows 10 PC.
Restart Date & Time
1. Check your system clock: Make sure the date and time on your Windows 10 PC are accurate. Incorrect settings can sometimes cause issues with Google Chrome.
2. Restart your PC: Sometimes, a simple restart can resolve the problem. Close all applications and click on the Start menu, then select “Restart” to reboot your computer.
3. Clear cache and cookies: Open Google Chrome and press “Ctrl+Shift+Delete” to open the Clear Browsing Data panel. Select “Cached images and files” and “Cookies and other site data,” then click on “Clear data.”
4. Disable Proxy Settings: Press “Win+R” to open the Run dialog box, then type “inetcpl.cpl” and press Enter. In the Internet Properties panel, go to the Connections tab and click on “LAN settings.” Uncheck the box that says “Use a proxy server for your LAN,” then click “OK” to save the changes.
5. Reset Chrome settings: Open Chrome, click on the three-dot menu in the top-right corner, and select “Settings.” Scroll down and click on “Advanced,” then scroll down again and click on “Restore settings to their original defaults.” Confirm the action by clicking on “Reset settings.”
6. Reinstall Chrome: If the issue persists, try uninstalling and reinstalling Google Chrome. Press “Win+X” and select “Apps and Features.” Locate Google Chrome in the list, click on it, and select “Uninstall.” Afterward, download and install the latest version from the official Google Chrome website. Remember to restart your PC after the installation.
Reinstall App
If Google Chrome is not opening or responding on your Windows 10 computer, a simple solution is to reinstall the app. Reinstalling the Chrome browser can help resolve various issues and ensure a smooth browsing experience.
To reinstall Chrome:
1. Press the Windows key + R to open the Run dialog box.
2. Type “appwiz.cpl” and press Enter to open the Programs and Features window.
3. Locate Google Chrome in the list of installed programs.
4. Right-click on Google Chrome and select Uninstall.
5. Follow the on-screen instructions to uninstall Chrome completely.
6. Once uninstalled, visit the official Chrome website and download the latest version of the browser.
7. Install Chrome using the downloaded setup file and follow the installation prompts.
Reinstalling Chrome can fix any issues related to app crashes, unresponsiveness, or other problems you may be experiencing. Remember to also check your internet connection and ensure that Windows Defender Firewall, if enabled, is not blocking the browser.
python

import os
def check_chrome_compatibility():
# Check if Google Chrome is installed
chrome_path = "C:\\Program Files\\Google\\Chrome\\Application\\chrome.exe"
if not os.path.exists(chrome_path):
print("Google Chrome is not installed.")
return
# Check Chrome version
version_info = os.popen(f'"{chrome_path}" --version').read()
version_number = version_info.split()[1]
print(f"Google Chrome version: {version_number}")
# Check Windows 10 compatibility
if "Windows 10" not in version_info:
print("This version of Google Chrome may not be fully compatible with Windows 10.")
print("Consider updating to the latest version or checking for updates.")
# Check for common issues
print("Checking for common Chrome issues...")
# Add your own checks here, such as checking for conflicting extensions, outdated drivers, etc.
print("Tool completed.")
check_chrome_compatibility()
This script checks if Google Chrome is installed, retrieves its version, and then verifies if it mentions Windows 10 compatibility. It also provides a placeholder for additional checks that can be implemented to identify common issues. However, please note that this tool does not fix the underlying compatibility problem but rather assists in identifying and troubleshooting it.
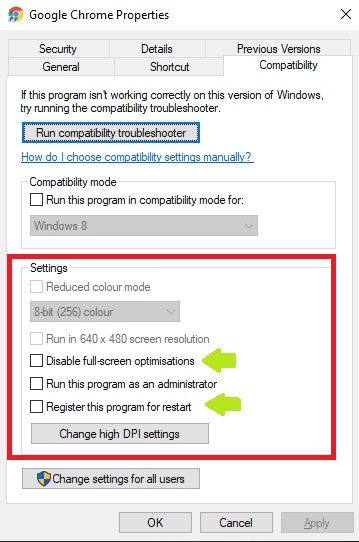
Compatibility Settings
If you’re experiencing issues with Google Chrome not opening or responding on your Windows 10 computer, you can try adjusting the compatibility settings to resolve the problem.
Step 1: Right-click on the Google Chrome shortcut and select “Properties” from the context menu.
Step 2: In the Properties window, go to the “Compatibility” tab.
Step 3: Check the box that says “Run this program in compatibility mode for” and select the appropriate operating system from the drop-down menu. If you’re unsure, choose “Windows 8” as it works for most users.
Step 4: Click on “Apply” and then “OK” to save the changes.
By adjusting the compatibility settings, you can help resolve compatibility issues between Google Chrome and Windows 10, allowing the browser to open and respond properly.
Note: Keep in mind that these instructions are specific to Windows 10 and may vary slightly for other operating systems.
By following these steps, you should be able to fix the issue of Google Chrome not opening or responding on your Windows 10 computer.
Network Commands
If Google Chrome is not opening or responding on Windows 10, there are a few network commands you can try to fix the issue. These commands can help reset your network settings and resolve any connectivity problems.
Step 1: Open the Command Prompt by pressing the Windows key + R and typing “cmd” in the Run dialog box. Press Enter.
Step 2: In the Command Prompt window, type “ipconfig /release” followed by Enter. This will release your IP address.
Step 3: Next, type “ipconfig /renew” and press Enter. This will renew your IP address.
Step 4: Finally, type “ipconfig /flushdns” followed by Enter. This will clear the DNS cache.
After completing these steps, try opening Google Chrome again. If the issue persists, you may need to explore other solutions or contact the support team for further assistance.
Clear Browsing History, Cache, and Cookies from Google
- Open Google Chrome.
- If you are unable to open Google Chrome, try right-clicking on the Google Chrome shortcut and selecting “Run as administrator.”
- Click on the three-dot menu icon located in the top-right corner of the browser window.
- Select “Settings” from the drop-down menu.
- Scroll down and click on “Advanced” to expand the advanced settings.
- Under the “Privacy and security” section, click on “Clear browsing data.”
- In the pop-up window, make sure the “Basic” tab is selected.
- Choose the time range for which you want to clear the browsing data.
- Check the boxes next to “Browsing history,” “Cookies and other site data,” and “Cached images and files.”
- Click on the “Clear data” button to start the clearing process.
- Wait for the process to complete.
- Restart Google Chrome.
Allow Google Chrome through Windows Defender Firewall
To allow Google Chrome through Windows Defender Firewall on Windows 10, follow these steps:
Step 1: Open Windows Defender Firewall settings by searching for it in the search bar.
Step 2: Click on “Allow an app or feature through Windows Defender Firewall” on the left-hand side.
Step 3: Click on the “Change settings” button, then scroll down and find “Google Chrome” in the list of apps.
Step 4: Make sure both “Private” and “Public” are checked for Google Chrome.
Step 5: Click “OK” to save the changes.
By following these steps, you can ensure that Google Chrome is allowed through the Windows Defender Firewall, which may resolve issues with the browser not opening or responding. Remember to restart your computer after making these changes.
If you continue to experience problems, you may want to consider other solutions such as clearing browsing history, disabling proxy settings, or checking for any conflicting software.
Restore Settings to Their Original Defaults
To restore Google Chrome settings to their original defaults on Windows 10, follow these steps:
1. Close Chrome and ensure it is not running in the background.
2. Press the Windows key + R to open the Run dialog box.
3. Type ” %LOCALAPPDATA%\Google\Chrome\User Data\ ” and press Enter.
4. Locate the “Default” folder and rename it to “Backup Default.”
5. Open Chrome again, and a new “Default” folder will be created automatically with the default settings.
Note: This method will reset Chrome completely, including your bookmarks, history, and saved passwords. Make sure to back up any important data before proceeding.
If the issue persists, you can try other methods such as clearing the browsing history, disabling proxy settings, or checking for DNS cache errors. Remember to restart Chrome after making any changes.
By following these steps, you should be able to fix any issues with Google Chrome not opening or responding on Windows 10.


