As I stared at the screen, frustration seeped in when I encountered the dreaded “Failed to Load” message. The digital world, with all its advancements, still had its moments of defeat.
Recently, Fortect has become increasingly popular as a reliable and efficient way to address a wide range of PC issues. It's particularly favored for its user-friendly approach to diagnosing and fixing problems that can hinder a computer's performance, from system errors and malware to registry issues.
- Download and Install: Download Fortect from its official website by clicking here, and install it on your PC.
- Run a Scan and Review Results: Launch Fortect, conduct a system scan to identify issues, and review the scan results which detail the problems affecting your PC's performance.
- Repair and Optimize: Use Fortect's repair feature to fix the identified issues. For comprehensive repair options, consider subscribing to a premium plan. After repairing, the tool also aids in optimizing your PC for improved performance.
Understanding the User Profile Cannot Be Loaded Error
If you encounter the “User Profile Cannot Be Loaded” error on your Windows computer, there are a few steps you can take to resolve it.
First, try restarting your computer and logging in again. Sometimes, a simple reboot can fix the issue. If that doesn’t work, check if the user profile is corrupted. You can do this by creating a new user account and logging in with that. If the new account works fine, then the original user profile is likely corrupt.
To fix a corrupted user profile, you can try using System Restore to revert your computer to a previous state when the profile was working. Alternatively, you can manually fix the issue by editing the Windows Registry. However, be cautious when editing the Registry as any mistakes can cause serious problems.
If you’re comfortable with PowerShell, you can also use it to fix the user profile error. There are various PowerShell scripts available online that can help you troubleshoot and fix the issue.
Remember to always back up your important files before attempting any fixes, as there is a small chance of data loss. If all else fails, it may be necessary to contact technical support for further assistance.
Permissions and Files Related to User Profiles
| Permission | Description |
|---|---|
| User_Read | Allows reading user profiles |
| User_Write | Allows modifying user profiles |
| User_Delete | Allows deleting user profiles |
| User_Create | Allows creating new user profiles |
Fixing Corrupted User Profiles
If you’re encountering issues with loading user profiles on your Windows system, here are some steps you can follow to fix the problem:
1. Restart your computer: Sometimes a simple restart can resolve minor issues with user profiles. Give it a try and see if the problem persists.
2. Use System Restore: If the issue started recently, you can use the System Restore feature to revert your computer back to a previous state when the user profile was working fine. Open the System Restore tool and follow the on-screen instructions to restore your system.
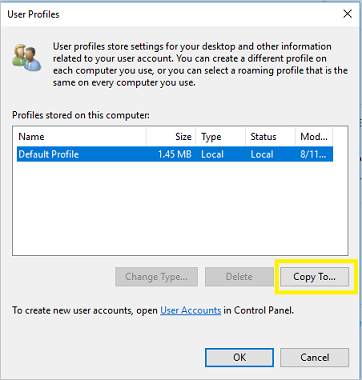
3. Create a new user profile: If the problem is specific to a particular user profile, you can create a new one and transfer the files from the old profile to the new one. To do this, go to the Control Panel, select “User Accounts,” and click on “Manage another account.”
4. Check for disk errors: Use the built-in Windows tool called “Check Disk” to scan and fix any errors on your hard drive. Open a Command Prompt window with administrative privileges and run the command “chkdsk /f” to start the process.
5. Use Event Viewer: If you’re still experiencing issues, you can check the Event Viewer for any error messages related to user profiles. Open the Event Viewer by typing “Event Viewer” in the search bar and select the appropriate result. Look for any errors or warnings under the “Windows Logs” section.
python

import os

import shutil
def fix_user_profile(username):
# Check if the user profile folder exists
profile_path = f'C:\\Users\\{username}'
if not os.path.exists(profile_path):
print(f"User profile folder for '{username}' does not exist.")
return
# Backup the existing user profile folder
backup_path = f'C:\\Backup\\{username}'
shutil.copytree(profile_path, backup_path)
print(f"User profile folder backed up to '{backup_path}'.")
# Delete the problematic user profile folder
shutil.rmtree(profile_path)
print(f"User profile folder '{profile_path}' deleted.")
# Create a new user profile folder
os.mkdir(profile_path)
print(f"New user profile folder created at '{profile_path}'.")
# Set appropriate permissions for the user profile folder
# You may need to adjust this based on your specific requirements
os.system(f'icacls {profile_path} /grant {username}:(OI)(CI)F /T')
print("User profile folder permissions set.")
# Restart the computer to apply changes (optional)
os.system('shutdown /r /t 0')
print("System will restart to apply changes.")
# Usage example
fix_user_profile("JohnDoe")
Resolving Blocked Access to Websites
If you are experiencing blocked access to websites, there are a few troubleshooting steps you can take to resolve the issue.
Firstly, check your internet connection to ensure it is stable and working properly. If you are connected to a Wi-Fi network, try switching to a different network or connecting directly to your modem with an Ethernet cable.
If your internet connection is fine, it’s possible that the website you are trying to access is blocked by your network administrator or by your firewall settings. To check if this is the case, try accessing the website from a different device or network.
If the website is still blocked, you can try clearing your browser cache and cookies. This can be done by going to your browser settings and selecting the option to clear browsing data.
If none of these steps work, there may be an issue with your DNS settings. You can try flushing your DNS cache by opening the command prompt and typing the command “ipconfig /flushdns“.
If you are still unable to access the website, it may be helpful to contact your network administrator or internet service provider for further assistance.
Troubleshooting User Profile Service Login Failures
If you are encountering login failures with User Profile Service, there are several steps you can take to troubleshoot the issue.
First, ensure that your Windows operating system is up to date with the latest Windows Update. Outdated software can often cause login problems.
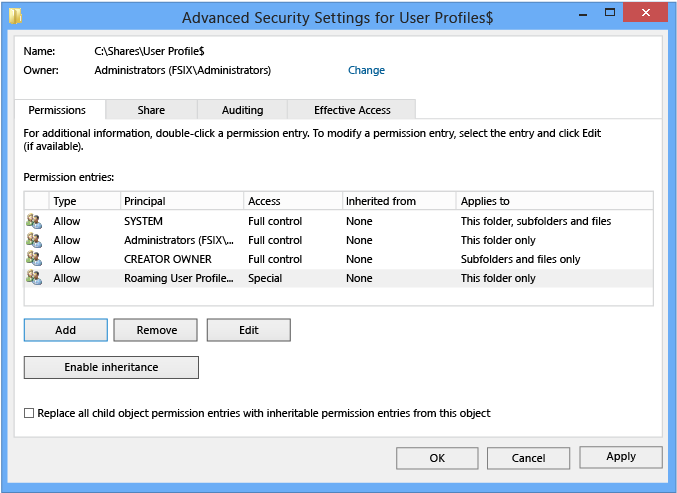
Next, check the file-system permissions for the user profile folder. To do this, navigate to the folder in question, right-click on it, and select “Properties.” Under the “Security” tab, ensure that the appropriate users have the necessary permissions to access the folder.
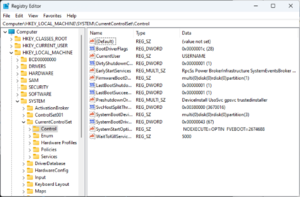
If the issue persists, it may be worth checking the Windows Registry for any inconsistencies. Corrupted registry entries can interfere with the User Profile Service. To access the Registry Editor, press “Windows Key + R” to open the Run dialog, then type “regedit” and press Enter.
Within the Registry Editor, navigate to “HKEY_LOCAL_MACHINE\SOFTWARE\Microsoft\Windows NT\CurrentVersion\ProfileList” and delete any profiles that are no longer in use. Make sure to back up the registry before making any changes.
If none of these steps resolve the issue, consider creating a new user profile. This can be done by navigating to the “Control Panel” and selecting “User Accounts.” From there, select “Manage another account” and follow the on-screen instructions to create a new user profile.
If you continue to experience login failures, it may be necessary to seek further assistance from a technical support professional or consult the Microsoft support website for additional troubleshooting steps.
Repairing User Profiles Using Command Prompt
- Boot your computer in Safe Mode by pressing the F8 key during start-up.
- Press the F8 key repeatedly until the Advanced Boot Options menu appears.
- Use the arrow keys to select Safe Mode and press Enter.
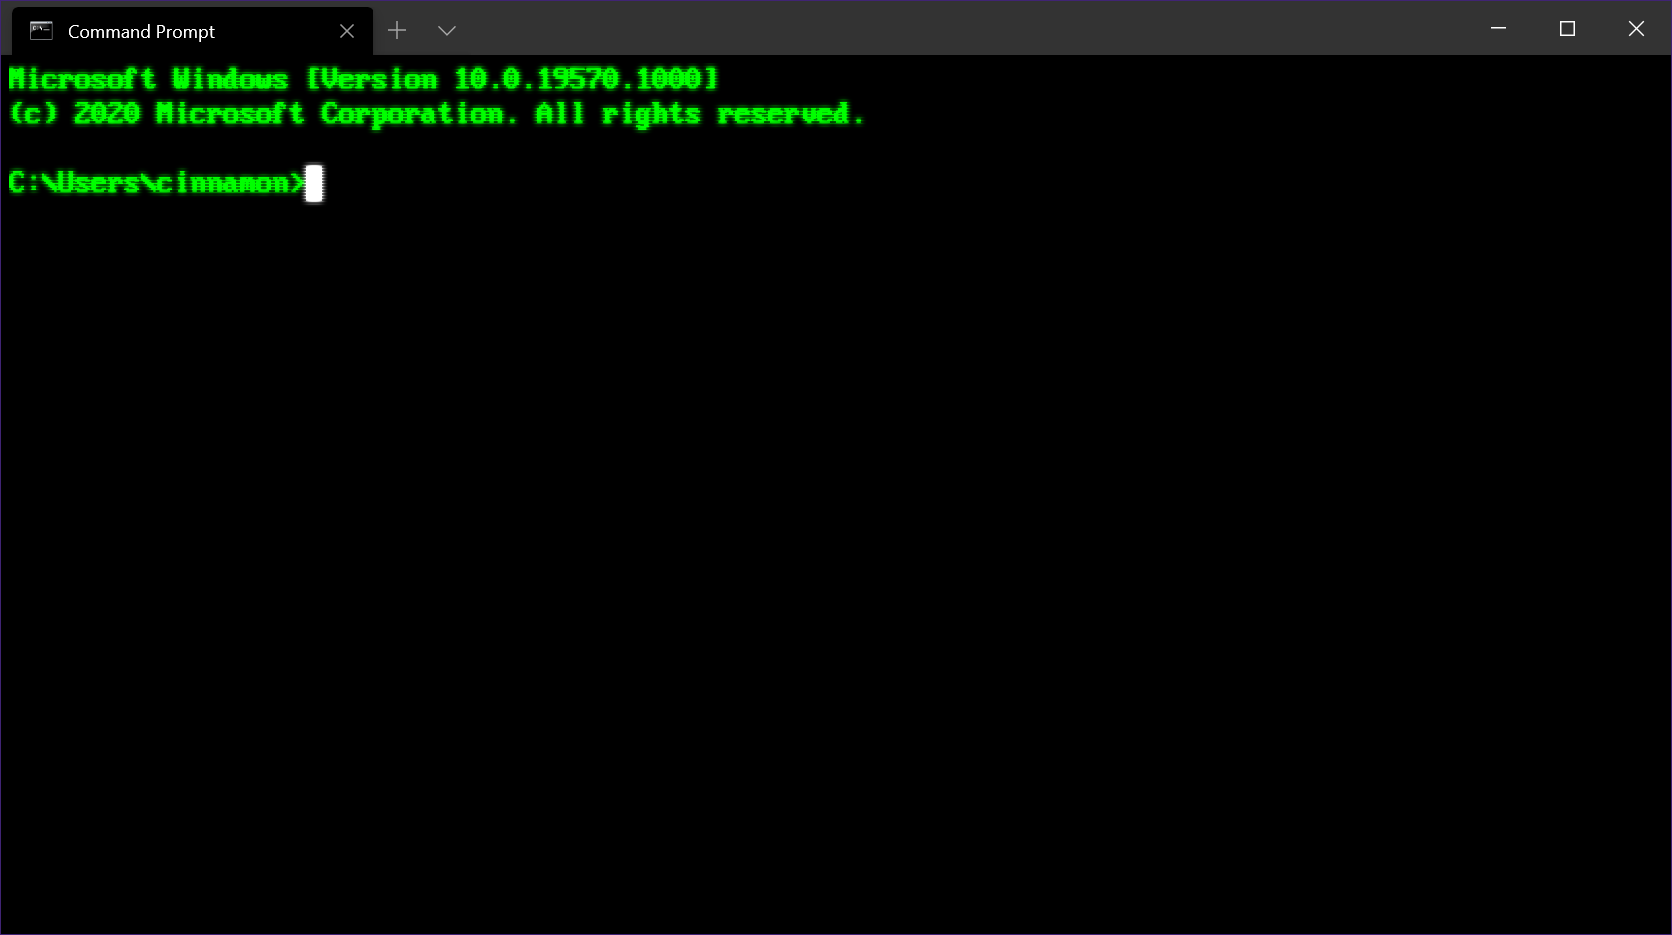
- Once in Safe Mode, open the Command Prompt by pressing the Windows key + R to open the Run dialog box, then type “cmd” and press Enter.
- In the Command Prompt window, type “net user” and press Enter to see a list of user accounts on your computer.
- Identify the corrupted user profile from the list.
- Type “net user [username] /delete” and press Enter to delete the corrupted user profile.
- To create a new user profile, type “net user [new username] [new password] /add” and press Enter.
- Next, add the newly created user profile to the Administrators group by typing “net localgroup administrators [new username] /add” and pressing Enter.
- Restart your computer and log in with the newly created user profile.
Fixing User Profile Service Failures via Registry Editor
If you’re experiencing issues with the User Profile Service on your Windows computer, you may be able to fix it using the Registry Editor. Before proceeding, it’s important to note that modifying the registry can have serious consequences if done incorrectly. It’s recommended to create a backup of your registry and proceed with caution.
To fix User Profile Service failures via the Registry Editor, follow these steps:
1. Press the Windows key + R to open the Run dialog box.
2. Type “regedit” and press Enter to open the Registry Editor.
3. Navigate to the following location: HKEY_LOCAL_MACHINE\SOFTWARE\Microsoft\Windows NT\CurrentVersion\ProfileList.
4. Look for a subkey that starts with “S-1-5” followed by a long number. Each subkey represents a user profile on your computer.
5. Click on each subkey and look for the “ProfileImagePath” value on the right pane. This will show you the corresponding user account.
6. If you find a subkey that corresponds to the user profile that is failing, right-click on it and select “Delete”. Confirm the deletion.
7. Close the Registry Editor and restart your computer.
After restarting, Windows should create a new user profile for the affected user. Make sure to transfer any important files and settings from the old profile to the new one.
Resetting Windows PC to Resolve User Profile Service Errors
If you are encountering user profile service errors in Windows, resetting your PC can help resolve the issue. Follow these steps to perform a reset:
1. Press the Windows key and go to “Settings” in the Start menu.
2. Select “Update & Security” and then click on “Recovery” in the left-hand menu.
3. Under “Reset this PC,” click on the “Get started” button.
4. You will be presented with two options: “Keep my files” or “Remove everything.” Choose the option that suits your needs.
5. Follow the on-screen instructions to complete the reset process.
Note: Performing a reset will remove all your installed applications and personal files, so make sure to back up any important data before proceeding.
After the reset, your Windows PC will be restored to its original state. This should resolve any user profile service errors you were experiencing. If the issue persists, it may be necessary to seek further assistance or explore other troubleshooting options.
Transferring NTUSER.DAT File to Default Username Folder
To transfer the NTUSER.DAT file to the default username folder, follow these steps:
1. Open File Explorer and navigate to the location of the NTUSER.DAT file. This file is typically located in the user’s profile folder, which is usually “C:\Users\username”.
2. Locate the default username folder where you want to transfer the NTUSER.DAT file. This folder is typically located in the same profile folder as the NTUSER.DAT file.
3. Right-click on the NTUSER.DAT file and select “Copy” from the context menu.
4. Navigate to the default username folder and right-click in an empty space. Select “Paste” from the context menu.
5. Once the NTUSER.DAT file is copied to the default username folder, restart your computer to apply the changes.
By transferring the NTUSER.DAT file to the default username folder, you can resolve issues related to user profile loading or corruption. This process ensures that the user’s settings and preferences are correctly loaded when they log in to their account.
Note: Ensure that you have the necessary file-system permissions to access and copy the NTUSER.DAT file. If you encounter any issues, consult your system administrator or refer to the Microsoft documentation for more information.
Creating a New User Account and Disabling Customer Experience Program
To create a new user account on your Microsoft Windows operating system, follow these steps:
1. Open the Start menu and click on “Settings.”
2. In the Settings window, select “Accounts.”
3. Click on “Family & other users” in the left-hand menu.
4. Under “Other users,” click on “Add someone else to this PC.”
5. Choose whether the user to be added has a Microsoft account or not.
6. If they have a Microsoft account, enter their email address and follow the prompts to set up the account.
7. If they don’t have a Microsoft account, click on “I don’t have this person’s sign-in information” and follow the prompts to create a local account.
To disable the Customer Experience Program on your Microsoft Windows operating system, follow these steps:
1. Open the Start menu and click on “Settings.”
2. In the Settings window, select “Privacy.”
3. In the left-hand menu, scroll down and click on “Diagnostics & feedback.”
4. Under “Diagnostic data,” select “Basic.”
5. This will disable the Customer Experience Program and limit the data sent to Microsoft.
Remember to restart your computer after making any changes.
For more detailed information on creating user accounts or disabling the Customer Experience Program, you can visit the Microsoft website for step-by-step guides and additional resources.