In this article, I will discuss how to repair a corrupted disk using DiskPart in Windows 10.
Recently, Fortect has become increasingly popular as a reliable and efficient way to address a wide range of PC issues. It's particularly favored for its user-friendly approach to diagnosing and fixing problems that can hinder a computer's performance, from system errors and malware to registry issues.
- Download and Install: Download Fortect from its official website by clicking here, and install it on your PC.
- Run a Scan and Review Results: Launch Fortect, conduct a system scan to identify issues, and review the scan results which detail the problems affecting your PC's performance.
- Repair and Optimize: Use Fortect's repair feature to fix the identified issues. For comprehensive repair options, consider subscribing to a premium plan. After repairing, the tool also aids in optimizing your PC for improved performance.
Checking and Repairing the File System
To check and repair the file system on a corrupted disk using DiskPart in Windows 10, you can follow these steps. First, open the Command Prompt by searching for “cmd” in the Windows search bar and running it as an administrator.
1. Type “diskpart” and press Enter to open the DiskPart utility.
2. Next, type “list volume” to display all the volumes on your computer.
3. Identify the volume that corresponds to the corrupted disk by looking at the drive letter and size.
4. Once you have identified the volume, type “select volume X” (replace X with the volume number) and press Enter.
5. Now, type “chkdsk /f” and press Enter to check and repair the file system on the selected volume.
Rebuilding the Master Boot Record (MBR)
- Open Command Prompt as an administrator by searching for “cmd” in the Windows search bar, right-clicking on Command Prompt, and selecting “Run as administrator.”
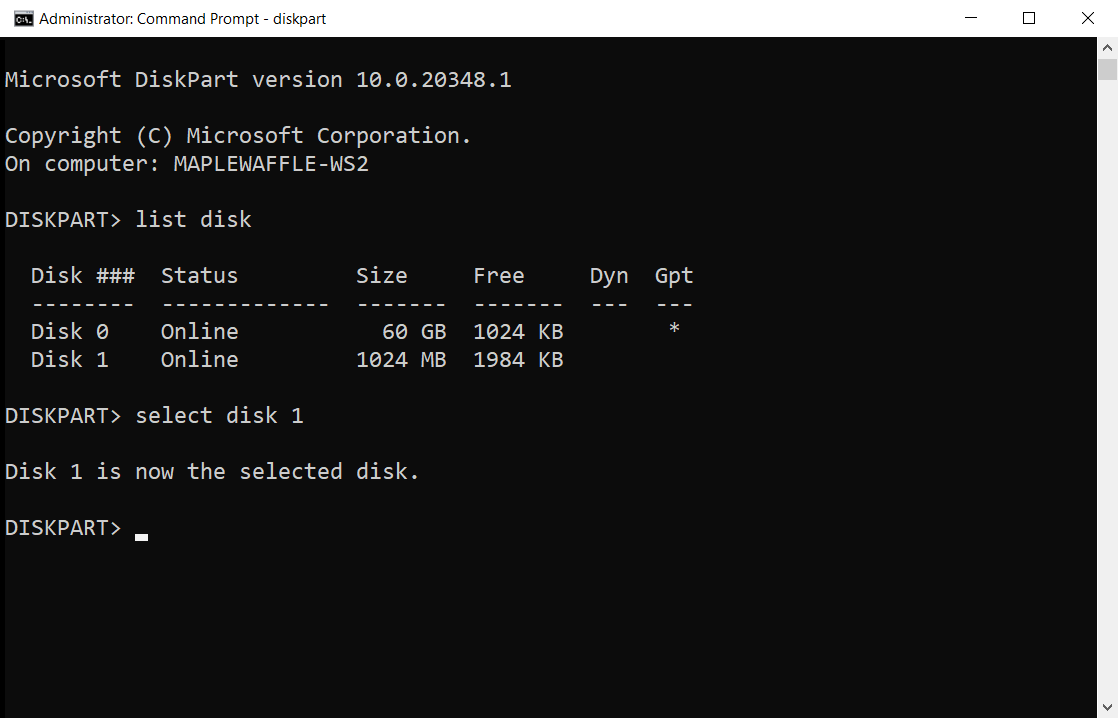
- Type diskpart and press Enter to launch the DiskPart utility.
- Type list disk and press Enter to display a list of all available disks on the computer.
- Type select disk X (replace X with the disk number where the MBR needs to be rebuilt) and press Enter.
- Clean the disk by typing clean and pressing Enter. This will remove all partitions and data from the selected disk.
- Rebuild the MBR by typing create partition primary and pressing Enter. This will create a new primary partition on the disk.
- Format the partition by typing format fs=ntfs quick and pressing Enter. This will format the partition with the NTFS file system quickly.
- Assign a drive letter to the partition by typing assign letter=X (replace X with the desired drive letter) and pressing Enter.
- Exit DiskPart by typing exit and pressing Enter.
- Type exit and press Enter to close the Command Prompt window.
Using CHKDSK to Address Errors
To address errors on a corrupted disk using CHKDSK in Windows 10, follow these steps:
1. Open Command Prompt with administrative privileges by searching for “cmd” in the Windows search bar, right-clicking on Command Prompt, and selecting “Run as administrator.”
2. Once Command Prompt is open, type the command “chkdsk /f X:” (X being the letter of the corrupted disk) and press Enter. This command will scan and fix any errors on the disk.
3. If prompted to schedule the disk check for the next system restart, type “Y” for yes and then restart your computer.
4. After the computer restarts, CHKDSK will begin the scanning and repair process on the corrupted disk. This may take some time depending on the size of the disk and the number of errors found.
5. Once CHKDSK has completed the process, check to see if the errors on the disk have been resolved.
6. If the errors persist or if you encounter any issues during the CHKDSK process, consider seeking further assistance from a professional or using other disk repair methods.
7.
Formatting Drives with Command Prompt (CMD)
To format drives using Command Prompt (CMD) in Windows 10, you can use the DiskPart utility. First, open CMD as an administrator. Then, type “diskpart” and press Enter. Next, type “list disk” to display all available drives. Identify the corrupted disk by its size and type “select disk X” (replace X with the disk number).
Once selected, type “clean” to remove all data on the disk. Finally, type “create partition primary” to create a new partition. You can now format the newly created partition using the format command.
Troubleshooting with DiskPart Commands
To troubleshoot and repair corrupted disks using DiskPart commands in Windows 10, follow these steps:
First, open the Command Prompt as an administrator by searching for “cmd” in the Windows search bar, right-clicking on Command Prompt, and selecting “Run as administrator.”
Next, type “diskpart” in the Command Prompt window and press Enter to open the DiskPart utility.
Then, type “list disk” to display a list of all the disks connected to your computer. Identify the corrupted disk by its size and note its disk number.
After identifying the corrupted disk, type “select disk X” (replace X with the disk number of the corrupted disk) to select the disk for repair.
Once the disk is selected, type “attributes disk clear readonly” to clear the read-only attribute of the disk.
Finally, type “clean” to remove all partitions and data from the disk, then type “create partition primary” to create a new primary partition on the disk.
These steps should help you troubleshoot and repair a corrupted disk using DiskPart commands in Windows 10.
Understanding Symptoms and Causes of Corruption
| Symptoms | Causes |
|---|---|
| File system errors | Power outages, improper system shutdown, hardware failures |
| Blue screen of death (BSOD) | Malware infections, outdated drivers, hardware conflicts |
| Data loss or corruption | Software bugs, physical damage to disk |
| Slow performance | Fragmented disk, insufficient RAM, outdated software |