Unleash Your Windows 10 Potential: A Guide to Installing and Disabling Unsigned Drivers
Recently, Fortect has become increasingly popular as a reliable and efficient way to address a wide range of PC issues. It's particularly favored for its user-friendly approach to diagnosing and fixing problems that can hinder a computer's performance, from system errors and malware to registry issues.
- Download and Install: Download Fortect from its official website by clicking here, and install it on your PC.
- Run a Scan and Review Results: Launch Fortect, conduct a system scan to identify issues, and review the scan results which detail the problems affecting your PC's performance.
- Repair and Optimize: Use Fortect's repair feature to fix the identified issues. For comprehensive repair options, consider subscribing to a premium plan. After repairing, the tool also aids in optimizing your PC for improved performance.
Unsigned Driver Installation Methods
If you need to install or disable unsigned drivers on Windows 10, there are a few methods you can try.
One method is to use the Advanced Boot Menu. Press Win + X to open the menu, then select “Command Prompt (Admin)”.
In the Administrator Command Prompt, enter the following command: bcdedit /set testsigning on. This will enable Test Mode and allow you to install unsigned drivers.
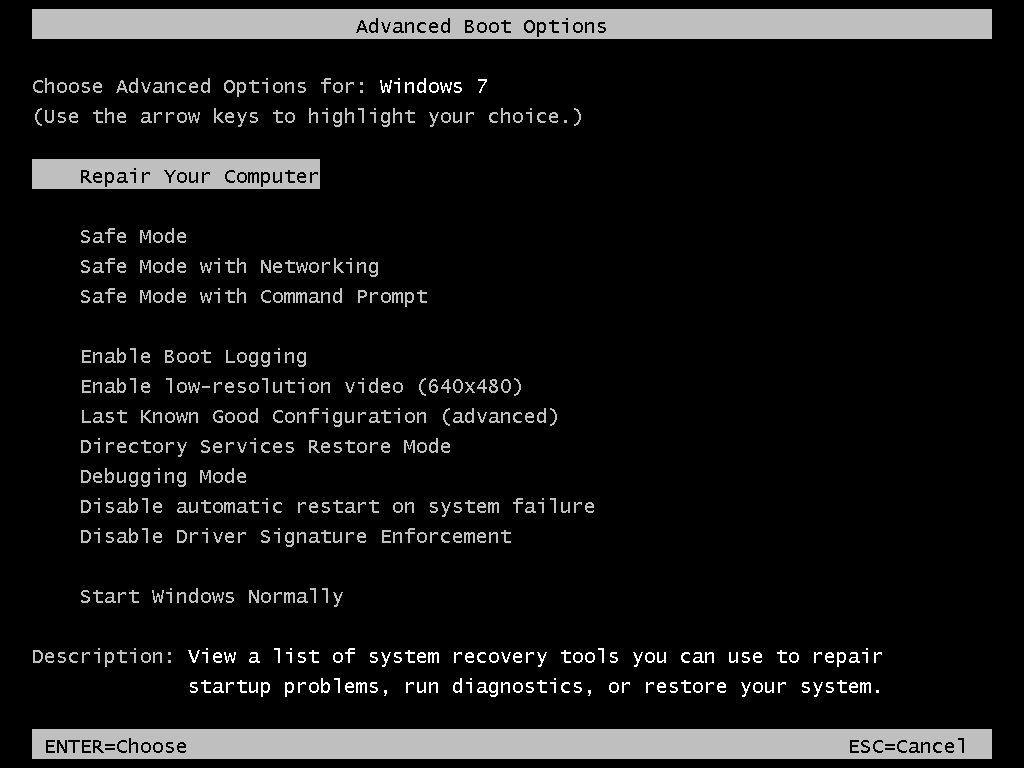
Another method is to use the Windows 10 Advanced Boot Options. Restart your computer and press F7 to disable driver signature enforcement. This will allow you to install unsigned drivers without enabling Test Mode.
Please note that disabling driver signature enforcement can potentially compromise the security of your computer. Make sure to only install drivers from trusted sources.
These methods can also be used on Windows 8 and Windows 7. However, it’s important to be cautious when installing unsigned drivers, as they may not have undergone the necessary testing and verification.
Security Features of Driver Signature Enforcement
Driver Signature Enforcement is a security feature in Windows 10 that ensures only digitally signed drivers are installed and loaded on your system. This feature helps protect your computer from malicious or incompatible drivers that could potentially harm your system.
To install unsigned drivers, you will need to disable Driver Signature Enforcement temporarily. Here’s how you can do it:
1. Press the Win + X keys on your keyboard and select “Command Prompt (Admin)”.
2. In the Administrator Command Prompt window, type bcdedit /set testsigning on and press Enter.
3. Restart your computer for the changes to take effect.
Once you have installed the unsigned driver, it is recommended to re-enable Driver Signature Enforcement for enhanced security. Repeat the steps above, but in step 2, type bcdedit /set testsigning off instead.
Remember, disabling Driver Signature Enforcement should only be done when necessary and with caution, as it may expose your system to potential security risks.
Advanced Boot Options for Installing Unsigned Drivers
- Introduction: What are unsigned drivers and why they require advanced boot options?
- Accessing Advanced Boot Options: Step-by-step instructions for reaching the Advanced Boot Options menu on Windows 10.
- Enabling Test Signing Mode: How to enable Test Signing Mode to install and use unsigned drivers.
- Installing Unsigned Drivers: A detailed guide on installing unsigned drivers using the Advanced Boot Options menu.
- Disabling Test Signing Mode: Step-by-step instructions on disabling Test Signing Mode once the unsigned drivers are installed.
- Benefits and Risks: Exploring the advantages and potential risks associated with installing unsigned drivers.
- Troubleshooting: Common issues and how to resolve them when installing or disabling unsigned drivers.
- Conclusion: Final thoughts on the Advanced Boot Options for installing and disabling unsigned drivers on Windows 10.
python

import subprocess
def install_driver(driver_path):
try:
# Disable driver signature enforcement
subprocess.run(['bcdedit', '/set', 'nointegritychecks', 'on'], check=True)
# Install the driver
subprocess.run(['pnputil', '-i', '-a', driver_path], check=True)
print("Driver installation successful.")
except subprocess.CalledProcessError as e:
print(f"Driver installation failed: {e}")
finally:
# Enable driver signature enforcement
subprocess.run(['bcdedit', '/set', 'nointegritychecks', 'off'], check=True)
# Usage example
driver_path = r'C:\Path\to\your\driver.inf'
install_driver(driver_path)
This code utilizes the `subprocess` module to interact with the command-line tools `bcdedit` and `pnputil`. It temporarily disables driver signature enforcement, installs the specified driver using `pnputil`, and then re-enables the driver signature enforcement. The `driver_path` variable should be set to the actual path of the driver you want to install.
Please note that this code is a simplified example aimed at illustrating the concept. In real-world scenarios, additional error handling, security measures, and compatibility checks may be required.
Disabling Signature Verification for Kernel-Mode Drivers
To disable signature verification for kernel-mode drivers on Windows 10, follow these steps:
1. Press the Windows key + I to open the Settings window.
2. Click on “Update & Security” and then select “Recovery” from the left-hand menu.
3. Under “Advanced startup,” click on “Restart now.”
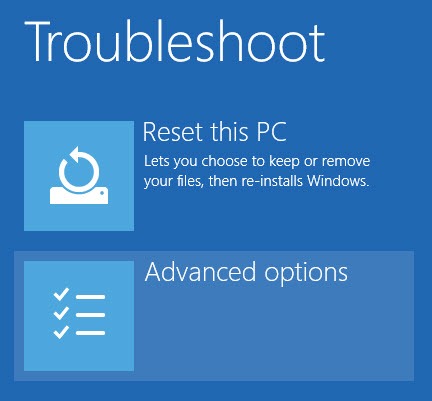
4. When your computer restarts, you will see a blue screen with several options. Select “Troubleshoot.”
5. In the Troubleshoot menu, click on “Advanced options.”
6. Choose “Startup Settings” and then click on “Restart.”
7. After your computer restarts again, you will see a list of startup settings. Press the F7 key to disable driver signature enforcement.
8. Once Windows boots up, you can now install and use unsigned drivers.
Please note that disabling driver signature verification can expose your computer to potential security risks. Only install drivers from trusted sources or if you fully understand the risks involved.