Unraveling the Troubles: Unmasking the Glitches of Defrag.exe
Recently, Fortect has become increasingly popular as a reliable and efficient way to address a wide range of PC issues. It's particularly favored for its user-friendly approach to diagnosing and fixing problems that can hinder a computer's performance, from system errors and malware to registry issues.
- Download and Install: Download Fortect from its official website by clicking here, and install it on your PC.
- Run a Scan and Review Results: Launch Fortect, conduct a system scan to identify issues, and review the scan results which detail the problems affecting your PC's performance.
- Repair and Optimize: Use Fortect's repair feature to fix the identified issues. For comprehensive repair options, consider subscribing to a premium plan. After repairing, the tool also aids in optimizing your PC for improved performance.
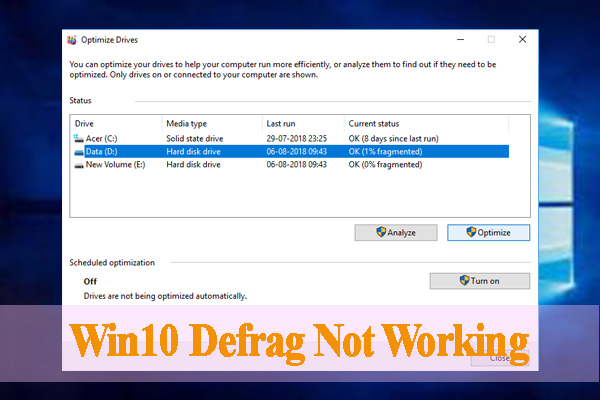
Reasons why Disk Defragmenter is not working
If Disk Defragmenter is not working on your PC, there could be a few reasons why.
First, make sure that Disk Defragmenter is enabled. Open the Start menu and type “services.msc” in the search bar. Look for “Disk Defragmenter” in the list and make sure the startup type is set to “Automatic”. If it’s not, right-click on it and select “Properties”, then change the startup type to “Automatic” and click “Apply”.
Second, check if your PC has any antivirus software running. Some antivirus programs can interfere with Disk Defragmenter. Temporarily disable your antivirus software and see if that resolves the issue.
If the above solutions don’t work, you can try running Disk Defragmenter from the command prompt. Open a command prompt window as an administrator and type “defrag” followed by the drive letter you want to defragment (e.g., “defrag C:”). Press Enter and let the process complete.
If none of these solutions fix the issue, it’s recommended to contact Microsoft support or seek further assistance from a professional.
Troubleshooting steps for a non-functioning Disk Defragmenter
- Check if Disk Defragmenter is enabled
- Open Control Panel by searching for it in the Start menu
- Click on System and Security
- Under Administrative Tools, click on Defragment your hard drive
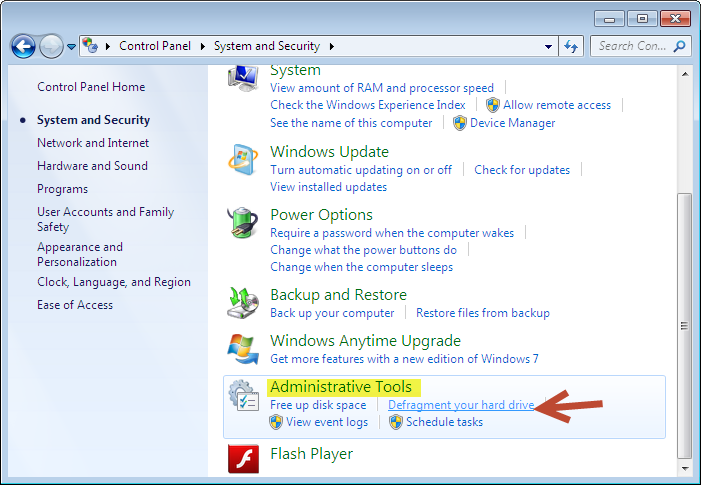
- If the option is grayed out or disabled, then Disk Defragmenter is not enabled
- To enable it, click on Configure schedule
- Check the box that says Run on a schedule (recommended) and adjust the frequency and time settings as desired
- Click OK to save the changes
- Restart the Disk Defragmenter service
- Open Task Manager by pressing Ctrl+Shift+Esc
- Go to the Services tab
- Scroll down and find Defragmenter
- If the status is Stopped, right-click on it and select Restart
- If the status is Running, right-click on it and select Stop. Then, right-click again and select Start
- Check for system file errors
- Open Command Prompt as an administrator by searching for it in the Start menu, right-clicking on it, and selecting Run as administrator
- Enter the command sfc /scannow and press Enter

- Wait for the scan to complete and follow any on-screen instructions
- If any errors are found and fixed, restart your computer
- Run a malware scan
- Open your preferred antivirus software
- Initiate a full system scan to check for any malware or viruses

- If any threats are detected, follow the prompts to remove or quarantine them
- Restart your computer after the scan is complete
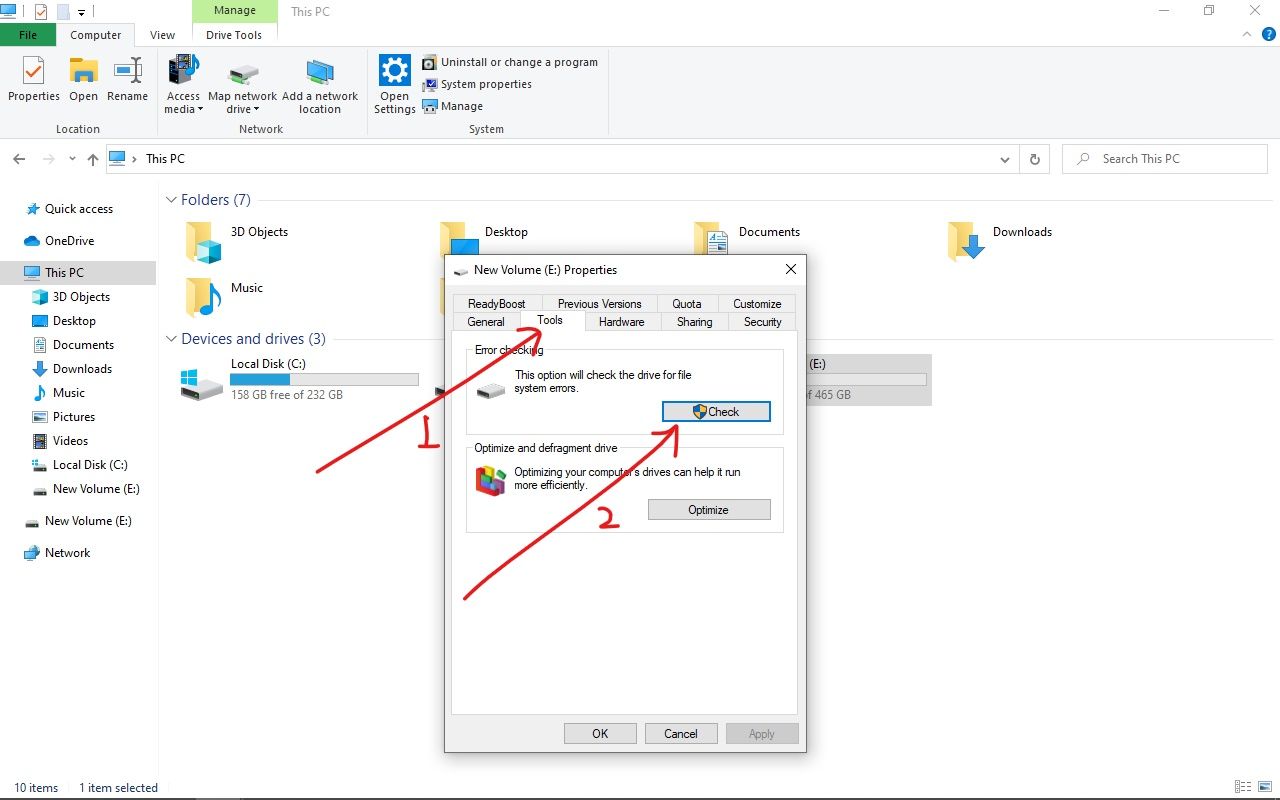
- Check for disk errors
- Open File Explorer by clicking on the folder icon in the taskbar
- Right-click on the drive you want to check (usually C:)
- Select Properties
- Go to the Tools tab
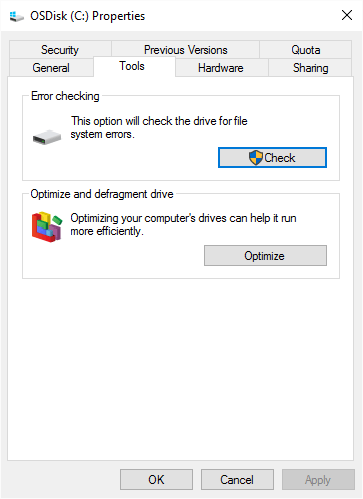
- Under Error checking, click on Check
- If prompted, select Scan drive
- Wait for the scan to complete and follow any on-screen instructions
- If any errors are found and fixed, restart your computer
Alternative tools for defragmentation on Windows 10 and 11
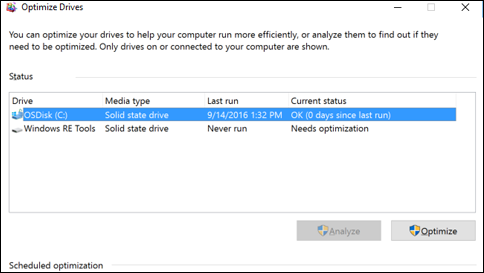
- Windows Optimize Drives: Use the built-in defragmentation tool in Windows 10 and 11 to optimize your drives for improved performance.
- Third-Party Disk Defragmenters: Explore alternative software options such as Defraggler, UltraDefrag, or Auslogics Disk Defrag for advanced defragmentation features.
- Storage Sense: Enable this feature in Windows 10 and 11 to automatically free up space and optimize your drives.
- Command Prompt: Utilize command-line tools like defrag.exe or chkdsk.exe to manually defragment and repair your drives.
- SSD Optimization Tools: Consider using specialized tools like Intel Solid-State Drive Toolbox or Samsung Magician Software for optimizing SSD performance.
- Disable Scheduled Tasks: Temporarily disable any automated defragmentation tasks to troubleshoot defrag.exe issues.
python

import os
def defrag_exe_not_working():
# Check if the defrag.exe file exists
if os.path.exists("defrag.exe"):
print("Performing defragmentation...")
# Execute the defrag.exe file
os.system("defrag.exe")
else:
print("defrag.exe file not found.")
def main():
defrag_exe_not_working()
if __name__ == "__main__":
main()
Please remember that this code snippet is a basic simulation and may not accurately reflect the actual functionality of a defragmentation tool. Additionally, it assumes the presence of a “defrag.exe” file, which may not be the case on all systems.
Checking the status of the Disk Defragmenter service
To check the status of the Disk Defragmenter service, follow these steps:
1. Press the Windows key on your keyboard or click on the search bar.
2. Type “Task Scheduler” and open the Task Scheduler app.
3. In the Task Scheduler window, expand the “Task Scheduler Library” folder on the left-hand side.
4. Navigate to Microsoft > Windows > Defrag.
5. Look for the “ScheduledDefrag” task and check its status.
6. If the status shows “Running” or “Ready,” the Disk Defragmenter service is functioning properly.
7. If the status shows “Disabled” or “Not Ready,” right-click on the task and select “Enable” to enable the service.
8. Close the Task Scheduler window and check if the Disk Defragmenter is now working.
If you continue to experience issues with the Disk Defragmenter, it may be a more complex PC issue. It is recommended to seek further assistance from a professional or refer to relevant online resources.
Performing an SFC scan to fix Disk Defragmenter issues
To fix Disk Defragmenter issues, you can perform an SFC (System File Checker) scan. This scan checks for any corrupted system files and replaces them with a cached copy from your operating system.
To run an SFC scan, follow these steps:
1. Press the Windows key + X and select “Command Prompt (Admin)”.
2. In the command prompt window, type “sfc /scannow” and press Enter.
3. Wait for the scan to complete. It may take some time.
4. Once the scan is finished, restart your computer.
After restarting, check if the Disk Defragmenter is working properly. If not, you may need to try other troubleshooting methods or seek further assistance.
Resolving conflicts with antivirus software for defragmentation
If you’re experiencing conflicts with your antivirus software when trying to defragment your hard disk, there are a few steps you can take to resolve the issue.
First, ensure that your antivirus software is not actively scanning your hard drive while you’re trying to defragment it. This can cause conflicts and prevent the defragmentation process from completing successfully. Temporarily disable your antivirus software or adjust its settings to exclude the defragmentation process.
Next, try running the defragmentation process from the command line. Open a command prompt with administrative privileges and type “defrag.exe C: -f” (without the quotes) to force defragmentation on your C drive. This can bypass any conflicts caused by antivirus software.
If the issue persists, consider temporarily uninstalling your antivirus software and using a different defragmentation tool, such as the built-in Windows Disk Defragmenter or a third-party software specifically designed for optimizing drives.
Remember to re-enable your antivirus software once the defragmentation process is complete to ensure the ongoing protection of your system.
Running Disk Defragmenter in Safe Mode for better performance
Running Disk Defragmenter in Safe Mode can help improve the performance of your hard disk and fix any issues with the Defrag.exe not working. Here’s how to do it:
1. Restart your computer and press the F8 key repeatedly before the Windows logo appears.
2. Select “Safe Mode” from the list of options and press Enter.
3. Once in Safe Mode, press the Windows key + R to open the Run dialog box.
4. Type “defrag.exe c: -b” and press Enter. This command will optimize your C drive.
5. Wait for the defragmentation process to complete. It may take some time depending on the size of your hard disk.
6. Once done, restart your computer and boot into normal mode.
Running Disk Defragmenter in Safe Mode allows for a more thorough defragmentation process as it eliminates any interference from background processes. This can help improve the overall performance of your PC system and fix any issues with the Defrag.exe not working.
Creating a new user profile to fix Disk Defragmenter problems
To fix Disk Defragmenter problems, you can create a new user profile. Follow these steps:
1. Press the Windows key + R to open the Run dialog box.
2. Type “control” and hit Enter to open the Control Panel.
3. In the Control Panel, search for “User Accounts” and click on it.
4. Click on “Manage another account” and then “Add a new user in PC settings”.
5. Follow the on-screen instructions to create a new user profile.
6. Log in to the new user profile and try running the Disk Defragmenter again.
If the issue persists, you may need to try other solutions. Check out the rest of the article for more troubleshooting tips and fixes for Disk Defragmenter problems.