Unraveling the Mysteries of NTFS: A Guide to Tackling Windows 10/11’s File System BSOD
Recently, Fortect has become increasingly popular as a reliable and efficient way to address a wide range of PC issues. It's particularly favored for its user-friendly approach to diagnosing and fixing problems that can hinder a computer's performance, from system errors and malware to registry issues.
- Download and Install: Download Fortect from its official website by clicking here, and install it on your PC.
- Run a Scan and Review Results: Launch Fortect, conduct a system scan to identify issues, and review the scan results which detail the problems affecting your PC's performance.
- Repair and Optimize: Use Fortect's repair feature to fix the identified issues. For comprehensive repair options, consider subscribing to a premium plan. After repairing, the tool also aids in optimizing your PC for improved performance.
Understanding the NTFS File System Blue Screen Issue
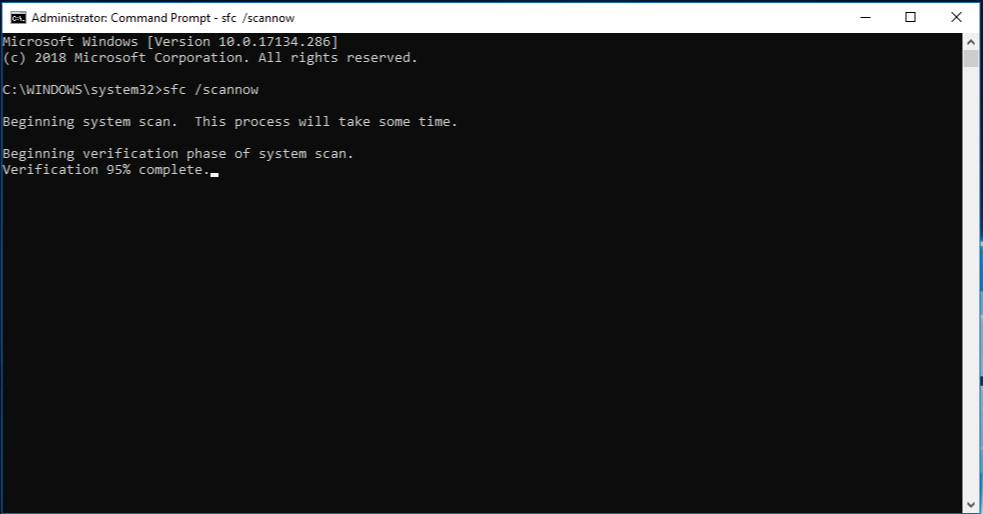
If you’re experiencing the NTFS File System Blue Screen issue on your Windows 10/11 PC, there are a few steps you can take to fix it. First, try restarting your computer to see if the problem resolves itself. If not, boot your PC into Safe Mode by holding the Shift key while restarting. Once in Safe Mode, open the Command Prompt and run the “sfc /scannow” command to check for any corrupted system files. You can also try updating your drivers using the Device Manager or reinstalling any recently installed software that might be causing the issue.
If these steps don’t work, you can try running the “chkdsk” command to check for any disk errors.
Causes of Windows 10 Blue Screen Error
1. Corrupted system files or drivers: Outdated or incompatible drivers can cause the NTFS file system BSOD error. Use the Device Manager to update drivers.
2. Insufficient hard drive space: Low storage space on your system drive can lead to this error. Free up space by deleting unnecessary files or moving them to an external storage device.
3. Hard drive issues: A failing or corrupted hard drive can trigger the NTFS_FILE_SYSTEM error. Run the chkdsk command to scan and fix any disk errors.
4. Recent software or hardware changes: Installing new software or hardware can sometimes conflict with system files, resulting in the blue screen error. Undo recent changes to identify the problem.
5. Malware or virus infections: Malicious software can disrupt system files and cause the error. Run a full scan with a reliable antivirus program to remove any threats.
Methods to Fix NTFS File System Blue Screen Error
- Open the Command Prompt as an administrator.
- Type chkdsk C: /f and press Enter.
- Wait for the scan to complete and follow any on-screen instructions.
- Restart your computer and check if the NTFS File System BSOD error is resolved.
Method 2: Update Device Drivers
- Press Win + X and select Device Manager.
- Expand the categories and locate the device drivers that need to be updated.
- Right-click on the driver and select Update driver.
- Choose to search automatically for updated driver software.
- Follow the on-screen instructions to complete the driver update process.
- Restart your computer and check if the error is resolved.
Method 3: Disable or Remove Recently Installed Software
- Press Win + I to open the Settings app.
- Go to Apps or Apps & features.
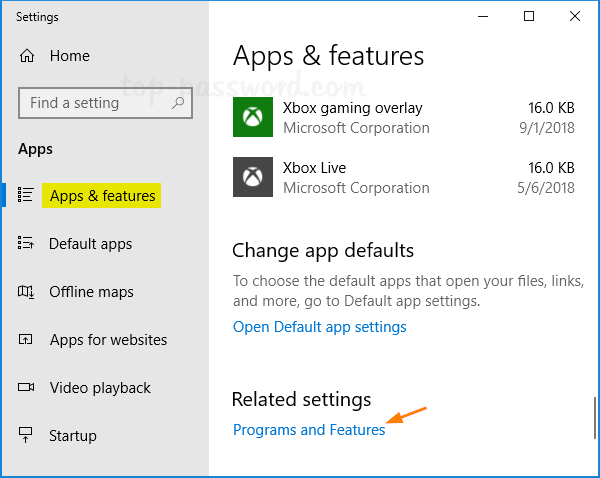
- Locate the recently installed software and select it.
- Click on Uninstall or Disable.
- Follow the on-screen instructions to complete the removal or disablement process.
- Restart your computer and check if the BSOD error is resolved.
Method 4: Perform System Restore
- Press Win + X and select System.
- Click on System Protection in the left pane.
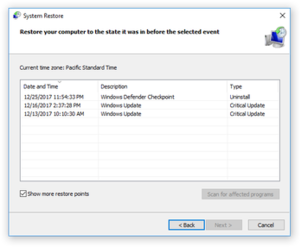
- Click on System Restore.
- Follow the on-screen instructions to choose a restore point and restore your system.
- Restart your computer and check if the NTFS File System BSOD error is resolved.
python

import os
def read_file(file_path):
try:
with open(file_path, 'r') as file:
content = file.read()
return content
except FileNotFoundError:
return "File not found"
except Exception as e:
return f"Error reading file: {str(e)}"
def write_file(file_path, content):
try:
with open(file_path, 'w') as file:
file.write(content)
return "File written successfully"
except Exception as e:
return f"Error writing file: {str(e)}"
# Example usage
file_path = "example.txt"
content = read_file(file_path)
print(content)
new_content = "This is the new content."
result = write_file(file_path, new_content)
print(result)
In the above code sample, the `read_file` function reads the content from a given file path, while the `write_file` function writes the provided content to a specified file path. You can modify the code according to your specific needs and incorporate it into a larger program.
Hard Rebooting and Removing External Devices
To fix the NTFS File System BSOD on Windows 10/11, try hard rebooting and removing external devices. First, turn off your laptop by holding the power button for a few seconds. Then, unplug any external devices such as USB drives or printers. This can help resolve any conflicts causing the blue screen error.
Once you’ve done that, power on your laptop and check if the NTFS_FILE_SYSTEM stop code error has been resolved. If not, you can try running the “sfc /scannow” command in the Command Prompt to scan and repair system files. Additionally, updating or reinstalling drivers using the Device Manager may also help.
Entering Windows Safe Mode
To enter Windows Safe Mode, follow these steps:
1. Reboot your PC and hold the Shift key while it restarts. This will bring up the Recovery menu.
2. Select Troubleshoot, then Advanced options, and finally Startup Settings.
3. Click on the Restart button and wait for your PC to reboot again.
4. When the Startup Settings menu appears, press the number key associated with the desired Safe Mode option (e.g., press 4 for Safe Mode).
5. Your PC will now boot into Safe Mode, a diagnostic mode that allows you to troubleshoot issues without certain drivers or services running.
Once in Safe Mode, you can troubleshoot the NTFS File System BSOD error by checking for and repairing any file system errors, updating or reinstalling problematic drivers, or freeing up hard drive space. Remember to restart your PC in normal mode after troubleshooting to see if the issue is resolved.
These steps should help you resolve the NTFS File System BSOD error on Windows 10/11 and get your system back up and running smoothly.
Checking and Clearing Disk Space
To check and clear disk space on Windows 10/11, follow these steps:
1. Open File Explorer and right-click on the drive you want to check.
2. Select “Properties” from the context menu.
3. In the General tab, you’ll see a visual representation of how much space is used and how much is free on the drive.
4. To clear disk space, click on the “Disk Cleanup” button.
5. Select the files you want to delete, such as temporary files, Recycle Bin, and system files.
6. Click “OK” and then “Delete Files” to remove the selected files.
7. Repeat these steps for other drives if needed.
If you’re experiencing a BSOD with the NTFS File System error, try these additional steps:
1. Restart your PC and boot into Safe Mode by holding the Shift key while clicking on “Restart” in the Start menu.
2. In Safe Mode, open the Start menu and search for “Device Manager.”
3. Expand the “Disk drives” category and right-click on your system drive.
4. Select “Properties” and go to the “Driver” tab.
5. Click on “Update Driver” and follow the on-screen instructions.
6. Restart your PC and see if the NTFS File System BSOD error has been resolved.
Performing SFC and DISM Scans
If you’re experiencing the NTFS File System BSOD on Windows 10/11, performing SFC (System File Checker) and DISM (Deployment Image Servicing and Management) scans can help resolve the issue. Here’s how you can do it:
1. Open Command Prompt as an administrator by pressing Windows key + X, then selecting “Command Prompt (Admin)”.
2. In the Command Prompt window, type “sfc /scannow” and press Enter. This will initiate the SFC scan, which will check for and repair any corrupted system files.
3. Once the SFC scan is complete, type “dism /online /cleanup-image /restorehealth” and press Enter. This will start the DISM scan, which will restore any damaged or missing system files from a known good source.
4. Wait for the DISM scan to finish. It may take some time, so be patient.
5. After the scan is complete, restart your PC and check if the NTFS File System BSOD issue persists.
Performing these scans can help fix common system file errors that may be causing the BSOD. If the issue persists, you may need to consider other troubleshooting steps or seek further assistance.
Updating Disk Drivers
To update disk drivers and fix the NTFS File System BSOD on Windows 10/11:
1. Open the Device Manager by right-clicking on the Start button and selecting “Device Manager.”
2. Expand the “Disk drives” category.
3. Right-click on the disk drive that you want to update the driver for.
4. Select “Update driver.”
5. Choose the option to automatically search for updated driver software.
6. Windows will search for and install the latest driver for your disk drive.
7. Restart your PC to apply the changes.
If you’re experiencing a reboot loop or cannot access the desktop, try booting into Safe Mode:
1. Hold the Shift key and click on “Restart” from the Windows login screen.
2. Select “Troubleshoot” > “Advanced options” > “Startup Settings” > “Restart.”
3. After restarting, press the F4 key to boot into Safe Mode.
Updating disk drivers can resolve many NTFS File System BSOD errors. However, if the issue persists, consider seeking further assistance from Dell or Microsoft support.
Troubleshooting and Fixing Disk Errors
| Troubleshooting and Fixing Disk Errors | |
|---|---|
| Issue | Possible Solution |
| NTFS File System BSOD on Windows 10/11 |
|