In the world of virtualization, enabling VT on your motherboard BIOS is a crucial step towards optimizing your system’s performance.
Recently, Fortect has become increasingly popular as a reliable and efficient way to address a wide range of PC issues. It's particularly favored for its user-friendly approach to diagnosing and fixing problems that can hinder a computer's performance, from system errors and malware to registry issues.
- Download and Install: Download Fortect from its official website by clicking here, and install it on your PC.
- Run a Scan and Review Results: Launch Fortect, conduct a system scan to identify issues, and review the scan results which detail the problems affecting your PC's performance.
- Repair and Optimize: Use Fortect's repair feature to fix the identified issues. For comprehensive repair options, consider subscribing to a premium plan. After repairing, the tool also aids in optimizing your PC for improved performance.
Understanding Hardware Virtualization and VT
Enabling VT on your motherboard BIOS is essential for running virtualization software like LDPlayer or Mumu App Player. This function is also known as Virtualization Technology and is available on most models.
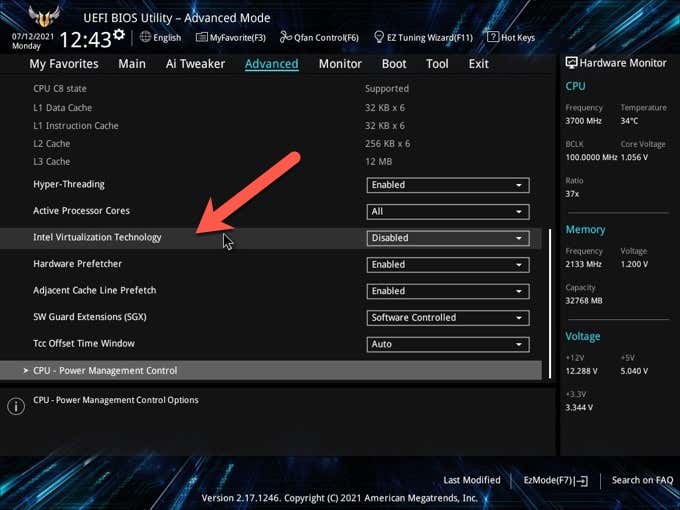
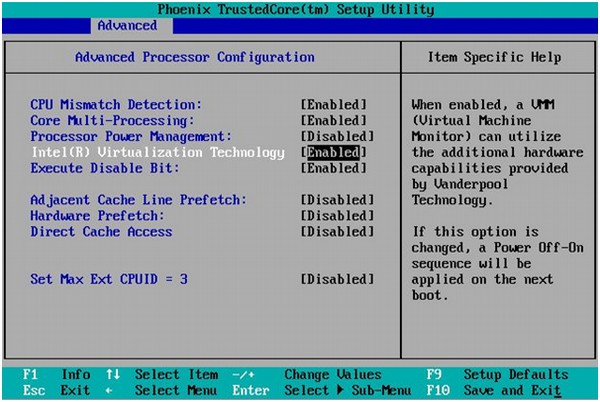
To enable VT, restart your PC and enter the BIOS settings by pressing the “Del” or “F2” button. Look for the virtualization option under the “Advanced” or “CPU” settings, and change the state to “Enabled”.
Save the changes by pressing “F10” and exit the BIOS. Your computer is now ready to run virtualization software and improve your gaming experience. If you have an AMD processor, look for the IOMMU option to enable hardware virtualization.
Enabling VT on your motherboard BIOS is a simple process that can significantly improve your gameplay experience. Follow these steps patiently, and you’ll be running Android mobile games on your PC in no time.
Checking Virtualization Capability on Your PC
- Step 1: Check if your PC has a 64-bit processor.
- Step 2: Check if your PC’s motherboard supports virtualization technology.
- Step 3: Enter your PC’s BIOS settings by pressing a specific key during startup.
- Step 4: Look for the virtualization option in the BIOS settings.
- Step 5: Enable the virtualization option and save the changes in the BIOS settings.
- Step 6: Restart your PC for the changes to take effect.
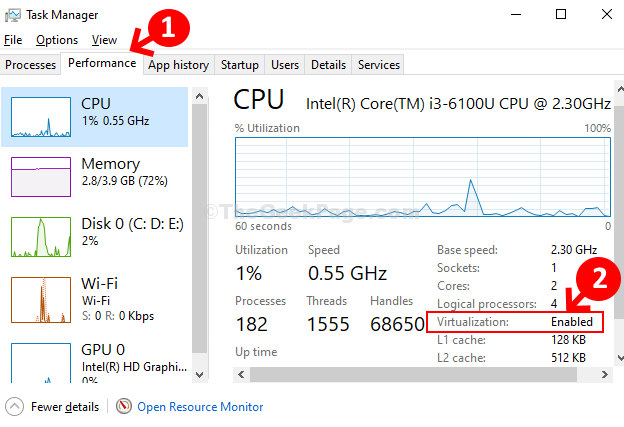
- Step 7: Check if virtualization is enabled on your PC using software tools like CPU-Z or Task Manager.
Enabling VT in Your BIOS Settings
Enabling VT in your BIOS settings is essential for virtualization on your computer. Follow these simple steps to enable it:
1. Reboot your computer and press the Del or F2 button to enter BIOS settings.
2. Locate the VT-X or Virtu Technology option, depending on your motherboard’s model and manufacturer.
3. Enable the option and save changes by pressing F10 or following the prompts on the screen.
Enabling VT will ensure that your computer can run virtual machines, Android emulators, and other virtualization software without any issues. This will enhance your gaming and gameplay experience, especially for mobile games. If you encounter any problems during the process, consult your motherboard’s manual or the manufacturer’s website for further fixes. Be patient during the process as it may take a few minutes to complete.
import subprocess
def check_vt_enabled():
cmd = "systeminfo | findstr /C:'Hyper-V Requirements: VM Monitor Mode Extensions: Yes'"
output = subprocess.check_output(cmd, shell=True)
if output:
return True
else:
return False
if __name__ == "__main__":
if check_vt_enabled():
print("VT is enabled on this motherboard.")
else:
print("VT is not enabled on this motherboard.")
This code uses the `systeminfo` command to check if the `VM Monitor Mode Extensions` are enabled, which indicates that VT is enabled. If the output contains the string `Yes`, the function returns `True`, indicating that VT is enabled. Otherwise, it returns `False`.
Note that this code is specific to Windows operating systems and may not work on other platforms. Also, the `systeminfo` command may not be available on some versions of Windows. Therefore, you should test this code thoroughly before using it in a production environment.
Steps to Enable Virtualization on Windows 10 or 11
- Check if your computer supports virtualization: You can do this by checking your computer’s documentation or by using a system information tool.
- Enable virtualization in the BIOS: Restart your computer and enter the BIOS setup by pressing the key indicated on the screen. Navigate to the virtualization settings and enable it.
- Save and exit the BIOS: Make sure to save your changes before exiting the BIOS setup.
- Update your BIOS: If virtualization is not available in your BIOS, check if there’s an update available. If there is, install it.
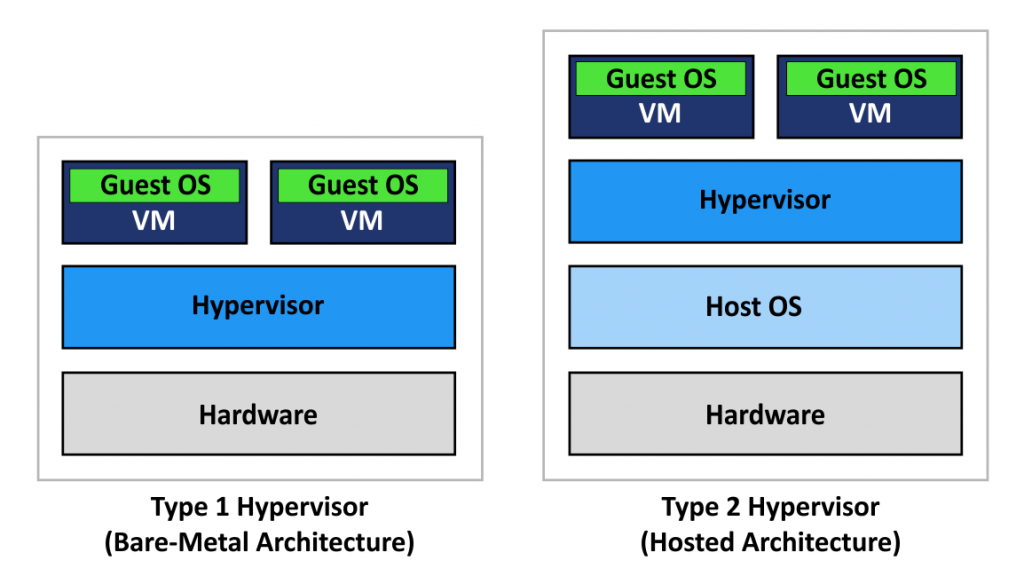
- Install a hypervisor: Once virtualization is enabled, you can install a hypervisor like VirtualBox or VMware to create virtual machines.
- Test virtualization: Verify that virtualization is working by starting a virtual machine and ensuring it runs without issues.
Troubleshooting VT Detection Issues
If you’re experiencing issues with VT detection after enabling it on your motherboard BIOS for virtualization, there are a few things you can try to troubleshoot the problem.
First, make sure that your operating system supports VT-X and that it’s enabled in your system settings.
Next, check that your emulator or virtualization software is compatible with your motherboard and that it’s up to date. If you’re using LDPlayer, try updating to the latest version.
If you’re still having issues, try enabling IOMMU in your BIOS settings. For MSI motherboards, click “Settings” > “Advanced” > “Integrated Peripherals” > “IOMMU” and set it to “Enabled”. For Gigabyte motherboards, go to “Settings” > “AMD Virtualization” and set “IOMMU” to “Enabled”.
Finally, if none of these fixes work, try contacting your motherboard manufacturer for further assistance.